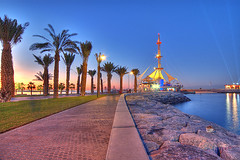
I was very surprised to get a call from the Managing Director of Marina Waves - a very friendly lady. She had seen some of my Marina pictures and wanted to congratulate me and invite me for a party.
I went over and found lots of music and lights. I checked with the security guy and found that the party was for a new restaurant that was opening up. I could see a live band and lots of activity.
Unfortunately, I had a dinner engagement at 8 p.m., so I decided not to go inside.
I used the opportunity of flashing lights to take some pictures with the Sigma 12-24 wide angle lens.
I must admit I am falling in love with this lens.
Thursday, November 30, 2006
Sunday, November 26, 2006
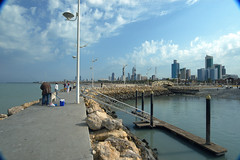
How wide is 12mm?
Short answer: Very wide!
I recently acquired the Sigma 12-24 wide angle lens. I was in two minds whether to pick up the newer 10-20 (which is wider) but is designed only for DX sensors. On the other hand the 12-24 will work fine with a full-frame sensor or even a film camera.
But my main reason for choosing the 12-24 over the wider counterpart was that the 12-24 feels solid and professional, while the 10-20 looks like a flimsy affair.
On my Nikon D70 (with it's 1.5 crop factor), the 12-24 translates into 18-36mm. So my question should really be "How wide is 18mm?".
Even at 18mm, the lens is very wide. It is like a whole new world opening up. Till now, I have been constrained by the lack of wide angle lens in my arsenal.
Now I am looking forward to creating some dramatic looking panaromic shots.
Friday, November 24, 2006
Camera advice
I recently received an email from a friend.
"Hi Cajie
How have you been? Hope you had a great time in Dubai. I love the place, even though traffic is horrible.
I have a question. I know you don't care much about P&S camera's but after seeing your results with your Casio, Iam going to ask nonetheless. My sister needs to buy one. She's moved on from a Nikon Coolpix 2200. She now wants a new one. She's concerned about size and megapixels (she won't listen to me!! ) Could you please recommend one?
Oh and how about the new Nikon D40?. I was thinking of getting into amateur DSLR myself. What say?"
Hello,
Yup, I enjoyed my time in Dubai. Connected with a very good friend who took me around. Now I am thinking of going back in Dec or Jan with my family. I have been to Dubai couple of times before but always for short business trips and never got time to look around.
Well, I am okay with P&S cameras because they serve a specific purpose and I always carry my Casio in my pocket because sometimes a photo oportunity turns up and it is better to take an average photo than no photo at all. And especially for ladies, they will want something that slips easily in their purse.
There is no specific P&S that is good. Just choose something that feels right in your hand. Current specs that will cost you in the 100 KD range ($300) is
- 6 megapixel
- 30fps video capture
- 2.5inch lcd monitor
- 3x to 4x optical zoom.
Panasonic has some interesting models that feature "Mega OIS" (optical image stabilization). If you can find a slim model that features OIS feature, I would advise to go for it - and you can pay around 20% premium for this feature.
As for the D40, before I left for Dubai, I had heard of the rumours and I see that they plan to release it in December. It is same as D50 minus some features - but the picture quality will be the same.
I would rather advise to go for a D50 with a 18-200 VR lens, and you will have an unbeatable photo-taking machine
Thursday, November 23, 2006
Photography in Dubai
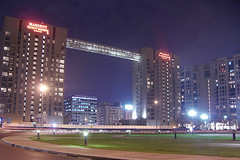
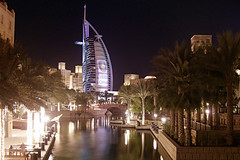
I went for a business trip (Gitex 2006) and was in 2 minds whether to take my Nikon dSLR along. In the end, I decided to travel light and did not carry the big camera. Instead, I took along with me a Casio EX-Z600 - my pocket point & shoot.
I regretted the decision because there are so many amazing structures that look great at night.
I was doubtful whether the Casio was up to the task of taking decent night time shots. After fiddling around the menu, I found that the best results could be obtained by setting the camera in "Night Scene" mode and placing the camera on some sturdy surface and using the self-timer mode to ensure that the shutter release does not cause a blur.
On the bright side, I found a great offer for a 12-24mm Sigma lens. When I compared the price on Amazon, I found that I got it cheaper than Amazon!.
Next time, I am taking the d70 and all my wide-angle lenses.
Sunday, November 05, 2006
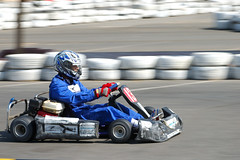
Panning Technique
Panning is a great way of showing subjects in motion, and to emphasize the movement of the subject. Regardless of how good you are, panning is always a hit-and-miss and you can expect some of the shots to come blurry. However, if you keep trying and follow a few simple guidelines, you should be rewarded with some great action shots.
1. Position yourself in such a way that the subject will pass directly in front of you.
2. Use a camera that supports manual focusing. If you shoot in auto-focus mode, the camera will take time acquiring focus and you will lose the shot or the focus will not be correct (unless you are using a high end professional camera). Also if you are using a small point & shoot camera, focusing is not such an issue because their tiny sensors mean the entire scene is in focus.
On the other hand, for a dSLR, the best thing to do is manually set the focus where you expect the subject to be. In this example, I focused as the drivers were passing me by, and made sure that they appeared sharp and not out-of-focus.
3. Next, you need to set you camera to shutter priority and select a slow shutter speed. A shutter speed of 1/15th to 1/30th of a second works best in these situations.
4. As the subject approaches you, follow the subject with the camera. When the subject is where the focus point is, click on the shutter button - BUT CONTINUE FOLLOWING THE SUBJECT!.
This is the key for great panning shots. As you click the shutter button, keep the camera following the subject. This way, the subject remains sharp, while the rest of the background gets blurred.
5. Practice, Practice!.
Tuesday, October 24, 2006
Kuwait Scientific Center
The Kuwait Scientific Center (KSR) is a great place to observe a world that most of us will not get to see otherwise. It has one of the largest aquarium tanks in the middle east, plus various other smaller tanks that host a variety of sea life.
KSR is located on the Gulf Road, just after the Sultan Center, Salmiya.
For a photographer (with the right equipment), it presents a great opportunity to take pictures of an underwater world. Flash is pretty useless here (and is actually prohibited as it disturbs the fish), but that does not stop all the excited visitors from happily clicking away with their point & shoot cameras, and then wondering why their photos are not coming properly. Of course, a flash will reflect off the glass resulting in over-exposed pictures, and the picture will have a big blob of light in the middle, where the fish is supposed to be.
What you really need is a camera that can operate at high ISO, and a fast lens. When I say fast lens, I mean "really really fast"!. For this picture, I used the 50mm F1.8 prime lens, with the ISO bumped upto 1000, and the lens opened wide to its maximum aperture of 1.8.
The Nikon D70 is not a stellar performer in handling noise once the ISO goes beyond 800. I had to use Neat Image Pro to reduce to noise and apply some post-processing in Photo shop to bring out the details in this picture.
My ideal combination for shooting here would be...
A Nikon D200 with a 85mm 1.4 lens. Alas, I can afford neither at this present moment.
Sunday, October 22, 2006
Portrait Photography
 Last week, my wife wanted to renew her passport so she went to the nearby studio to take some passport-sized photos. The results came out quite unflattering. Over-exposed face, distorted perspective, wrong pose etc. etc. I would have posted the sample photo taken by the studio but I fear for my life :)
Anyway, I suggested that I take the studio shot as I have the basic equipment required to take portrait photos, plus a photo printer to do the printing and a photo cutter to make it look like a professional job.
This is the first time I have attempted an actual portrait photo so I wanted to make a good job of it. I setup my blue backdrop and arranged the 2 wireless flash units on each side pointing upwards so that they will bounce off the white ceiling giving an even distribution of light. The Nikon D70 was setup with it's master flash covered with a flash diffuser pointing straight at the subject (that's my wife), but with the power reduced to eliminate over-exposure.
I fitted the camera with the superb 50mm 1.8 lens opened to it's optimum optical performance of F8. The shutter speed was manually set to 125th of a second, and the 3 flashes took care of providing the sufficient light to make this work.
The resulting photo was slightly photoshopped with some healing brush and some minor adjustments. I think I will stick to home-made portraits for the family in future.
Tuesday, October 10, 2006
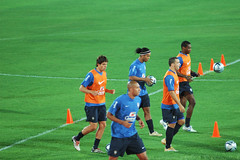
Brazilians In Kuwait
I have not had many opportunities to use my Nikon 80-200 F2.8 lens. The football match between Kuwait & Brazil was a good chance for me to try out it's low-light capabilities.
I had previously tried photographing night-time football matches with the cheaper 70-300 lens, and had never found any photos acceptable. The lens was so slow (F5.6 at the tele end), that it made focusing virtually impossible, and the resulting images were soft and blurry.
The new lens is a stellar performer. Even without AF-S, the focusing is very fast. I mounted it on a monopod and set the ISO to 1000. The images (though a bit noisy) are tack sharp and very usable.
This lens (for approx $800) is currently the best value for money from Nikon (apart from the 50mm F1.8 - which, at $90, is the deal of the century).
Friday, September 29, 2006
Product Photography
 We are surrounded by product photos everwhere we go. Glossy advertisements hawk all kinds of products accompanied by beautiful pictures. You really need a studio environment for product photography. The key is to control the amount of light so that it is evenly spread - something you cannot do with normal lighting or a normal flash.
However, you can achieve reasonably good results at home with some creativity, and optionally - some good flash units.
I own a Nikon D70 - which is blessed by Nikon, with their CLS (Creative Lighting System). This amazingly flexible system allows you to control multiple flashes in wireless mode - and control the flash output of each flash unit independently. I have 2 SB-600 flash units, and 1 SB-800. The SB-800 acts as a "master" flash and can wirelessly control the other 2 flashes. You can find more information about the CLS system here.
I decided to use this setup to do some product photography. The first requirement for this type of work is a "light box". If you have the time and effort, you can create your own light box. I purchased mine from a local camera store. Depending on the type of products you want to photograph, you can purchase different sizes. The one used in this project is the smallest available - and is suitable for photographing small objects like mobile phones, small cameras, toys etc. The light box comes with different backgrounds that you can use depending on the type of product you are shooting. I use white background for dark objects, and vice-versa.
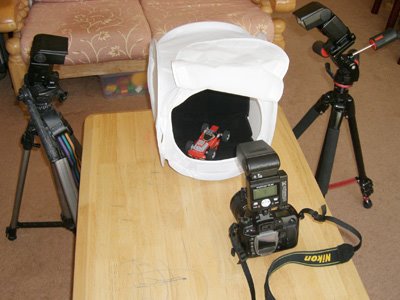 The light box was setup on a table, with the 2 SB-600 units on either side mounted on tripod stands. The camera was mounted with the SB-800 unit and set to "master mode". After setting up the appropriate background cloth, I place the product inside the lightbox, and then close it completely. The lightbox comes with a small slit in front to push the lens inside. Takes a little bit of trial and error to setup the correct flash output to get decent pictures. That's the great thing about digital photography. I cannot imagine doing something like this with film-based cameras!
Of course, it is not mandatory to have flash units. You can achieve similar results by placing the light box in bright (and direct) sunlight. It will be hot work - and not as flexible as using the system shown above, but the results will certainly be good enough that people will ask you "How did you do that?"
Wednesday, September 06, 2006
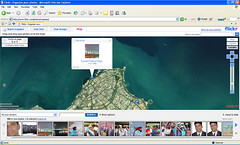
Geo-Tagging with Flickr
Geo-Tagging allows photographers to embed the details of the physical location (latitude/longtitude) from where the photo is taken. This information is usually recorded as EXIF (Exchangeable Image File) data inside the photograph.
How is geo-tagging useful?. Well, in the first place, you will be able to identify the exact location each photo was taken. Imagine being able to go back to the exact same location after 20 years and compare the scene from the original photograph. For historians, it can provide vital information on changing environment.
Most professional digital cameras can link to an external GPS unit and automatically embed the location information everytime a photo is taken.
But what about normal digital cameras that cannot record this information?. One low-tech solution is to use a stand-along GPS unit such as the SONY GPS-CS1. Just make sure the date and time on the camera is synchronized with the GPS unit and the included software will then scan your images to match the date/time with the coordinates recorded by the GPS unit.
If you have your own GPS unit, you could also record geo-tags in your images manually using an EXIF editor tool such as the Opanda Exif Editor.
But this article is not about all of the above. It is about how href="http://www.flickr.com/">Flickr has come out with a cool way of embedding geo-tags inside your photos - and the good thing is that you don't need any hardware or software to do it!
By integrating Yahoo! maps inside the Flickr photostream, users can zoom into the map to identify the spot at which the photo was taken - and simply drop the photo at that location.
Flickr automatically reads the physical coordinates and embeds them inside your photograph. Once you have geo-tagged all your photos, you can view a global map showing the locations where each photo was taken. Pretty cool!.
I have just started geo-tagging my photos. You can see an example here.
Now for the not so cool part. Yahoo! maps are'nt the best in the world (At least when compared to Google maps). Yahoo! maps are pretty detailed for the U.S. region, but fall short when it comes to the rest of the world. It would have been really cool if Flickr had integrated their
service with Google maps, but I guess that would be asking too much since Flickr is owned by Yahoo!. I only hope Yahoo! updates it's maps to be on a similar level as Google.
Secondly, Geo-tagging using satellite maps can be, at most, a task in approximation (however detailed the maps may be or may become in future). It can never replace a direct interface between the camera and a GPS unit. But in the absence of a GPS interface, it is the next best thing.
Go ahead and try it out.
Saturday, August 19, 2006
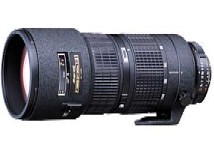
Nikkor 80-200 F2.8
I got hold of this superb lens last month - but did not get much opportunity to use it until now. When you hold this lens in your hands, you immediately realize that this is some serious glass.
It weights in at 2.84 lb. So even if you don't get good pictures with it, you will at least build your upper body strength carrying this beast around.
This week, I got my first opportunity to use this lens. The occasion being the Independence day celebrations at the Indian Embassy. The lens was perfectly suited for the occasion. The zoom range meant that I could take portraits such as this.

At the same time, the wide aperture allowed me to throw background out of focus. Even when the lens is kept wide open at F2.8, it is beautifully sharp.
At $900, this is not a cheap lens, but at the same time, it is the best bargain Nikon has on offer for this range. The other alternative is the 70-200 AF-S VR which costs almost twice as much (approx. $1700). Optically, both lenses are about the same. The more expensive version provides faster and silent focusing, and the VR (Vibration reduction) features means that you can shoot hand-held, which is very difficult with my lens. My solution is to use a $70 Manfrotto monopod, which gets the job done.
Rating: Highly Recommended.
It weights in at 2.84 lb. So even if you don't get good pictures with it, you will at least build your upper body strength carrying this beast around.
This week, I got my first opportunity to use this lens. The occasion being the Independence day celebrations at the Indian Embassy. The lens was perfectly suited for the occasion. The zoom range meant that I could take portraits such as this.
At the same time, the wide aperture allowed me to throw background out of focus. Even when the lens is kept wide open at F2.8, it is beautifully sharp.
At $900, this is not a cheap lens, but at the same time, it is the best bargain Nikon has on offer for this range. The other alternative is the 70-200 AF-S VR which costs almost twice as much (approx. $1700). Optically, both lenses are about the same. The more expensive version provides faster and silent focusing, and the VR (Vibration reduction) features means that you can shoot hand-held, which is very difficult with my lens. My solution is to use a $70 Manfrotto monopod, which gets the job done.
Rating: Highly Recommended.
Thursday, August 17, 2006
Photographers right's in Kuwait
Photographing public places in Kuwait is always a tricky thing. There are no laws (that I am aware of), that can prevent someone from taking a picture of a public building.
Even Saudi Arabia loosened it's tight grip on photography recently - allowing public buildings to be photographed.
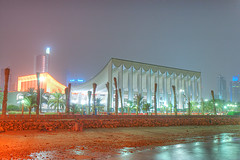
I generally don't have any problems while photographing public places. However, on a few occasions, I have had people come up to me and question me why I am taking pictures. Few months back, while photographing this building, a woman walked up to me and wanted me to stop taking the picture because she thought that she and her friends - who were sitting nearby - might get included in the shot. I quickly took the pictures anyway, before she reached me.
This week, I was photographing the National Assembly building. I setup my tripod and the camera and started taking some long exposures. A Kuwaiti guy walks up to me and wants to know why I am taking picture of this particular building - and whether I am a presss photographer. Unfortunately for me, I don't know much Arabic and all I could communicate was that I am taking the pictures for personal use. He seemed to become suspicious and it looked like he wanted to call the cops or something. Luckily for me, my wife and kids were around, and when they walked up to me, he seemed to lose interest.
Moral of the story: When taking pictures of public places in Kuwait, it's good to have your family nearby as insurance !
Even Saudi Arabia loosened it's tight grip on photography recently - allowing public buildings to be photographed.
I generally don't have any problems while photographing public places. However, on a few occasions, I have had people come up to me and question me why I am taking pictures. Few months back, while photographing this building, a woman walked up to me and wanted me to stop taking the picture because she thought that she and her friends - who were sitting nearby - might get included in the shot. I quickly took the pictures anyway, before she reached me.
This week, I was photographing the National Assembly building. I setup my tripod and the camera and started taking some long exposures. A Kuwaiti guy walks up to me and wants to know why I am taking picture of this particular building - and whether I am a presss photographer. Unfortunately for me, I don't know much Arabic and all I could communicate was that I am taking the pictures for personal use. He seemed to become suspicious and it looked like he wanted to call the cops or something. Luckily for me, my wife and kids were around, and when they walked up to me, he seemed to lose interest.
Moral of the story: When taking pictures of public places in Kuwait, it's good to have your family nearby as insurance !
Tuesday, August 15, 2006
Proud to be an Indian
I have been living in Kuwait for 14 years and never once attended the Independence day or Republic day celebrations held at the Indian Embassy. I always meant to go, but the time (7 AM) was a bit too early for me.
This year, I was motivated because of my new lens that I purchased few weeks back. I just knew that this lens was ideal for this kind of event.
I reached the Embassy just 5 minutes before the ceremony began. I was a little worried that the security would not let me get in - because the camera with the 80-200 lens mounted looks quite menacing. Plus I was carrying a monopod.
To my surprise, I found that everyone simply assumed that I am a professional photographer, and I could walk just about anywhere and take whatever photo I want (including going right in front of the Ambassador during his speech).
Here are some more of the photos that I took.
http://www.flickr.com/photos/cajie/sets/72157594237713141/
Monday, August 14, 2006
Summer in Kuwait...
What can I say? Summer time in Kuwait is.... Well, it's hot.
Starting from May, temperatures stay in the 40+ degree celsius throughout the day. It is not unusual to see a day where the temperature reaches 50 degrees.
The worst part of summer is that it is practically impossible to get any decent photographs. Extreme heat makes the desert sand dry causing huge dust storms that can last for days.
I am eagerly waiting for September, when temperatures will cool down.
Sunday, April 23, 2006
Hands-on HDR (High Dynamic Range) Photography

I was recently asked to post my views on HDR photography. These days, every other picture posted on flickr (www.flickr.com) seems to be HDR rendered image. There are plenty of tutorials on HDR. Just type "HDR Photo" in Google, and you should get plenty of hits.
I decided to make my own HDR tutorial which explains how I do my HDR images.
I am quite new to HDR but immensly enjoy the process of generating HDR images. In this tutorial, I will use the following image as an example. This is the KPC (Kuwait Petroleum Company) headquarters just near the Shuwaikh Port.
So, what exactly is HDR ?
HDR stands for High-Dynamic Range. The objective of HDR is to present an image similar to what our eye would have seen. You must remember that our eye is a very, very powerful lens that is able to resolve incredible amount of detail. It can distinguish between very bright and very dark objects. The same is not true of cameras (either digital or film). Cameras have a very limited dynamic range. This is especially true for digital cameras which have a very narrow latitude. This means you need to get your lighting and metering just right when shooting digital, otherwise you will have blown-out highlights, or dark areas in your photos.
So what happens when you come across a beautiful scene that is very contrasty (i.e. it has some areas that are very bright, and some areas very dark) ?. You can choose to do any of the 3.
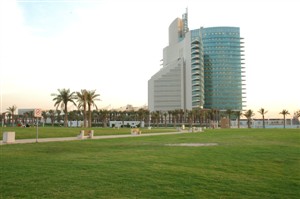
1. Show the details in the shadows at the cost of blown-out highlights. In this picture, the grass and the building is nicely exposed, but the sky is blown out and appears as a white blob. Not a very pretty picture.

2. Show the details in the highlight at the cost of making details in the shadow very dark. Here we have a very dramatic sky, but we can no longer see the details of the grass and the building.
3. The third option is the best. Get a cool can of Pepsi or Coke or any of your favourite beverage and wait for the lighting to change so that it is evenly spread out. In a country like Kuwait, this may mean waiting for a few months, and you can only drink so much Pepsi.
Till very recently, there was'nt anything you could do about it. Perhaps if you were a good photoshopper, you could take the above 2 images, merge them as separate layers, and blend them till sufficient details are exposed in the image. That all changed with Photoshop CS2. CS2 now has a new tool called "Merge to HDR" which takes 2 or more images and automatically blends them to create a balanced exposure.
But what really kicked off the HDR revolution, in my opionion, is a neat program called Potomatix (www.hdrsoft.com). This program introduces a concept called "tone mapping", which really brings out the details from multiple exposures. Some users manipulate tone mapping to a point that the photograph looks more like a painting. This has resulted in lot of criticism for HDR, with some people claiming that HDR is not real photography. Time will tell how HDR will be used as a photographic tool. I personally feel that HDR will allow lots of people to capture images, especially landscapes and architechture, that were just not possible with normal photographic methods.
So let's get started with the tutorial. You will need:
- A digital camera (I used a Nikon D70 in this example)
- A solid tripod (I purchased mine for KD 35/- from Photo World, near Jashanmal). A solid tripod is the key element of HDR photography.
- Photomatix software (download a trial version from www.hdrsoft.com)
STEP 1: GETTING MULTIPLE EXPOSURES
The first step in getting a HDR image is to create multiple images of the same scene, but at DIFFERENT EXPOSURES. This is best achieved using the auto-bracketing function of your camera. Most new digital cameras allow you to shoot 3 images in auto-bracketing mode. Even my small Canon Powershot S50 point & shoot camera has the auto-bracketing feature. Check your camera for this feature and learn how to use it. You should be able to take 3 pictures as follows:
- Picture 1 as metered by the camera
- Picture 2 at -2 stops of the metered value
- Picture 3 at +2 stops of the metered value
Why 2 stops difference ?. Most cameras allow only 3 shots in auto-bracketing mode, and 2 stops (plus or minus) is the maximum deviation from the metered value. Remember we want maximum dynamic range so we go for the maximum deviation available in the camera.
If you don't have auto-bracketing feature, don't despair. As long as you have a camera that allows you to control both the shutter speed and the aperture (called the manual mode), you can still take HDR images. You just have to do this manually. First set your camera to aperture priority and meter the scene. For example, if you set the aperture to F11 and the camera shows the shutter speed to be 1/125 of a second, then you can take the 3 pictures as follows:
- Picture 1 at aperture F11, shutter speed 1/30 of a second (2 stops below 1/125)
- Picture 2 at aperture F11, shutter speed 1/125 of a second (ideal metered value)
- Picture 3 at aperture F11, shutter speed 1/500 of a second (2 stops above 1/125)
Notice that the aperture is kept constant, because aperture controls the depth of field, and we don't want the depth of field to change between the shots.
You can take more than 3 pictures, and some people choose to do so, even if they have the auto-bracketing feature. For example, if you wanted to take 5 exposures at 1 stop interval in the above example, then you could set the aperture to F11, and take 5 exposures at the following shutter speeds (1/30, 1/60, 1/125, 1/250, 1/500).
When taking the different shots, DO NOT MOVE YOUR CAMERA!!!. For this reason, a solid tripod is a must. Even a small shake may cause mis-alignment. Both Photomatix and Photoshop have a feature that will attempt to align the different exposures, but it is best not to rely on it.
It is recommended that you choose a scene that does not have moving objects.
In this tutorial, I have used the following 3 images, taken in Auto-Bracketing mode with 2 stop interval.

The first image was taken as metered by the camera. By applying some curves, this could be an interesting image by itself. However, we are not interested in making interesting images. We want to make an image that makes people go "Wow!. How did you do that?".
The other 2 images were taken at -2EV and +2EV, as shown in the the first part of the tutorial. The image at -2EV shows the sky in dramatic color, but the grass and image are dark. The image at +2EV shows the grass and building in nice colors, but washes out the sky.
I set the camera on the tripod and used the remote control unit to fire the images quickly one after another.
Okay, Now that we have the 3 images to work with, let see how we can generate HDR image.
STEP 2: MERGING THE IMAGES IN PHOTOMATIX
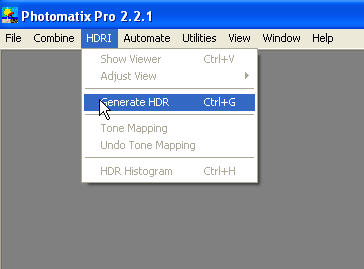
Transfer the images to your computer and load photomatix. Choose "HDRI", then select "Generate HDR" as shown in the screen above:
You will now be prompted for the files.

Load the 3 images by clicking on the "Browse" button and locate the 3 files from your hard drive. Once the images are selected, click OK to proceed to the next step.
Your screen should now show the following:
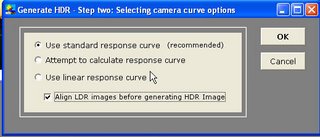
Choose the "Use Standard response curve" option, and click on the "Align LDR images" as shown in the screen above. If you are very sure that there is no mis-alignment in your images, you can de-select the "Align LDR images" option which will speed up the process.
The system will now compute the HDR image, and show a preview of the image as shown in the screen shot below:
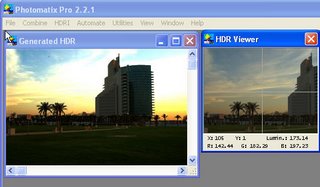
Well, that does'nt look like something that will make people go "Wow!". But don't worry. This is because you are viewing a HDR image on a screen that is not capable of displaying the huge dynamic range that is available in this image The quick preview on the right side approximates what the final image will look like. Move your mouse around the image to get a feel of the expected result. You can now save the HDR image if you wish.
Next, we need to now scale the HDR image back into a normal image using the Tone mapping tool of photomatix. To do this, select "HDRI", and then choose "Tone Mapping" from the menu.
Your screen should now look like this:
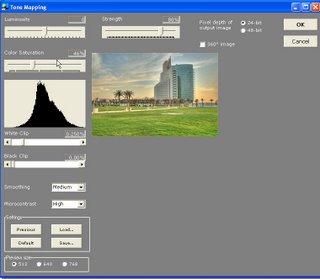
Wow, look at that histogram. Is'nt that a pretty looking histogram ?. The resulting image is a tone mapped image that has taken the correct values from all the 3 files to represent a final image which is approximately what your amazing and powerful eyes would have seen.
You can now play with the various controls to achieve the desired result. Increase or decrease the luminosity slider to make the image darker or brighter. The color saturation slider similarly increases or decreases the color saturation in the image. You can similarly play with the other controls. I usually set the microcontrast to Medium, however that is purely a personal preference. You can leave it at the default of "High"
The important control here is the "pixel depth of output image". By default it is 24 (which means it is a 8-bit image). If you want to have a 16-bit image, choose 48. 16-bit images can only be saved as TIFF (.tif) files, while 8-bit images can be saved as JPEG files or TIFF files or Windows BMP files.
That's all there is to it. Click on "OK" and then Save the file to your hard disk. Share it on flickr and have fun.
I hope you found this tutorial useful. I enjoyed preparing it.
See some of my other HDR photos at
Tuesday, April 11, 2006
Photoshopping
I use Photoshop mostly for minor adjustments and tweaks for the photos, and to remove dust spots with the healing brush. I think the healing brush tool alone is worth the price of Photoshop.
It is very rare that I do serious photoshopping. I simply don't have the time and energy. However, I thought this beautiful portrait of my son deserved some photoshop treatment.
The original picture had a red curtain as background. Using the Filter->Extract tool, I removed all the background and replaced it with a gradient layer.
I am quite pleased with the result, and the 8x11 printout that I did on my HP photo printer looks just great.
HDR Photography
HRD (High Dynamic Range) photography seems to be the new buzzword on flickr. I came across some of the HDR photos and was at a loss to understand how they managed to get the painting-like effect.
After reading about the subject a bit, I decided to give it a try. This is my first attempt at HDR photography.
I took my trusty Nikon D70 and a tripod and went to some of my favourite haunts. This one in the picture is the new KPC building near Shuwaikh Port.
You need more than 1 photograph taken at different exposures to generate a HDR photo. I used the exposure bracketing feature of the D70 to take 3 pictures with 2 stop difference.
In order to eliminate any misalignment in the 3 photos, I sat the D70 on a tripod, and triggered the exposure using the tiny remote control. I am extremely happy with this picture with it's dramatic background, and the green grass in front.
Monday, April 10, 2006
A good win for Qadsia
After living in Kuwait for more than 10 years, I went for my first football match.

The match was between Qadsiya sports Club of Kuwait, and Pakhtakor from Ukraine.
My wife and my 2 kids joined me for the match. My wife was a little bit apprehensive as she was the only female in the 1000+ crowd gathered for the match. But my 7 year old son thoroughly enjoyed the match - egging on the home team (Qadsiya), and jumping up and down whenever they were near the opponent's goal.
Qadsiya won the match 2-1, after training 1-0 for the first 85 minutes, and scoring 2 quick goals in the last 5 minutes.
Subscribe to:
Posts (Atom)