Sunday, December 19, 2010

Explore Goa: Bird-Watching

Juvenile Brahminy Kit
I am on vacation. I go to sleep late at night and I would like to stay in bed till noon. But every morning, I end up being forced out of bed at 5 a.m., when it is still pitch black outside. That is the price I have to pay for living in a tropical paradise. The cacophony of thousand birds screaming their guts out means that morning sleep is just not possible.

Yesterday morning, I decided to take my revenge on the noisy birds by fixing the newly acquired 80-400mm lens and going out and shooting all the birds I could see. The biggest noise making culprits are, of course, the crows. There are thousands of crows screaming all day long. However, I was astonished to see the varied bird life that exists in Mobor. I managed to get the following captures in just 1 hour. I can only imagine what an avid birder can find here.

Explore Goa: Margao to Panjim.

National Highway NH17 connecting Margao to Panjim.
I decided to cycle from Margao to Panjim. Margao is the commercial hub of Goa, while Panjim is the capital of Goa. Since the distance is relatively short, I thought it might be a good idea to check out some of the places near Vasco (named after Vasco-da-Gama).

The weather was hazy without any clouds, so I knew in advance that my landscape photography was not going to be anything spectacular. I decided to focus on the journey. The route I followed is marked on the map in red.

Route from Panjim to Margao via Vasco.

Saturday, December 18, 2010

Explore Goa: Fishing in Arabian Sea.

Early Morning on Mandovi River.
My brother Roy is an avid angler. Okay. Let me rephrase that. My brother is a crazy fisherman. He can spend hours in the sea waiting for the fish to bite. I have tried fishing on a number of occasions and always came back with the same conclusion. I don't have the patience for fishing. This does not mean I lack patience. I have plenty of patience. For example, when it comes to photography, I can sit for hours waiting for the sun to be at just the right position so that I can get the "perfect shot". The difference, for me, is that I know exactly how long I have to wait for the sun to be at a specific point. But when it comes to fishing, I don't know when (or if) the fish are going to bite - and that is what I find frustrating. I thrive on certainty. I leave uncertainty for others.

Roy called me late last night asking if I would join him for a fishing trip along with some friends of his. The fishing would be in a high-speed boat, which he felt I might enjoy. The was a catch (pardon the pun). I had to get up at 5:30 am!!. Even as I groaned at the prospect of getting up at such an ungodly hour, I agreed to join him - thinking that the trip might offer some photographic opportunities.

Tuesday, December 14, 2010

Explore Goa: Dudhsagar.

Dudhsagar Waterfalls
Dudhsagar (which literally means "sea of milk") is a waterfall on the Mandovi river, and a must-see destination for tourists. The falls dry up into a trickle during the dry seasons (January to May) but provide an awe-inspiring view during the monsoon season (June to September) - as the heavy monsoon water gushes over the mountain.

Dudhsagar is in a very remote location and not accessible by car or bicycle. I had a number of options to visit the place:
1. Ask my brother to drive me to the falls in his 4x4 SUV (most convenient).
2. Go on one of the tourist vehicles that take people to Kulem by car - and then a bumpy 1 hour ride to the waterfalls in a 4x4.

How about Trekking?

Monday, December 13, 2010

Explore Goa: Margao to Ponda and Back.

The "Old Market" in Margao.
After a nice rest in Margao at my Sisters place, I was unsure what to do next. I wanted to make the trip to Dudhsagar waterfalls, but felt that I should keep it for another day. Instead, I thought I'll take a trip to the Old Market and perhaps do a little cycling to Ponda & back. The "little cycling" eventually turned out to be 4 hours of solid cycling.

My bike trip from Margao to Ponda & back.

Explore Goa: River Sal Boat Trip.

Betty's Cruise on the River Sal.
A river trip in a tourist boat is about as close I wanted to get on my photography trip as a Turkish family wants to get to a Greek Salad. The only reason I decided to give it a try is:
1. The boat belongs to my brother and he captains the boat.
2. I felt like I needed a break to just sit back and relax.
3. Great food and drinks. Did I mention that its all free for me?

The boat trip is a major attraction for the visiting tourists who enjoy the scenic river and the sea. The trip starts in River Sal and briefly goes into the Arabian sea for dolphin viewing before returning back to the river. The trip continues upstream - going all the way to Varca before returning back to Mobor after 5 hours of cruising. Books on birds, plus a pair of binoculars are provided on each table.

Route taken by the boat.

Sunday, December 12, 2010

Explore Goa: From Mobor to Palolem

My 21-gear Trek bicycle ride.
I decided to do the Mobor-Palolem route using a bicycle. I knew it would be challenging, considering that the route is full of small mountains but I felt my newly acquired 21-gear bike Trek bike would be up to the challenge. I was wrong.

I started early morning at 6:00 am. It was still dark as I cycled towards Cavelossim, to get to the ferry to cross over to Assolna.

My bike route from Mobor

Thursday, December 09, 2010

Explore Goa: Fontainhas.

One of the many Portuguese style homes in Fontainhas.

"Fontainhas (or Bairro das Fontainhas, in Portuguese) is an old Latin Quarter in the city of Panaji in Goa, India. It maintains to this day its Portuguese influence, namely at the architectonic level, such as narrow streets, old villas and buildings painted in lively colors. The quarter shows how Panaji was during the Portuguese rule of Goa." - Source: Wikipedia.

I used to work and live in Panjim 20 years ago. I would pass by Fontainhas almost every day, but never thought to give it a second glance. For my career-oriented eyes, it seemed like any other place. Last week, when I was flying from Mumbai to Goa on Spice Jet airlines, I started reading their in-flight magazine and found an article in their travel section called "Must-see places", and Fontainhas is listed as one of the places. That was an eye opener for me so I decided to check it out.

I got into an auto-rickshaw and asked the driver to drop me anywhere on the Fontainhas street. He stopped right in front of the place where Fontainhas (Portuguese word for "small fountains") begins. The water from the fountains looks very dirty. I am not sure if the locals use this water for their daily use.

Fontainhas (The little fountains).

Explore Goa: Cholta Cholta

Cholta Cholta at Panjim Gardens.
Cholta Cholta (A Konkani term which means "While walking") is a walking tour organized by Goa Bookworm. Goa Bookworm promotes reading for children. They have a special library where children can explore a fine selection of books organized by age group. Goa Bookworm organizes these Cholta Cholta tours so that children (and adults) learn more about the history of Goa.

My friend Cecil thought it would be a good opportunity for both of us to learn something about Panjim - especially since I am on a "Explore Goa" tour. I jumped at the opportunity and took a local bus to travel all the way to Panjim (The capital of Goa that is about 60 kilometers from where I live). My family (especially my brothers) were perplexed why I chose to travel by the local buses when I could easily ask one of them to drive me by car. I've been enjoying my travels by buses because I get to know a lot of interesting people-  so I plan to use buses as often as I can during my stay here in Goa.

Wednesday, December 08, 2010

Explore Goa: Aldona.

Aldona - North Goa
Aldona is a sleepy village in North Goa full of greenery and colorful people. One of the most colorful person being the well known Goan writer/humor columnist, and my long time friend Cecil Pinto. Cecil loves everything Goan and offered to drive me around his beautiful village looking for interesting things to photograph.

20 years back, I was a regular in Aldona and not much seems to have changed since then as far as the unique character of the village is concerned. There are a lot of new houses, but they retain their typical village architecture. Thankfully, there are no grotesque modern style concrete block houses in the Village.

Friday, December 03, 2010

Nikon 80-400: First Impressions.

The Nikkor 80-400 f4.5-f5.6.
As part of my plans to travel to Goa and photograph wildlife over there, I decided to invest in a suitable telephoto lens. I would have ideally preferred something along the lines of Nikkor 200-400 f4 but obviously, that's way over my budget - and even if I could arrange the money, it would be very impractical to carry around on a trek (due to its size and weight).

After reading various reviews, I decided to finally settle for the aging Nikkor 80-400. When this lens is mounted on my D300 (which has a crop sensor of 1.5x), this lens effectively becomes 120mm-600mm - which is ideal range for shooting wild-life (or snooping into your neighbors house).


Wednesday, December 01, 2010

Explore Goa: Introduction

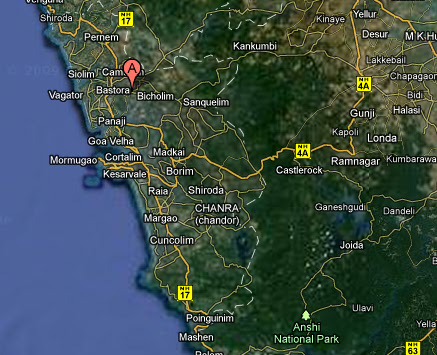
Satellite View of Mobor

I was born and brought up in a small village called Mobor in Goa (India). Life was pretty hard for us as children. We had to walk nearly 1 hour to the nearest bus station as there were no roads where we lived. The River Sal flows 100 meters in front of our house, and the Arabian sea is 500 meters at the back of our house. Both the river and the sea meet up about 1 kilometer down and we are locked up in a peninsula.

When the monsoons hit, everything would get flooded. The only advantage of living in a peninsula with all this water surrounding us is that we never had to pay for fish. When we wanted to eat fish, we would go either to the river or the sea and catch fish. Fresh fish all day, every day!!.

It is only after I left Goa and started living in Kuwait that I came to the realization that I was brought up in one of the most beautiful places on earth. The pristine white sandy beaches, lush forests, amazing wildlife, fruit bearing trees all around. It's all there. In fact, I've realized that there are many interesting places in Goa that I have not yet been to - especially the wild life sanctuaries and the national parks.

I travel to Goa regularly for my vacations - but I always look at this time as an opportunity to sit with my family & friends, relax, eat good food and return back to Kuwait. Besides an occasional trip to the amazing Dudhsagar Falls, I have rarely ventured out to explore Goa.

I have decided to try something different this time. Instead of looking at Goa as my home town, I am going to look at Goa as a travel destination to explore and photograph. I plan to visit most of the wildlife sanctuaries (hello 80-400mm lens, you will come in handy here), and visit different villages and towns to appreciate Goa and the place that I call my home.

I fly to Goa on 4th December, and in the next 3 weeks, I will be documenting my journey on this blog.

My other passion (i.e. fitness), and the fitness blog, will have to take a backstage for 1 month.

Saturday, September 25, 2010

Grand Mosque Kuwait - Revisited

The Holy Koran at the Grand mosque - Kuwait
Back in May 2007, I visited the Grand Mosque with my brand new D200 and immediately realized that I should  have taken a tripod to get some interior shots.

To those who are interested in visiting the Grand Mosque, the AWARE center organizes tours every month (usually the 2nd Saturday of each month). More details about the tour are here.

My family wanted to see the Grand Mosque so I decided to visit it once again with the whole family. We gathered at the Mosque at 9:30 am (there were around 40 other people). We were served water, tea, juices and biscuits and the guide gave us a comprehensive tour of the mosque - along with its history, architecture, and statistics on how many people the mosque can accommodate.

I had carried my tripod this time so I managed to get some nice shots of the interior - especially the detailed ceilings and walls inside the mosque.

You can see the photos here.

Monday, August 02, 2010

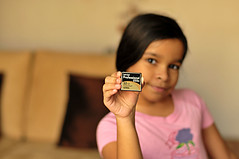
Lexar Professional 32GB 233x


Lexar Professional 32GB 233x
Originally uploaded by Cajie.
As our cameras become bigger in resolution, our need for increased storage keeps on increasing. Few years back, I could get decent mileage out of a 2GB card on my D70 (a 6 mega-pixel camera). Once I upgraded to a D200 (10.1 mega-pixel), The 2GB started feeling very small and I invested in a couple of 4GB and 8GB cards.

On the D300 (a 14.2 mega-pixel camera) , the 4GB and even the 8GB cards seem inadequate - especially when I decide to shoot both JPEG and RAW images at the same time.

I decided to order a 32GB 233x card since they have become quiet affordable. As of this writing, this card is neither the largest (you can get 64GB CF cards), nor the fastest (you can get a 600x speed cards). These high-speed demons are necessary when you want to capture HD video, but for general photography, a 233x is more than sufficient. I tried shooting continuous shots (the D300 can shoot at 6fps), and the card had no problem keeping up with the shooting.

My only concern using such high-capacity cards is the possibility of losing a large number of photos if the card gets corrupted. I just popped the card in the camera and the display shows that it will capture 2800 pictures at the highest quality settings!. Imagine filling up the card and then losing all those photos.

I am travelling this month to Kashmir for an adventure trek and I will get my first opportunity to test both the new D300 as well as the new card. Only when I return back will I know if my concerns were valid or not.

Saturday, July 17, 2010

An Impulse Upgrade.

I've been using the Nikon D200 for the past 3 years as my primary tool for photography. It has served me well and the controls on the camera feel like second nature to me. Before taking a picture, I can switch the settings for ISO, Aperture, Shutter, etc. without even looking at the camera body. I was happy with my images and I had no plans of upgrading as I was waiting for Nikon to update their full-frame (FX Sensor) camera D700, (hopefully with 1080p video) before making the upgrade decision.

Jumping to a FX sensor  is going to be a big jump for me - as I have already invested in some quality lenses that are not compatible with the FX sensor (especially my lovely Nikkor 17-55 f2.8 and the Sigma 30mm f1.4). Besides buying the expensive camera body, I will also have to invest in some quality FX lenses. So that will not happen in the near future.

When I saw an ad for a used D300 body for a very good price, my antenna went up. I knew that the D300 was a step up from the D200. I was also aware of its improved ISO performance, but was not really sure about other enhancements compared to my current D200.

I pulled the trigger and purchased the body (It came bundled with the awesome 50mm f1.4 lens that I reviewed yesterday). Once I had the camera in my grubby hands, I decided to check its features compared to the D200. I was shocked!. This thing is an improvement over the D200 in almost every single area. DPReview has a nice side-by-side comparison of both D200 and D300. If I had analyzed these differences earlier, I am sure I would  have been tempted to upgrade much much earlier.

For me, these are the main differences:

1. ISO performance: I can shoot comfortably up to ISO 800 on the D200. It can go up to ISO 1600, but the pictures are not really usable. According to the data sheet, D300 allows me to shoot usable pictures up to ISO 1600, and it goes up to ISO 3200. So essentially, 1 whole stop of low-light improvement.

2. Auto-Focusing: D300 has 51 focus points for fast and accurate focusing, compared to the 11 focus points of D200.

3. Picture Size: D300 outputs 12.3 megapixels, compared to the 10.2 megapixels from the D200.

4. Dust Reduction System: D300 comes with a dust reduction system that automatically cleans the sensor using vibrations. D200 does not have such a system and dust removal requires careful manual cleaning that requires surgical skills.

5. Live View: I was surprised to learn that D300 has a live-view mode. Images can be composed using the LCD screen. D200 does not support live view.

Of course, there are many other differences but the above are what caught my fancy.

I've had the camera in my hands for only 2 days so I can't make a definitive judgement on how good it is compared to the D200. However, I will be shooting a lot in the coming days and I will post my detailed impressions on this camera. More importantly, I am going for a Himalayan trek next month so the camera will see some action there.

Since my main motivation of upgrading to D300 was its low-light capabilities, I decided to test this first. We had an outing last night at the beach with some friends. I took the new camera along with me to try some low-light shots. Here's one example shot at ISO 3200.

The place was almost dark and the only lights available for this picture were some sodium lights in a nearby basket-ball court about 50 meters away!!. This photo would be impossible to capture with the D200,

As expected, the image was quite noisy. I ran it through Neat Image Pro, and then applied some sharpening to make it usable. As you can see, the picture is decent and usable (albeit at a lower-resolution). But at the end of the day, it is usable and that is all that matters.

Here's a 100% crop of the original image (after running through Neat Image).

 Needless to say, I am terribly excited with the D300. Combined with the 50mm f1.4, it appears to be a deadly combination for low-light photography.

I still haven't decided what I will do with the D200. Perhaps use it as a backup body. It is, after all, still an awesome picture-taking machine.

Friday, July 16, 2010

The Superlative Nikon 50mm f/1.4D AF

Back in 2008, I sold off my trusty 50mm f/1.8D AF prime lens, with the idea that I will upgrade to the faster version of the lens. I even placed the order for it on Amazon. For some reason, Amazon had difficulty in fulfilling the order and kept postponing the delivery. I got fed up and cancelled the order and got the 105mm VR macro lens instead.

It was always in my schedule to eventually get the f/1.4 lens, and when Nikon introduced their AF-S version of the 50mm f/1.4, I thought that is the lens I should go for - but the steep price of $440 kept me at bay.

So when I saw an ad for a used 50mm f/1.4 for around $200, I was really really tempted even though I was not sure whether I could afford it. The decision became much easier when my wife urged me to go ahead and pick it up. All photographers should have a wife like mine.

The f/1.4 lens is 2/3rd stops brighter than the f/1.8 counterpart (i.e. 66% brighter). That makes a big difference when it comes to shooting in low-light situations.

The lens can be shot wide open without any worries (i.e. images appear sharp even when the lens is fully opened at f/1.4) unlike some lenses that need to be stopped down by a stop or two to get ideal results.

This picture of my daughter Erika was taken at f/1.4.

BTW, it is a ritual of mine to first take a picture of Erika with any new lens that I purchase.

The f/1.4 also makes it possible to completely blur out the background because of its extremely shallow DOF (depth-of-field). This is easy to see in the picture above. Erika was standing in a mall when I took the picture - but the whole background is completely blurred out.

The shallow DOF makes it very tricky to get the right focus. Even a slight mistake can render the picture out-of-focus so nailing the focus is extremely important when shooting wide open with this lens.

This picture really demonstrates the wafer-thin DOF of this lens. In this picture (shot wide open at f/1.4), just 2 or 3 lines of text are in focus, while the rest of the book (both front and rear) are out of focus. This can best be demonstrated by a 100% crop of the above image.

The area of focus is just a few millimeters. Imagine if you were shooting a portrait with this lens, it would be extremely important to get the camera to focus on the eyes of the model to ensure that the portrait appears sharp. Of course, you must keep in mind that the depth-of-field is also determined by the distance to the subject. Closer the subject (as in the case of Erika above), nailing the focus is paramount. However, when the subject moves further away, the depth-of-field increases. This means that if you are shooting a photo of a person who is 10 meters away, then focusing on any part of the body will be just fine.

Traditionally, on the film cameras, 50mm was considered the "normal" lens because the area of coverage provided by a 50mm is similar to the coverage that we get with our naked eyes. And this principle still applies if you have a FX sensor camera such as a Nikon D700, Nikon D3S, Nikon D3X, etc. However, when you mount this lens on a DX sensor camera such as the D90, D300s, the camera gives you a field-of-view of 75mm because these sensors have a crop factor of 1.5 (so 50mm x 1.5 = 75mm).

Since 75mm is an ideal range for portraits, this becomes an ideal portrait lens when mounted on DX sensor cameras.

Conclusion: If you love low-light photography or portrait photography, you owe it to yourself to invest in a 50mm f/1.4.

Monday, July 12, 2010

The Sigma 30mm f1.4


Perfect Breakfast
Originally uploaded by Cajie.
I was just checking my archives and realized that I never posted about this beautiful lens. I've had this lens for more than a year, but never really made good use of it.

However, I've recently become something of a health nut. I even started a separate blog to record my progress. Since the new blog is dedicated to fitness and healthy lifestyle, I find myself taking lots of food pictures. The Sigma (with its ultra-fast f1.4 aperture) allows amazing shallow depth-of-field, which, in turn, results in interesting pictures of food.

The Sigma 30mm f1.4 is a DX-optimized lens, which means it works on DX sensors such as D40, D80, D300 etc. It will not work correctly on full-frame sensors such as D700, D3, D3X etc.

It has a HSM (Hyper-Sonic Motor) on its body, which allows for fast and silent focusing. The HSM also allows the lens to be used on bodies that don't have a motor on the body such as the D40 and the D60.

It is not cheap. At around $450, it is something you purchase when you have lots of spare change or you need it for professional work.

Saturday, May 15, 2010

My next camera for travelling.

Ever since Olympus released their affordable PEN E-PL1, I've been meaning to pick it up as a travel camera. It is extremely tiny, has a decent selection of lenses (especially, the highly desirable 20mm f/1.7), and most importantly, supports capturing of HD Video which looks amazing thanks to its large sensor size that gives professional looking shallow depth of field.

When Amazon dropped the price of the PEN E-PL1 from $599.99 to $549.99, I almost hit the trigger and placed the order. It's a good thing I held on for a few days because Sony just announced their versions of the tiny mirror-less cameras to compete in this ultra-compact category.

There are actually 2 models introduced
   - Sony Alpha NEX-5
   - Sony Alpha NEX-3

Both are identical in features and technical specifications. The only difference between the 2 are:
   - Video quality: NEX-5 can capture 1080i in the AVCHD format, while the NEX-3 is limited to 720p in the MP4 format.
   - Build Quality: NEX-5 has a magnesium alloy body while the NEX-3 has the plastic polycarbonate.
   - Size & Weight: The NEX-5 is slightly smaller & weighs a wee bit lesser than the NEX-3

So what makes the NEX-5 better than the Olympus E-PL1?
For me, the obvious is the sensor size. The NEX-5 has a large APS-C sensor (same sensor size as my current Nikon D200 and about 40% larger than the E-PL1) and its ISO can go up to 12,800 (which leaves my D200 in the dust with its maximum ISO of 1600).

There are only 2 lenses available at the moment (a 16mm f2.8 and a standard zoom lens 18-55mm). Currently, the lenses can only be purchased as part of the kit and Sony has announced that it will release a third lens (18-200) that will retail for around $800.

I plan to pick up NEX-5 with the 18-55mm lens (retail price $699), the moment it is released (end of June) and will give it a spin when I travel to India in July, and will hopefully be able to pick up the 20mm at a later date.

Both NEX-5 and NEX-3 can be currently pre-ordered for Sony Style.

Thursday, April 22, 2010

Geocaching


Geocache Treasure
Originally uploaded by Cajie.
Geocaching is a high-tech treasure hunting game where you use a GPS to hide and seek containers with other participants in the activity. The official website provides more information about this interesting game.
You basically create an account on the website and then search for treasures (or caches) that are hidden around your area.
Each cache is identified by its GPS coordinates. You punch the coordinates in your GPS device and let it guide you to the cache location. Since there is always a margin of error, the GPS will basically take you very close to your target, and then it is up to your skills to actually locate the cache.
The game is very popular in U.S. However, there is not much interest in the game here in Kuwait (where I live). When I created my account and started searching for hidden caches, I could only find a handful hidden caches in Kuwait, and most of them were located on restricted U.S. military areas.
One cache did catch my attention. It was hidden in Jal Al-Zour on top of Mutla Ridge (considered to be the highest point in Kuwait). The ridge is a long hilly area made up of sand and stone that lines up the bay of Kuwait. Since it's a family oriented game, all of us got into our 4x4 and decided to go on an adventure to find the treasure.

What has geocaching got to do with photography, you say? Well, it is an excellent opportunity to go out and explore - which in turn gives you an opportunity to take pictures.

We did manage to locate the cache - and take some nice pictures in the process.

Monday, January 04, 2010

Panoramas and Zooming

Yesterday, I created a panorama of Kuwait City using 44 images and a photo stitching software called Auto-Stitch. I was not very happy with the result, as the limitations of the demo-version of Auto-Stitch combined with my weak laptop configuration meant that the resulting file was only 50% of what I wanted it to be.

I decided to give Photoshop a try - and even though it took couple of hours to process the images, it finally came up with a gigantic 112 mega pixel image.

My next dilemma was how to present this image to others. The file is 22,885 pixels wide and 4,885 pixels long. Obviously, viewing such a large image on a standard 800 x 600 screen would not provide the ideal experience as the user has to scroll up and down to view the details in the image.

There are couple of solutions available for presenting large images to the end user. Zoomify provides a simple application that allows you to feed the application with the large image and it spits out hundreds of tiny images and presents them interactively using a flash-based application. I tried the free version of zoomify with my original (half-sized) image and uploaded it to one my my websites. The result is pretty interesting as you can see it here.

A friend recommended Seadragon - a cool application from Microsoft Live Labs. To implement Seadragon, you first upload the image to any image hosting website (I used my normal Flickr Account) and then give the URL to Seadragon, and it comes up with a interactive version of the image that the user can zoom in and see the details.

I love Seadragon since it's very easy to implement and the result can be embedded directly within your blog/website.

This is my Seadragon implementation of the final image. Click on the (+) and (-) buttons to zoom in and out of the image. You can also use the scroll bar of the mouse for zooming.

Enjoy.


Saturday, January 02, 2010

Panoramas and Stitching.

I've been meaning to create a panorama of Kuwait City for quite some time. But every time I looked out of the window, the weather was either too dusty or too dull or bland - a feature that is part & parcel of this dry & dusty desert place.

Today, the weather was nice and crisp, so I decided to give it a shot. I packed my D200 and the Nikkor 80-200 f2.8 and headed to my favorite destination to capture the Kuwait City skyline.

I shot around 44 pictures and then came home to see how they would look like once stitched together.

I downloaded the demo version of Auto-Stitch. I did face some problems as it was unable to stitch all the images at full resolution due to the limitations of my laptop - so I ended up stitching them at 50% resolution.
I am quite pleased with the initial results of my mega-panorama attempt and will try this with some other projects that I have in mind.

Here's the output from the Auto-Stitch program.

Kuwait Cityscape Panorama - 1

A larger version of the image can be viewed here.

And this is the original output from the Auto-Stitch program. WARNING!. It's a large download so don't click the link if you are on a slow link.