Sunday, September 04, 2011

First Impressions: Olympus E-P2

Olympus E-P2 with the 14-42 lens.
Holding a micro-third camera in my hand feels very strange. Owning a camera from Olympus or Panasonic (the 2 manufacturers who make the 4/3rd cameras) was never in my agenda. Last year when Sony announced their NEX cameras, I thought I had found my perfect travel camera, and almost purchased it. However, after reading couple of expert reviews, I decided against it.

My recent trekking trip to Kashmir made me realize that I really need a more compact camera. One that is small enough to carry - but does not compromise on quality.

My back and shoulders demanded a smaller and lighter camera - especially after carrying a 8 kg load for 7 days straight. A bit of research indicated that the micro 4/3 format has evolved and matured to a point, that investing in this format felt like a sound idea. I was further goaded into this purchase when Olympus suddenly dropped their price for the E-P2 from a lofty $899 to tantalizing $499. The reason for the price drop was the introduction of a newer model E-P3.

Wednesday, August 31, 2011

Explore Karnataka: Hampi

Virupaksha Temple, Hampi
The historic city of Hampi is about 8 hours drive from Goa. My brother suggested that I would enjoy visiting the place, since I love photography. He even volunteered to drive me and my family to Hampi, and back.

I had never been to the place before, and did not know much about it. A quick Google search suggested that one should allocate at least 2 to 3 days to really explore the place. Unfortunately, we did not have that many days left in our schedule, so we decided to do a quick 1 day tour.  One thing that worked in our favor is that most of the important places now have road access, so we could easily drive to different parts of the huge 26-square kilometer city.

We reached early in the morning and located a tourist guide. The guide traveled with us in the car explaining the history of the place - and the various places of interest.

Hampi was the capital of the Vijayanagar empire that ruled South India from 1336 AD - 1565 AD. History of Hampi can be found here.

Saturday, August 20, 2011

Explore Kashmir: Srinagar

Panoramic view of Srinagar
After we completed our trekking trip in Kashmir, we had a few days left to spend in Srinagar, before returning back to Goa.

Aside from relaxing in a houseboat on the Dal Lake, we also took this time to explore some of the interesting places in Srinagar. Srinagar is famous for its Mughal gardens. These gardens were built by the Mughal kings, who used to travel here during summer, to escape the hot weather of Delhi.

Saturday, August 13, 2011

Explore Kashmir: Dal Lake.

The idyllic Dal Lake, Srinagar.
Our trip to Kashmir was primarily about our Trekking tour. When I was planning the trip, I was not sure how long the trek would last, so I had left ample room by booking some extra days in Srinagar. When our trek ended, we still had 3 more days to spend in Srinagar, before our return flight back to Goa. We decided to use these days to explore Srinagar a bit more.

Friday, August 12, 2011

Trekking in Kashmir: Wrap-Up

Gangbal Lake, Kashmir.
When I first traveled to Srinagar in July for our Trekking trip, I really had no idea what to expect. I had done all the ticket and hotel booking up to Srinagar and back. But what exactly would happen in Srinagar was a big mystery. My brother has friends in Kashmir, and he assured me that they would take care of the actual trek.

Ticket and hotel bookings were done using the online portal MakeMyTrip. A really excellent website for planning air travel and hotel bookings. Most of the air travel was done using IndiGo, but for some of the sectors, we used GoAir. Even though both the airlines are classified as "low-cost", they are both excellent and highly recommended.

Thursday, August 11, 2011

Trekking in Kashmir: Day 7

Shokhdari (Table Top), near Sonamarg.
To read about our Day 6 adventures, click here.

On the 7th and last day of our trek, we relaxed in Shokhdari, before heading out to Sonamarg to be picked up by our car - for the drive back to Srinagar.

I went near the edge of Shokhdari, which provides a panoramic view of Sonamarg. The morning was misty and cloudy and I couldn't get any good pictures of Sonamarg from this vantage point.

Wednesday, August 10, 2011

Trekking in Kashmir: Day 6

Early morning at Vishnasar Lake
To read about our Day 5 adventures, click here.

Day 6 of our Kashmir trek can be best described as "The day of Shawn". This was the first time Shawn completed the entire trek without using his horse. A solid 8 hours of continuous trekking.

I had slept like a log the previous night - no doubt helped by the Rum that I had taken before dinner. When I got up in the morning, it was yet another beautiful Kashmir morning. Clear blue skies and puffy while clouds. I walked up to Vishinsar lake to take some early morning pictures. The water of the lake was very still, reflecting the mountains and making it look as if the lake has disappeared.

Tuesday, August 09, 2011

Trekking in Kashmir: Day 5

Gadsar-Vishnasar Trek.
After a long and well deserved rest at Gadsar on Day 4, we mentally prepared ourselves for another long and hard trek on Day 5. As we did not want to get into the same sticky situation that we faced on Day 3 (i.e. not reaching our destination before sunset), we decided to start our trek early. It would later prove to be a very wise decision - though for a different reason.

We had our breakfast at 6:00 AM, and were ready to start off by 7:00 AM. It was a bright and beautiful morning. We packed only the raincoats, water and some chocolates and set off. The support team would pack everything and catch up with us. Those guys are really amazing. They make trekking look so effortless - and they don't have any fancy trekking gear.

Monday, August 08, 2011

Trekking in Kashmir: Day 4

A wet and cloudy morning in Gadsar.
After a hard and long trek on Day 3, we woke up to a cold, wet and cloudy morning in the valley of Gadsar. It had rained most of the night and we were shivering in our tents.

Our original plan was to do a short trek to Gadsar lake (around 2-3 hours trek from the valley), but our support team advised us that it would be better to stay put in Gadsar for the whole day - instead of venturing into the wet and slippery trail.

I liked the idea of a full day of rest. My bones were aching from the long trek the previous day, and looked forward to a day of lazing around the valley.

Sunday, August 07, 2011

Trekking in Kashmir: Day 3

Another glorious morning at Gangbal lake with the imposing Harmukh peak.
After a relaxing second day, we woke up to yet another glorious Kashmir morning on the 3rd day of our trek. We were well rested and anxious to start the "serious" portion of our trek. A long trek from Gangbal lake to Gadsar. We would need to first cross the steep Zagibal pass (4000 meters above sea level), and then move to Satsar (Seven lakes), and finally skirt the Poshpatri (valley of flowers) mountain to reach our destination Gadsar.

Saturday, August 06, 2011

Trekking in Kashmir: Day 2

Harmukh Mountain - as seen from Trunkol.

If the first day of the our Kashmir trek was mother nature testing our strength and determination, then the second day of our trek can only be described as mother nature apologizing for the hardships thrown at us the previous day, and showing us the beauty that it had kept hidden from us the first day

We woke up and were greeted to a glorious Kashmir morning. Harmukh peak, that was hidden by clouds the previous evening, dominated the landscape with a background that can only be describe as a picture perfect postcard. The sky was a brilliant blue with white puffy clouds. We were awestruck and just wandered around our tent enjoying the beautiful scenery.

Wednesday, August 03, 2011

Trekking in Kashmir: Day 1

Packed and ready to go for the trek.
We started our 6-night, 7-day trek (that would take us from Naranag to Sonmarg) on a cold Saturday morning on 16th July. We were supposed to be picked up from our house at 6 A.M., but the vehicle was delayed and reached only by 7:30 A.M.

It was a 3-hour drive to Naranag with frequent delays at various security check points in Srinagar. At one check point, the cops were actually refusing to let us through - due to the unstable weather in the mountains, but our guide Muzafar (who was also with us in the car) managed to convince the security that he knew what he is doing, and they let us through.

Sunday, July 24, 2011

Trekking in Kashmir: Route Selection.


Our trekking route from Naranag to Sonamarg.
When we first arrived in Srinagar, we had no clear idea what trek we would undertake. The only thing I had set as an objective was that the trek should last around 5-6 days, and that it should be challenging enough to make the trip worthwhile.

My brother has a lot of friends in Kashmir, and they hooked us up with Baktoo Group, which organizes professional and customized trekking trips and also offers relaxing houseboats on the Dal/Nagin Lake.

I explained our objectives for the trek, and they immediately came up with a suggestion of a moderate to tough trek that would last 6 nights and 7 days. We were warned that the trek would be tough in some stages. 

The itinerary of our trek would be as follows:

DAY 1: Pick-up from Srinagar by car. Drive to Naranag and start the steep ascent from Naranag to Trunkol.

DAY 2: Short trek from Trunkol to Gangbal lake overlooking the imposing Harmukh peak. Relax at Gangbal lake. Trout fishing in the lake.

DAY 3: Tough trek from Gangbal lake to Gadsar. Steep climb up the Zagibal peak (4200 meters) that provides a stunning view of the Gangbal lake and the Harmukh peak.

DAY 4: Rest in Gadsar.

DAY 5: Another tough trek from Gadsar to Vishnasar. Steep climb up Krishnasar pass at 4100 meters.

DAY 6: Trek from to Shokhdari (table top). 

DAY 7: Short trek from Shokhdari to Sonamarg. Transfer by car to Srinagar.

This itinerary matched with my expectations and we immediately decided to go ahead with this option. The tour operator would arrange for tents, guide, porters etc. All we had to do was carry a bottle of water and walk. And walk.....

I was a little concerned about my 12-year old son who was also joining me on the trek. The tour operator suggested that I add an extra riding horse to the package so that if my son feels tired, he could just hop on to the horse and we could continue with the trek. I immediately felt relieved.

Treks such as this cost around $35 to $40 per person per night. Since we were referred by a close friend, we got an excellent deal. The package that we took would normally cost in the range of Rs. 45,000 to Rs. 50,000 for the whole 7-day package for 3 persons (Me, my brother and my son). You can negotiate a better deal if there are more persons trekking. The package included:

1. One Guide
2. Two Porters
3. Six horses (5 for carrying all the luggage and 1 for my son).
4. Tent, Sleeping bags, blankets, etc.
5. All food.
6. Transport to and from Srinagar.

The trek was everything I had hoped for, and more. I shot over 1000 pictures during the 7 days. As and when I get the time, I plan to post a separate entry for each day explaining our exhilarating and exhausting journey through the great Himalayan range.


Monday, July 11, 2011

First Impressions: Kodak EasyShare Sport C123

The Kodak EasyShare Sport c123.

I had purchased this cheap little camera last week to take with me on my Kashmir trip. I got my first chance to test its waterproof capabilities when I went out for an early morning run in heavy rains. I wanted to see if it could stand the test of the heavy Goa Monsoons.


Friday, July 01, 2011

Trekking in Kashmir.

Trekking gear by North Face.
I love the idea of Trekking. Walking in the wild and enjoying nature - and most importantly, being able to photograph nature.

I have not done any serious trekking till now - but it was something that was always on my mind. I had made plans last year (even booked my tickets from Kuwait to Kashmir). But those plans were foiled when trouble erupted in the Kashmir region, and we cancelled our plans at the last minute.

This year, the situation in Kashmir is stable, so we revived our plans to go for a trek there. I will be joined by my 12-year old son, my brother, and 2 other friends. One of the friend (Richard) is a very experienced trekker - which will make our life easier in terms of planning and deciding what to take on the trek. In fact, it was Richard, who had given me very precise instructions when I did the 1-day trek to Dudhsagar.

We fly to Srinagar on 13th July, and we will be there for about 10 days. The exact trekking route is not yet decided, but we plan to do a moderate-to-strenuous trek that lasts anything between 5 to 7 days. The rest of the days would be spent relaxing and enjoying Srinagar and the surrounding areas.

I can't wait.

Friday, April 08, 2011

Perfect White Balance and Exposure with the Spyder 3 Cube.

Sypder 3 Cube

I have always relied on manual white balance whenever I wanted to get the perfect white balance under difficult lighting conditions. I explained about manual white balance here.

Also, when it comes to getting the correct exposure (where white comes out as white), a 18% grey card is the photographers choice tool for getting that perfect exposure. I explained about the 18% grey card here.

A reader of the blog made a very interesting comment on the 18% grey card post - He proposed that a better solution would be to use a card that includes White, Black and neutral Grey which a RAW converter could then use to sample all three colors and make a more accurate exposure.

I did not pay much attention to the above comment since I was quite comfortable with the Grey card solution. That is..until I came across the Spyder 3 Cube. I was actually looking for a color calibration tool on Amazon. When I selected the Spyder 3 Express (which I reviewed here), Amazon suggested that I might be interested in the Sypder Cube. After reading what it does, I thought my photography might benefit so I decided to add it to the cart.

I don't know what I was expecting. Perhaps a fancy electronic gizmo? Certainly it was more than the 1.5 inch plastic box that I received with a small steel ball on top. I paid $40 bucks for this?

Anyway, if this tiny plastic box could solve both my White balance AND Exposure problems, I wouldn't mind having spent the money. I decided to give my new toy a trial.

The basic idea of the Spyder 3 cube is very simple:
1. Place the cube in the frame where you will take the picture (you can place it on a flat surface or it can be placed on a tripod as it has a tripod thread at the bottom. You can also hand it anywhere using the supplied loop)
2. Take the RAW picture making sure that the cube is in focus.
3. Remove the cube and continue shooting in RAW.
4. If the lighting conditions change, repeat the above steps.

I decided to test it with my daughters Barbie doll.
Original image straight from the camera.
Using the RAW processing software, you will first load the image that contains the cube

In my example, it is evident that the white balance is off. The white does not look white. Correcting the white balance is as simple as clicking on the neutral Grey color. And Voila!

Correct White Balance.
Since all the 3 colors are available in the image, exposure can be easily corrected by watching the histogram as you adjust both the highlights and the shadows. The cube has a black trap in the front (a small circle that is absolute black).

White Balance & Exposure corrected.
Once you are happy with the settings, you apply them to all the other pictures that were shot under the same lighting conditions (without the cube in the picture, of course).

Final image with correct white balance & exposure.
So there you have it. 40 dollars for a tiny piece of plastic. Is it worth it? If you are a serious photographer, then the answer is yes. Since it solves 2 problems at one time. i.e. Solves the White balance problem and the Exposure problem.

NOTE: The Sypder 3 cube is suitable when you are shooting static subjects under similar lighting conditions. It is not suitable for dynamic situations where the subject is constantly moving or the lighting conditions are changing rapidly.

Wednesday, April 06, 2011

Importance of Calibrating your Monitor.


LG Flatron 24" Display Monitor.
I recently purchased a 24 inch display, the LG Flatron W248GL. The first thing I noticed is that the colors seemed a little off. I tried tweaking the settings in the menu, but just couldn't get the right feel. 

Since I plan to use the monitor for photo-editing, I was worried about color distortion. For example, I might edit the image thinking it is one color, but another person seeing the same image on another monitor might see it as a slightly different color. 

Traditionally, graphic editors and professional photographers ensure that they are always working on a calibrated display. In other words, when you see the color red on the screen, it is actually red - and not a whim of the display adjustment. Question is: How do you ensure you are working on a correctly calibrated display?

There are many color calibration tools that cost anything from a hundred dollars to several hundred dollars. A professional may use something like the Sypder 3 Studio system that costs around $500. I wanted something affordable, yet provides a high degree of color accuracy. After looking around, I chose the budget Spyder 3 Express. ($70 on Amazon).

The Spyder 3 Express is a very simple and easy-to-use color calibration tool. It is designed to calibrate only the display (the studio version allows you to calibrate your printer too). 

To calibrate your monitor:
a. Install the software that comes with the device.
b. Connect the color sensor and place it in front of the monitor.
c. Click a few buttons and wait while the device measures the color output from your monitor and then automatically creates a proper calibrated profile.

Spyder 3 Color Calibration in progress.
It takes a few minutes for the entire calibration process to complete. The program shows you the "before" and "after" pictures. Click "Finish" and the monitor automatically switches to calibrated mode.

Here's my "Before" and "After" images.

Uncalibrated Display.

Calibrated Display.
My uncalibrated display was clearly on the reddish side. You can clearly see that in the 3rd picture of the woman. Editing on this uncalibrated monitor might have given completely unnatural results in skin tones. 

So if you are a photographer, make sure you calibrate your monitor. That way, what you see is what others will see.


Saturday, April 02, 2011

Explore Maharashtra : Mahabaleshwar

Up in the Clouds: Mahabaleshwar.
It was my sons idea that we travel to Mahabaleshwar for a few days. Since we had a few days in Pune, before our return back to Kuwait, we decided to check out the place since we've never been there.

We hired a car that would take us to Mahabaleshwar, and then drive us around during our stay there. This way, we wouldn't have to worry about transport.

We started early morning at around 7 a.m. The drive is around 5 hours long - most of it in the winding and dangerous looking Sayadri mountains. We had booked a hotel online so we drove straight to the hotel.

The first thing we noticed in Mahabaleshwar is Strawberries. Lots and lots of Strawberries. You find them everywhere. Perhaps it was the season in January. The first thing we did was stop by the roadside and pick up a big box of fresh strawberries. They were the best strawberries I have ever tasted; and my daughter agreed as she gobbled them up. All the restaurants serve "Strawberry Cream" as dessert. We overloaded on it during our stay there.

Saturday, March 12, 2011

Explore Maharashtra : Bibi-Ka-Maqbara

Bibi-Ka-Maqbara, Aurangabad City, India.
If you did a double-take and wondered what the heck happened to the beautiful Taj Mahal, you wouldn't be the first.

During our trip to Aurangabad, to see the famous Ellora and Ajanta Caves, our driver suggested that we stop by and have a look at Bibi-Ka-Maqbar, a sort of a replica of the Taj Mahal. Since it was very close to where we were staying, we decided to visit it and check it out.

Here's an inscription that is posted at the gate of Bibi-Ka-Maqbar and gives a historical explanation of this monument.

Thursday, March 10, 2011

Explore Maharashtra : The Great Ajanta Caves.

First view of Ajanta Caves.
If our trip to the Ellora caves wowed us with their grandeur and intricate carvings, our trip to the Ajanta caves was even more satisfying. We managed to spend an entire day at the caves, but still felt that there was so much left to explore.

Ajanta caves are more than 2 hours drive from the city of Aurangabad. We left early in the morning and reached Ajanta at around 10 a.m. The whole site is a UNESCO world heritage site and private vehicles are not allowed near the caves. You need to take a special bus that winds through the mountains for about 10 minutes before you reach the caves.


Sunday, February 27, 2011

Explore Maharashtra : Rajgad Fort

View of Rajgad Fort from the base of the mountain.
I read about Rajgad fort, while looking for interesting places to visit during my holiday in Pune. Rajgad Fort (which means King of forts), is about 2 hours drive from Pune city (Maharashtra, India). The fort is approximately 4,250 feet above sea level.

There is no direct access to the fort except trekking trails, and the trek can only be described as strenuous. It is definitely not recommended unless you are physically fit. Also, due to the steep and dangerous trails, it is also not recommended for children.

I decided to do the challenge along with my 12-year old son Shawn. Initially, I had some misgivings taking Shawn along with me as I had read about the treacherous trail, but he insisted he is up for the challenge. I thought this would be a great opportunity for some father son bonding and I kept the option of turning back, if I felt that the trail was getting dangerous.

We started off early in the morning from our house in Kondhwa. We wanted to catch the first bus from Swaraj Gate. When we reached the bus station, I had a tough time figuring out which bus to take - and more importantly, when the bus would leave. My lack of knowledge of the local language (Marathi) was not helping me here.

I decided not to waste my time and looked around for other options. There was this guy who was inquiring about people travelling to Rajgad and I figured that he had a private vehicle. He was looking for 10 passengers to cram into his 4x4. I told him that I will pay the cost of all the 10 passengers - and we were off.


Saturday, February 26, 2011

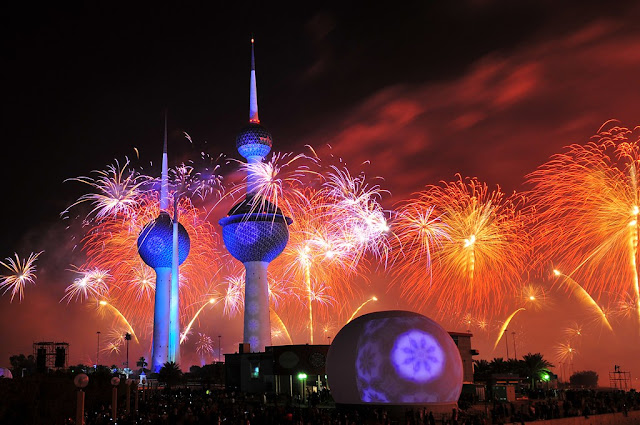
Photographing Fireworks.

Kuwait's 50th anniversary of Independence. 
Fireworks is one of the most photo-friendly activity because it is so dramatic and colorful. However, getting the right picture requires a little bit of planning, the right equipment and a little bit of luck.

Why luck?, you may ask. The reason is that fireworks generate lights of different intensity, and at random intervals. Your camera cannot do the calculations quickly enough to get the right exposure because the fireworks will be over before the camera computes the correct exposure. When shooting fireworks, almost everything has to be done manually.

Here's what you need to capture great pictures of fireworks.
   1. Tripod.
   2. Camera (preferably a dSLR) that can be set to "bulb" mode.
   3. A cable release (or a remote) that can activate the shutter and then close the shutter when you decide that the right amount of light has reached the sensor.
   4. Patience
   5. Bit of luck.

Nikon D300, f8, 5.2 seconds, ISO 200, 18mm, EV +0.5.
To get the above picture, I made sure that I found myself a nice uninterrupted view and set up my tripod 2 hours before the start of the show. During the entire period, I stood there making sure nobody else came and took my place.


Thursday, February 17, 2011

360 degree Panoramas

Image created using 360 panorama.

360 Panorama is a fun little application that I found for the iPhone. My experience with panoramas up till now has been to take a series of images and then stitch them together using various stitching programs such as Photoshop, Auto-Stitch etc. Here is an interesting example of a very large panorama that I did last year.

The problem with stitching software is that you have to load all the images into a computer and let the software do the magic of stitching. This means that any problems are identified only after the stitching, when it is too late.

What makes 360 Panorama interesting is that you do the stitching in real time. You launch the app, and a series of grids are displayed. You just move the camera in a 360 degree circle to fill up all the grids, and the app stitches the images as you move the camera. Really amazing.

Once the stitching is complete, you have various options of saving the images.

1. As a proper 360 panorama that requires you to go to the occipital website to view the panorama. Here's an example that I shot while sitting inside the Hard Rock Cafe.

2. As a flat image. This is an example of the 360 degree view as a flat image.

3. And finally, you have the option of flattening out the 360 panorama into a stereoscopic image. This is an example of the same interior shot of Hard Rock cafe flattened into a stereoscopic image.

I love the stereoscopic effect the best, because it is something totally out of the ordinary and definitely fun to experiment with.

Tuesday, January 25, 2011

Explore Maharashtra: The Great Ellora Caves

When I decided to explore a bit of Maharashtra with my family, the first thing that came to my mind was to see the famous Ellora & Ajanta caves. Though both the caves are in Aurangabad, they are actually quite far away from each other - so visiting both the caves on the same day is not possible.

We decided to explore Ellora caves on the first day. I had learned about Ellora in school - as part of our history lessons, but I only had a vague idea how it look in real life. I guess I should have just hit Google or Wikipedia before visiting the caves. In a way, I am glad that I did not do my usual research before visiting Ellora. The sheer magnificence can only be appreciated once you stand in front of the amazing structures.

Cave 29 (Hindu Cave) - Click photo to view large size.
Ellora is a set of 34 different caves. The caves are neatly numbered based on who constructed the caves. More details of the numbering and the religious influence of each cave can be found here.

Visiting all the 34 caves on foot is not practical (especially with a family). The caves are spread far apart. The easiest way to see the most important caves is to hire a rickshaw that will drive you around for a nominal price of Rs. 200 (less than $5). The rickshaw driver also acts as a guide giving you important details of each cave that you are visiting.

Inside cave 29. Click photo to view large size.
Ellora caves is a monolithic structure (carved out of a single piece of rock). Everything you see inside the caves (pillars, carvings, intricate designs) are all created by carving the rock. Imagining the amount of work that was involved simply boggles the mind. Some of the caves took hundreds of years to complete.

Wednesday, January 12, 2011

Explore Maharashtra: Introduction.

An elderly lady selling limbu sherbat on the way to Rajgad Fort.
When I went down to India for a much-needed break, I basically had 2 objectives:
1. Explore Goa on my own - preferably on a bike.
2. Travel to Pune (Maharashtra) to meetup with my family (who were flying directly from Kuwait to Pune), and spend some quality time with them.

As far as sight-seeing or photography goes, I did not have any expectations regarding Maharashtra. I find the place over-crowded, unhygienic, and communication with the people is a hassle as I don't know Marathi, and my knowledge of Hindi is very limited.

The only concrete plan I had made regarding Maharashtra was that I would try to do the "Rajgad Fort" trek - which is supposed to be a very challenging one-day trek. I also had some vague idea of spending a few days in Lonavla or a similar hill station - just to unwind myself.

Once I landed in Pune, I learned 2 things:
1. Maharashtra has massive history dating back to thousands of years. It also has an amazing natural beauty crafted by the Sayadhri mountains range.
2. For a decent amount (around Rs. 3000/- per day), you can hire a good car (such as the Toyota Innova) plus the driver - and drive anywhere you want.

I wasted no time in plotting a sight-seeing agenda that included historical places like Ajanta and Ellora Caves, challenging treks to various forts, and of course, unwinding in the beautiful hill stations of Mahabaleshwar & Lonavla.

It ended up being the most interesting time for the whole family. Long drives, interesting places and people, eating strawberries fresh from the garden, food poisoning and even a theft of my beloved Nike running shoes.

Over the coming few days, I'll try to sort out all the photos and organize them by place. Stay tuned.

Monday, January 10, 2011

Explore Goa: Old Goa

A trip to Goa would not be complete without visiting Old Goa. My original plan was to Visit Old Goa on 3rd December, which is the feast of the church and its patron saint - St. Francis Xavier. It would have been fun shooting the throngs of people who gather on the feast day, dressed in their finest clothes. Unfortunately, due to scheduling problems, I landed in Goa after the feast day.

Old Goa, also known as Velha Goa, was the former capital of the Portuguese India from the 16th to the 18th century, until it was abandoned due to plague and the capital was moved to Panaji.

Old Goa houses some very important catholic churches, the most famous being the "Basilica of Bom Jesus", which has the remains of St. Francis Xavier.

Basilica of Bom Jesus

Intricate facade of Bom Jesus Church