
What's a 18% grey card, you ask?
Our modern cameras have sophisticated meters that determine what is the "right" amount of light that should be allowed inside the camera's sensor to record an image that is neither under-exposed or over-exposed.
The exposure is determined by 2 elements:
1. Shutter speed.
2. Lens Aperture.
The shutter speed in measured in fractions of a second. Thus, if you see 250 in your view finder, it means that the camera's shutter will be opened 250th of a second (that's very fast, btw).
The lens aperture is the amount of the len's diaphragm that is opened to allow more or less light to enter the camera's chamber. Lens aperture is measured in f stops, and a higher f number indicates a smaller diapghragm (meaning less light is allowed) and a lower f number (meaning the diaphragm is opened more) will allow more light inside. I know it sounds messy - but that's a photographer's life.
So how does the camera determine how much aperture to open and what shutter speed to use?
That's where the camera meter comes in. It is designed to analyze the existing light and select an appropriate aperture/shutter combination that will result in an ideal image.
But the camera's meter is actually a very basic piece of electronics. It simply assumes that the scene being recorded is made of 18% grey and computes the aperture/shutter speed combination based on that assumption.
But why 18% grey?, you may ask...
Good question. When camera manufacturers were designing light meters, they determined that generally, an "average" scene consists of 18% grey. They arrived at this conclusion by shooting wide variety of shots under different lighting combinations.
Of course, not every scene is 18% grey - which is where the camera meter gets fooled. For example, take a picture of a person in front of a white wall, and chances are that the wall will appear grey, instead of white. Now take the same person and place him in front of a black wall and the black wall will not look black at all. In fact, it will appear greyish.
And therein lies the problem. The camera meter wants everything to be grey; but our world is much more complex than that.
Take this picture that I took of a diamond necklace. It was placed on a pristine white A4 paper.
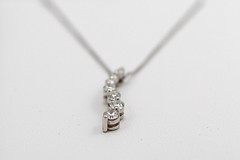
Notice how the background looks greyish. That's because the camera's meter got overwhelmed by the amount of white in the image (while it was expecting an 18% grey).
In normal shooting situations, you can use the EV compensation and rely on your camera's histogram to ensure a reasonably accurate exposure.
But when you are shooting stock-type photography (like the vegetables here), you must get the exact exposure and the whites must look like white.
To do this:
1. Arrange your camera, lights, and subject till you are satisfied with the arrangement.
2. Now place a 18% grey card in front of the subject and take a meter
reading directly off the grey card. Let's assume you are using aperture priority. In this case, the camera's meter will tell you the correct shutter speed to use. If you have seen professional phtographers shooting models, they usually first ask the model to hold a grey card in front of them. Once they are satisfied with the reading, they will remove the grey card and continue with the shooting.
3. You can now remove the grey card and set your camera to manual exposure and set the same f stop that you used in step #2, and enter the shutter speed recommended by the camera.
You can now be sure that your exposures will be perfect.
Enjoy.
4 comments:
In todays world of RAW interpreters, identifying the neutral-light portion with a grey card solves part of the problem of calibrating the dynamic range of the photographed subject. In fact software packages like Capture NX include a utility to ID black, white as well as grey points. Hence a useful tool for digital photographers is a card with these three shades simultaneously, and the adjustments made based on the three points can be applied to other pictures taken during the session. Here is an example of a triple shade card:
http://www.xrite.com/product_overview.aspx?ID=942
Great new lessons on your blog!
Thanks :)!
I meter off the palm of my hand, and it works pretty nice. Great article though :-)
oh thank goodness - finally it makes sense to me - on all the sites i have missed the link between metering from the grey card and then switching to manual and plugging in the exposure suggested from the grey card to get an accurate picture of reality - thank you!
Post a Comment