With my recent obsession with macro and stock-type photography, I found it a necessity to get hold of a 18% grey card.
What's a 18% grey card, you ask?
Our modern cameras have sophisticated meters that determine what is the "right" amount of light that should be allowed inside the camera's sensor to record an image that is neither under-exposed or over-exposed.
The exposure is determined by 2 elements:
1. Shutter speed.
2. Lens Aperture.
The shutter speed in measured in fractions of a second. Thus, if you see 250 in your view finder, it means that the camera's shutter will be opened 250th of a second (that's very fast, btw).
The lens aperture is the amount of the len's diaphragm that is opened to allow more or less light to enter the camera's chamber. Lens aperture is measured in f stops, and a higher f number indicates a smaller diapghragm (meaning less light is allowed) and a lower f number (meaning the diaphragm is opened more) will allow more light inside. I know it sounds messy - but that's a photographer's life.
So how does the camera determine how much aperture to open and what shutter speed to use?
That's where the camera meter comes in. It is designed to analyze the existing light and select an appropriate aperture/shutter combination that will result in an ideal image.
But the camera's meter is actually a very basic piece of electronics. It simply assumes that the scene being recorded is made of 18% grey and computes the aperture/shutter speed combination based on that assumption.
But why 18% grey?, you may ask...
Good question. When camera manufacturers were designing light meters, they determined that generally, an "average" scene consists of 18% grey. They arrived at this conclusion by shooting wide variety of shots under different lighting combinations.
Of course, not every scene is 18% grey - which is where the camera meter gets fooled. For example, take a picture of a person in front of a white wall, and chances are that the wall will appear grey, instead of white. Now take the same person and place him in front of a black wall and the black wall will not look black at all. In fact, it will appear greyish.
And therein lies the problem. The camera meter wants everything to be grey; but our world is much more complex than that.
Take this picture that I took of a diamond necklace. It was placed on a pristine white A4 paper.
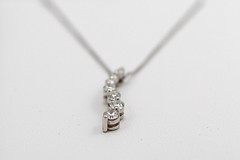
Notice how the background looks greyish. That's because the camera's meter got overwhelmed by the amount of white in the image (while it was expecting an 18% grey).
In normal shooting situations, you can use the EV compensation and rely on your camera's histogram to ensure a reasonably accurate exposure.
But when you are shooting stock-type photography (like the vegetables here), you must get the exact exposure and the whites must look like white.
To do this:
1. Arrange your camera, lights, and subject till you are satisfied with the arrangement.
2. Now place a 18% grey card in front of the subject and take a meter
reading directly off the grey card. Let's assume you are using aperture priority. In this case, the camera's meter will tell you the correct shutter speed to use. If you have seen professional phtographers shooting models, they usually first ask the model to hold a grey card in front of them. Once they are satisfied with the reading, they will remove the grey card and continue with the shooting.
3. You can now remove the grey card and set your camera to manual exposure and set the same f stop that you used in step #2, and enter the shutter speed recommended by the camera.
You can now be sure that your exposures will be perfect.
Enjoy.
Photography is one of my passions (fitness being the other). This blog is focused on anything and everything to do with photography.
Thursday, April 24, 2008
Friday, April 18, 2008
Getting the perfect "White Balance"
At one point or the other, all of us have come across a situation where our photo just does not feel right. The whites in the image look more like sickly yellow, or magenta or some other color; other than white.
One of the common reasons for this is that your camera was unable to correctly estimate the color temperature. Back in the old days of film, there was no concept of white balance. Professional photographers would load their cameras with specific temperature balanced films. For example, if the photographer knew in advance that his shooting would be done under tungsten lights, then he would load a tungsten balanced film. Similarly if the shooting was done in daylight, then he would load a daylight balanced film. You can understand how complicated this process would be.
Luckily for us, our digital cameras are not film-based but sensor based; and the software in the camera can automatically interpret the data coming from the sensor and correct it to match the lighting conditions. The trick is to figure out the correct lighting conditions.
Digital cameras, to a very large extent, are very good at determining the lighting conditions at the time of taking the picture. They measure the color temperature and the software manipulates the image to match the color temperature.
But they do get confused now and then. This mostly happens when shooting under mixed lighting conditions (a room lit simultaneously by light bulbs and flourescent lights for example) or where the light is changing rapidly (theatre/concerts etc.).
One of the best ways of overcoming white balance confusion is to shoot in RAW and then determine the correct white balance during post processing.
If RAW shooting is not feasible (or you don't want to spend time in post processing), then the next best option is to use a preset white balance. Almost all advanced digital cameras allow you to "compute" an accurate white balance.
To get a proper white balance:
1. Set your camera to measure the white balance. On my Nikon D200, I turn the white balance dial till it says "PRE". On my Casio P&S, the option is available in the menu. Each camera will have it's own way of measuring the white balance.
2. Put a white A4 paper in front of the subject. If you are shooting a person, you can make the person hold the paper.
3. Focus on the paper so that the camera can see only the paper and nothing else. You may have to move in a little closer or zoom in.
4. Click the shutter button and wait for your camera to measure the balance and set the temperature.
5. Now you can start taking pictures with the knowledge that the whites in the pictures will actually look white.
6. Do remember to reset the white balance once you are finished (or if the lighting conditions change) otherwise your camera will be stuck on the last known white balance and subsequent pictures will not come out properly.
Some people deliberately fool the white balance on the camera to get artistic results. But that's another story.
Saturday, April 12, 2008
Getting better at this.
After nearly 1 week of experimenting with various lights, white balance, exposure and focusing, I've finally figured out the whole process of macro photography.
I still need a few more things to make an ultimate macro setup.
1. An 18% grey card. Something like this. Having a proper grey card will allow me to do manual exposure; rather than playing with EV shift and histogram checking after each shot. I have to make a trip to the local photo shop to see if they have something similar. Ordering from Amazon will take at least 2 weeks.
2. Daylight balanced light-bulbs. Also known as full-spectrum light bulbs or 5000k (Kelvin) bulbs, these bulbs emit light at 5000k temperature; the same temperature used by flash lights and closely resemble natural light. Having daylight balanced lights would mean I could simply dial in the white balance to 5000k and I would not have to worry about color cast or white balance correction in post processing. I am not sure if such bulbs are available in Kuwait. I checked all the usual suspects (photo shops, sultan center etc.), but haven't found exactly what I am looking for.
Once I have all the necessary equipment, I'll write a detailed review of the whole process of macro-photography of still-objects.
Wednesday, April 09, 2008
Playing with Macro Lens
After the initial fondling, it was time to start playing with the 105mm macro lens. There are a couple of things worth noting about macro lenses - things that I realized only after trying to shoot with this lens.
1. Variable aperture. This was a shock to me. All my fast lenses (read: fixed aperture lenses) stay fast regardless of zoom or focus distance. So when I open my 80-200 f2.8 wide to it's max aperture of 2.8, it remains 2.8 unless I explicity change it. Not so with this baby. The max aperture is determined by "focus distance", so the closer you focus, the harder it is to achieve the stated f2.8 aperture. It's really a sort of a variable aperture lens.
2. Very painstaking to focus. This is a AF-S (silent wave motor) lens. All my previous experiences with AF-S lenses is that they focus silently and very very fast. This is not true for macro lenses. Because it's focusing range is so great, I found that the lens was hunting like crazy (very silently, of course). There is a focus-limit selector that you can set if you know the focus range is more than 0.5 meters (this limits the focusing from 0.5 meters to infinity but prevents macro focusing). The focus-limit switch speeds up the focusing a bit; but don't expect to whip up this lens and take the "candid moment" shot.
3. Shallow DOF. My 30mm f1.4 has a very shallow depth-of-field but then again, it's not a macro lens and cannot focus very close. This little baby has such a shallow DOF that even a tiny change in distance from camera to subject will throw the focus off. Observe the DOF in this tiny bottle. The DOF is limited only to a few centimeters.
Of course, none of these are limitations. They are basically features attributed to macro lenses. You just have to get adjusted to it.
This is a pretty fanstastic review of this lens.
Monday, April 07, 2008
Micro-Nikkor 105mm VR - First Impression
When I get hold of a new lens, it is customary for me to plug it into my camera, and take a quick shot of my daughter. That is exactly what I did when I got my new toy, the 105mm Micro-Nikkor.
It is also customary for me to take my first shot with the most extreme settings. This usually means shooting wide open (f2.8 in this case), and since this is my first VR (vibration reduction) lens, I wanted to see if the VR really works. This means shooting at speeds which usually result in blurry images.
This image is taken using Aperture priority, wide open at f3.2 (I will explain why it couldn't be f2.8 in my next post), and at shutter speed of 1/15th of a second. In order to achieve this modest shutter speed, I had to crank up the ISO to 800.
Conclusions: The VR works, and I can safely take hand-held shots at low shutter speeds (as long as the subject is not moving).
Keep in mind that this is a macro lens so taking picture of my daughter is not the most ideal way to test this lens. I will now spend some quality time with a lightbox and some tiny objects trying some real macro shots.
Subscribe to:
Posts (Atom)