We are surrounded by product photos everwhere we go. Glossy advertisements hawk all kinds of products accompanied by beautiful pictures. You really need a studio environment for product photography. The key is to control the amount of light so that it is evenly spread - something you cannot do with normal lighting or a normal flash.
However, you can achieve reasonably good results at home with some creativity, and optionally - some good flash units.
I own a Nikon D70 - which is blessed by Nikon, with their CLS (Creative Lighting System). This amazingly flexible system allows you to control multiple flashes in wireless mode - and control the flash output of each flash unit independently. I have 2 SB-600 flash units, and 1 SB-800. The SB-800 acts as a "master" flash and can wirelessly control the other 2 flashes. You can find more information about the CLS system here.
I decided to use this setup to do some product photography. The first requirement for this type of work is a "light box". If you have the time and effort, you can create your own light box. I purchased mine from a local camera store. Depending on the type of products you want to photograph, you can purchase different sizes. The one used in this project is the smallest available - and is suitable for photographing small objects like mobile phones, small cameras, toys etc. The light box comes with different backgrounds that you can use depending on the type of product you are shooting. I use white background for dark objects, and vice-versa.
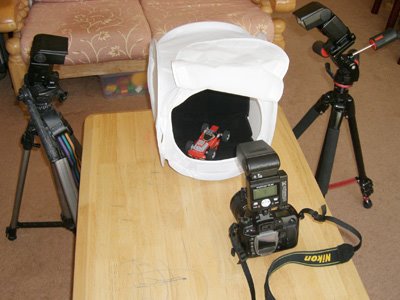 The light box was setup on a table, with the 2 SB-600 units on either side mounted on tripod stands. The camera was mounted with the SB-800 unit and set to "master mode". After setting up the appropriate background cloth, I place the product inside the lightbox, and then close it completely. The lightbox comes with a small slit in front to push the lens inside. Takes a little bit of trial and error to setup the correct flash output to get decent pictures. That's the great thing about digital photography. I cannot imagine doing something like this with film-based cameras!
Of course, it is not mandatory to have flash units. You can achieve similar results by placing the light box in bright (and direct) sunlight. It will be hot work - and not as flexible as using the system shown above, but the results will certainly be good enough that people will ask you "How did you do that?"