
I was recently asked to post my views on HDR photography. These days, every other picture posted on flickr (www.flickr.com) seems to be HDR rendered image. There are plenty of tutorials on HDR. Just type "HDR Photo" in Google, and you should get plenty of hits.
I decided to make my own HDR tutorial which explains how I do my HDR images.
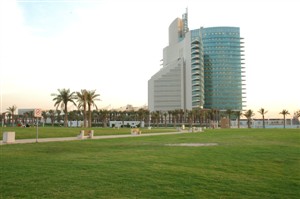
I am quite new to HDR but immensly enjoy the process of generating HDR images. In this tutorial, I will use the following image as an example. This is the KPC (Kuwait Petroleum Company) headquarters just near the Shuwaikh Port.
So, what exactly is HDR ?
HDR stands for High-Dynamic Range. The objective of HDR is to present an image similar to what our eye would have seen. You must remember that our eye is a very, very powerful lens that is able to resolve incredible amount of detail. It can distinguish between very bright and very dark objects. The same is not true of cameras (either digital or film). Cameras have a very limited dynamic range. This is especially true for digital cameras which have a very narrow latitude. This means you need to get your lighting and metering just right when shooting digital, otherwise you will have blown-out highlights, or dark areas in your photos.
So what happens when you come across a beautiful scene that is very contrasty (i.e. it has some areas that are very bright, and some areas very dark) ?. You can choose to do any of the 3.
1. Show the details in the shadows at the cost of blown-out highlights. In this picture, the grass and the building is nicely exposed, but the sky is blown out and appears as a white blob. Not a very pretty picture.

2. Show the details in the highlight at the cost of making details in the shadow very dark. Here we have a very dramatic sky, but we can no longer see the details of the grass and the building.
3. The third option is the best. Get a cool can of Pepsi or Coke or any of your favourite beverage and wait for the lighting to change so that it is evenly spread out. In a country like Kuwait, this may mean waiting for a few months, and you can only drink so much Pepsi.
Till very recently, there was'nt anything you could do about it. Perhaps if you were a good photoshopper, you could take the above 2 images, merge them as separate layers, and blend them till sufficient details are exposed in the image. That all changed with Photoshop CS2. CS2 now has a new tool called "Merge to HDR" which takes 2 or more images and automatically blends them to create a balanced exposure.
But what really kicked off the HDR revolution, in my opionion, is a neat program called Potomatix (www.hdrsoft.com). This program introduces a concept called "tone mapping", which really brings out the details from multiple exposures. Some users manipulate tone mapping to a point that the photograph looks more like a painting. This has resulted in lot of criticism for HDR, with some people claiming that HDR is not real photography. Time will tell how HDR will be used as a photographic tool. I personally feel that HDR will allow lots of people to capture images, especially landscapes and architechture, that were just not possible with normal photographic methods.
So let's get started with the tutorial. You will need:
- A digital camera (I used a Nikon D70 in this example)
- A solid tripod (I purchased mine for KD 35/- from Photo World, near Jashanmal). A solid tripod is the key element of HDR photography.
- Photomatix software (download a trial version from www.hdrsoft.com)
STEP 1: GETTING MULTIPLE EXPOSURES
The first step in getting a HDR image is to create multiple images of the same scene, but at DIFFERENT EXPOSURES. This is best achieved using the auto-bracketing function of your camera. Most new digital cameras allow you to shoot 3 images in auto-bracketing mode. Even my small Canon Powershot S50 point & shoot camera has the auto-bracketing feature. Check your camera for this feature and learn how to use it. You should be able to take 3 pictures as follows:
- Picture 1 as metered by the camera
- Picture 2 at -2 stops of the metered value
- Picture 3 at +2 stops of the metered value
Why 2 stops difference ?. Most cameras allow only 3 shots in auto-bracketing mode, and 2 stops (plus or minus) is the maximum deviation from the metered value. Remember we want maximum dynamic range so we go for the maximum deviation available in the camera.
If you don't have auto-bracketing feature, don't despair. As long as you have a camera that allows you to control both the shutter speed and the aperture (called the manual mode), you can still take HDR images. You just have to do this manually. First set your camera to aperture priority and meter the scene. For example, if you set the aperture to F11 and the camera shows the shutter speed to be 1/125 of a second, then you can take the 3 pictures as follows:
- Picture 1 at aperture F11, shutter speed 1/30 of a second (2 stops below 1/125)
- Picture 2 at aperture F11, shutter speed 1/125 of a second (ideal metered value)
- Picture 3 at aperture F11, shutter speed 1/500 of a second (2 stops above 1/125)
Notice that the aperture is kept constant, because aperture controls the depth of field, and we don't want the depth of field to change between the shots.
You can take more than 3 pictures, and some people choose to do so, even if they have the auto-bracketing feature. For example, if you wanted to take 5 exposures at 1 stop interval in the above example, then you could set the aperture to F11, and take 5 exposures at the following shutter speeds (1/30, 1/60, 1/125, 1/250, 1/500).
When taking the different shots, DO NOT MOVE YOUR CAMERA!!!. For this reason, a solid tripod is a must. Even a small shake may cause mis-alignment. Both Photomatix and Photoshop have a feature that will attempt to align the different exposures, but it is best not to rely on it.
It is recommended that you choose a scene that does not have moving objects.
In this tutorial, I have used the following 3 images, taken in Auto-Bracketing mode with 2 stop interval.

The first image was taken as metered by the camera. By applying some curves, this could be an interesting image by itself. However, we are not interested in making interesting images. We want to make an image that makes people go "Wow!. How did you do that?".
The other 2 images were taken at -2EV and +2EV, as shown in the the first part of the tutorial. The image at -2EV shows the sky in dramatic color, but the grass and image are dark. The image at +2EV shows the grass and building in nice colors, but washes out the sky.
I set the camera on the tripod and used the remote control unit to fire the images quickly one after another.
Okay, Now that we have the 3 images to work with, let see how we can generate HDR image.
STEP 2: MERGING THE IMAGES IN PHOTOMATIX
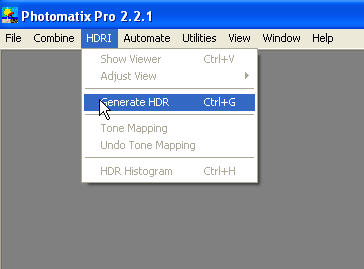
Transfer the images to your computer and load photomatix. Choose "HDRI", then select "Generate HDR" as shown in the screen above:
You will now be prompted for the files.

Load the 3 images by clicking on the "Browse" button and locate the 3 files from your hard drive. Once the images are selected, click OK to proceed to the next step.
Your screen should now show the following:
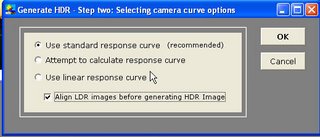
Choose the "Use Standard response curve" option, and click on the "Align LDR images" as shown in the screen above. If you are very sure that there is no mis-alignment in your images, you can de-select the "Align LDR images" option which will speed up the process.
The system will now compute the HDR image, and show a preview of the image as shown in the screen shot below:
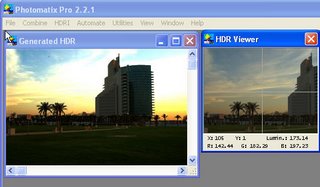
Well, that does'nt look like something that will make people go "Wow!". But don't worry. This is because you are viewing a HDR image on a screen that is not capable of displaying the huge dynamic range that is available in this image The quick preview on the right side approximates what the final image will look like. Move your mouse around the image to get a feel of the expected result. You can now save the HDR image if you wish.
Next, we need to now scale the HDR image back into a normal image using the Tone mapping tool of photomatix. To do this, select "HDRI", and then choose "Tone Mapping" from the menu.
Your screen should now look like this:
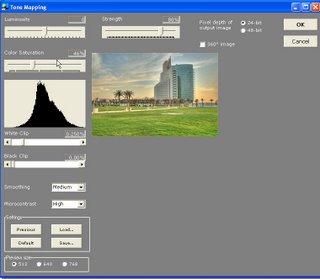
Wow, look at that histogram. Is'nt that a pretty looking histogram ?. The resulting image is a tone mapped image that has taken the correct values from all the 3 files to represent a final image which is approximately what your amazing and powerful eyes would have seen.
You can now play with the various controls to achieve the desired result. Increase or decrease the luminosity slider to make the image darker or brighter. The color saturation slider similarly increases or decreases the color saturation in the image. You can similarly play with the other controls. I usually set the microcontrast to Medium, however that is purely a personal preference. You can leave it at the default of "High"
The important control here is the "pixel depth of output image". By default it is 24 (which means it is a 8-bit image). If you want to have a 16-bit image, choose 48. 16-bit images can only be saved as TIFF (.tif) files, while 8-bit images can be saved as JPEG files or TIFF files or Windows BMP files.
That's all there is to it. Click on "OK" and then Save the file to your hard disk. Share it on flickr and have fun.
I hope you found this tutorial useful. I enjoyed preparing it.
See some of my other HDR photos at

