Ever since we returned back to Kuwait (after our trip to Toronto in January), I've been having a tough time to get back into photography. The first few weeks were immersed in work and a long business trip to Saudi Arabia. But even after returning back to a normal schedule, I just can't seem to get the inspiration to go out and do some shooting.
This picture of the KPC building was the only picture I have taken during the past 2 months!!
The weather is really great these days (well, most of the time), and it's spring time with lots of flowers springing up everywhere. I need something to make me get out of the house. Perhaps a cool beer, which I miss from my Canada trip?
I did manage to do 2 events. The first was the communion of my niece in India. I flew there just for the occasion, and managed to get some great pictures of the whole ceremony. I am currently doing a project to get these pictures printed through www.blurb.com. I will post about this experience very soon.
The second event was a birthday party that I did last week for the daughter of a very close friend. The D200 paired with the 17-55 f2.8 and the SB-800 speed-light was a fantastic combination. I wish I could post some of the pictures, but I would feel uncomfortable posting pictures of friends without their consent.
Wednesday, March 19, 2008


Tuesday, January 22, 2008
Slideshows


Slideshows are a pretty neat way of showcasing your photographs, and there are plenty of free tools on the net that can do this for you. I came across a friend's post showcasing a new tool from slide.com that is dead-easy to use; especially if you are using a photo-sharing site like flickr. I just entered my flickr name and it pulled out all my sets. As a test, I just selected my recently shot "Toronto" set, and I was done. It spewed out some code that I just paste into my blog, and the slide show is up and running.
Very cool.
Wednesday, January 02, 2008
The Amazing CN Tower
We got up today to a bright and clear day after 2 days of heavy snow and dull weather. I thought this would be a great opportunity to visit the Toronto CN tower - one of the tallest structures in the world. The clear weather meant I would have some good photo opportunities.
We reached the tower at around 11:00 AM. It was indeed a great day to visit the place as the view was simply stunning. The only problem was that the temperature was -9 degrees and we literally turned to ice as we walked up to the tower to purchase our tickets.
Due to the cold weather, there were not much people around, so we managed to get an elevator fairly quickly - and very soon, we were on top of Toronto. I was not interested in anything except clicking away at the amazing view.
The thing on my mind was - if this is such a great view during daytime, how good will it be at night? and more importantly, how the heck can I keep the kids for 6 whole hours on top of the tower so that I could get some night-time shots of Toronto city?
I took the family to lunch in the Tower restaurant where I sipped on a cool cocktail while enjoying the panaromic view of Toronto City. Then I got the kids involved in some trick photography one guy was doing by taking their pictures on a green background and then photoshopping it to make the kids look as though they were climbing the CN Tower like King Kong.
Finally, it was sunset and the city started turning on the lights. As you can see from the picture, the view was indeed stunning.

We reached the tower at around 11:00 AM. It was indeed a great day to visit the place as the view was simply stunning. The only problem was that the temperature was -9 degrees and we literally turned to ice as we walked up to the tower to purchase our tickets.
Due to the cold weather, there were not much people around, so we managed to get an elevator fairly quickly - and very soon, we were on top of Toronto. I was not interested in anything except clicking away at the amazing view.
The thing on my mind was - if this is such a great view during daytime, how good will it be at night? and more importantly, how the heck can I keep the kids for 6 whole hours on top of the tower so that I could get some night-time shots of Toronto city?
I took the family to lunch in the Tower restaurant where I sipped on a cool cocktail while enjoying the panaromic view of Toronto City. Then I got the kids involved in some trick photography one guy was doing by taking their pictures on a green background and then photoshopping it to make the kids look as though they were climbing the CN Tower like King Kong.
Finally, it was sunset and the city started turning on the lights. As you can see from the picture, the view was indeed stunning.
Monday, December 31, 2007
A walk on the wild side.
I decided to take the family to the Toronto Zoo. Probably not a very good idea to visit a zoo during a time where the outside temperature is zero degrees.
It was freezing, with snow everywhere. Most of the animals were either hibernating or hiding in their warm homes. But there was still plenty to see and do.
The kids had a good time though the little one got tired with all the walking and the freezing cold; and I ended up carrying her most of the time.
The high point for me was this lion exhibit. It's designed in such a way that you get to see the lion face to face with only a wall separating the lion and a tasty snack. This particular lioness was looking the other way and I waited around 15 minutes near the exhibit hoping he will turn his face. Finally he did, and I managed to to get this shot.
Here are some more pictures that I took at the zoo.

It was freezing, with snow everywhere. Most of the animals were either hibernating or hiding in their warm homes. But there was still plenty to see and do.
The kids had a good time though the little one got tired with all the walking and the freezing cold; and I ended up carrying her most of the time.
The high point for me was this lion exhibit. It's designed in such a way that you get to see the lion face to face with only a wall separating the lion and a tasty snack. This particular lioness was looking the other way and I waited around 15 minutes near the exhibit hoping he will turn his face. Finally he did, and I managed to to get this shot.
Here are some more pictures that I took at the zoo.
Zero Degrees
We travelled to Toronto, Canada - and my kids went berserk with all the snow around. Erika (my 4-year old daughter) had never seen real snow before but you wouldn't know that seeing her embrace it like a long lost friend.
I took them near the Toronto harbor area which has an outdoor skating rink. The temperature was zero degrees celsius, which for everyone (except for me and my wife) seemed to be nice and balmy.
I rented out some skates for both the kids - Shawn can do some basic skating (He learned at the Kuwait skating rink), but it was first time for Erika.
As the sun went down, I had a very hard time convincing Erika to get out of the rink.

I took them near the Toronto harbor area which has an outdoor skating rink. The temperature was zero degrees celsius, which for everyone (except for me and my wife) seemed to be nice and balmy.
I rented out some skates for both the kids - Shawn can do some basic skating (He learned at the Kuwait skating rink), but it was first time for Erika.
As the sun went down, I had a very hard time convincing Erika to get out of the rink.
Sunday, December 23, 2007
Merry Christmas
Last night, I happened to be at the Catholic church just as they were unveiling this year's christmas crib. Luckily, I had my camera bag in the car.
When the organizers saw my camera gear, they immediately requested that I do an "official" photograph of their creation. This meant that I needed a tripod, which I always keep in the car.
The funny thing is that everyone who wanted to take a picture with their camera phone or point & shoot gave me a wide and respectful berth; assuming I am some official photographer - which, in this case, I guess I was.
So I ended up doing this "official" photo of the 2007 christmas crib. I also ended up taking some pictures of the organizing committee.
Merry Christmas & a Happy New Year 2008.

When the organizers saw my camera gear, they immediately requested that I do an "official" photograph of their creation. This meant that I needed a tripod, which I always keep in the car.
The funny thing is that everyone who wanted to take a picture with their camera phone or point & shoot gave me a wide and respectful berth; assuming I am some official photographer - which, in this case, I guess I was.
So I ended up doing this "official" photo of the 2007 christmas crib. I also ended up taking some pictures of the organizing committee.
Merry Christmas & a Happy New Year 2008.
Wednesday, December 19, 2007
Nikkor 17-55 f2.8, First test shots.
I got my first chance today to try out the new 17-55 lens. It looks and feels great and allows me to take pictures that were not possible before.
This picture of a local mall is taken wide open at 17mm at f4 and ISO 640 giving me sufficient hand-held shutter speed of 1/50th of a second.
What is more interesting for me is that at this ultra-wide angle, the distortion (though it exists) is minimal and well-controlled.
This is going to be the lens that stays on my camera body 95% of the time from now on.

This picture of a local mall is taken wide open at 17mm at f4 and ISO 640 giving me sufficient hand-held shutter speed of 1/50th of a second.
What is more interesting for me is that at this ultra-wide angle, the distortion (though it exists) is minimal and well-controlled.
This is going to be the lens that stays on my camera body 95% of the time from now on.
Tuesday, December 18, 2007
The beast has arrived.
I have been toying with the idea of purchasing this lens for a long time, but the price was just beyond my reach. I just could not justify paying $1400 for a lens with a range of 17-55mm, when my $300 18-70mm DX lens was giving great results, plus extra range upto 70mm.
But what sets this lens apart from the 18-70mm lens is that this is a fixed focal lens - just like my 80-200 f2.8. It has a constant maximum aperture of f2.8, which means that regardless of what focal length I choose, the widest aperture is guaranteed to remain at f2.8. This is great for low light photography.
I was finally convinced to pick this thing when I saw Amazon offering it for $1200. Though not cheap, I decided to throw caution to the wind and closed my eyes and hit the order button.
The first impression I got when I held this lens in my hand is that I better hit the gym. The thing is built like a tank and carrying this thing around for a long time is definitely going to test my frail muscles.
I have not yet got a chance to test the image quality of this lens, but I am looking forward to doing so in the next few days.

But what sets this lens apart from the 18-70mm lens is that this is a fixed focal lens - just like my 80-200 f2.8. It has a constant maximum aperture of f2.8, which means that regardless of what focal length I choose, the widest aperture is guaranteed to remain at f2.8. This is great for low light photography.
I was finally convinced to pick this thing when I saw Amazon offering it for $1200. Though not cheap, I decided to throw caution to the wind and closed my eyes and hit the order button.
The first impression I got when I held this lens in my hand is that I better hit the gym. The thing is built like a tank and carrying this thing around for a long time is definitely going to test my frail muscles.
I have not yet got a chance to test the image quality of this lens, but I am looking forward to doing so in the next few days.
Friday, December 07, 2007
Farewell to a trusty tool.
I just sold this lens, as I ordered the Nikkor 17-55 f2.8 lens, and expecting to receive it in the next few days.
The 18-70 served me well during the 2 year that I owned it - first on my D70, and then for the past few months, on the D200. It is fast, wide, light in weight and offers a good zoom range that is ideal while travelling, or general walkabouts.
As of now, more than 90% of the work posted on my flickr account is taken with this lens. I had come to learn it's quirks and how to work around them. For e.g., it distorts heavily at the wide angle. In this photo, the nearest lamp post looks like it is curved instead of appearing straight. Nothing much can be done about it because that the nature of lower-end glass.
The 17-55, on the other hand, is a professional grade lens, and hence distortion should be minimal. I say "should", because I have not yet tried this lens, nor held it in my hands. I have simply ordered it based on the recommendations of fellow photographers.
Some people asked me why I would give up the advantage of the wider zoom range (18-70), and pay 4 times the price for a lesser zoom range (17-55). Well, it's true that I will be crippled because I do not have anything from 55mm to 80mm (My 80-200 f2.8 does duties from 80 to 200mm).
However, it's not just about zoom range. For e.g., for half the price, I could have picked up the 18-200 VR wonder lens. But what sets the 17-55 apart from all these amateur lenses is the constant f2.8 aperture for the entire zoom range. That means, whether I set the lens at 17mm or 55mm, I can keep the aperture at 2.8, which in turn, means I can shoot great photos in very low-light conditions.
At least, that's the theory.
And my 1300 dollars are riding on that theory.

The 18-70 served me well during the 2 year that I owned it - first on my D70, and then for the past few months, on the D200. It is fast, wide, light in weight and offers a good zoom range that is ideal while travelling, or general walkabouts.
As of now, more than 90% of the work posted on my flickr account is taken with this lens. I had come to learn it's quirks and how to work around them. For e.g., it distorts heavily at the wide angle. In this photo, the nearest lamp post looks like it is curved instead of appearing straight. Nothing much can be done about it because that the nature of lower-end glass.
The 17-55, on the other hand, is a professional grade lens, and hence distortion should be minimal. I say "should", because I have not yet tried this lens, nor held it in my hands. I have simply ordered it based on the recommendations of fellow photographers.
Some people asked me why I would give up the advantage of the wider zoom range (18-70), and pay 4 times the price for a lesser zoom range (17-55). Well, it's true that I will be crippled because I do not have anything from 55mm to 80mm (My 80-200 f2.8 does duties from 80 to 200mm).
However, it's not just about zoom range. For e.g., for half the price, I could have picked up the 18-200 VR wonder lens. But what sets the 17-55 apart from all these amateur lenses is the constant f2.8 aperture for the entire zoom range. That means, whether I set the lens at 17mm or 55mm, I can keep the aperture at 2.8, which in turn, means I can shoot great photos in very low-light conditions.
At least, that's the theory.
And my 1300 dollars are riding on that theory.
Tuesday, November 27, 2007
Perfect Timing.
Even though this picture took some planning and patience, in the end, it was a result of many factors coming together to result in one of my best night-time exposures.
1. My tripod was acting a little wobbly, so just before taking this shot, I visited the shop from where I purchased it, and the wizard there magically made it into a rock-solid tripod.
2. I had observed that it was a full moon the night before so I knew it would be almost full moon on this night - and the moon would rise at just the right time (around 7 p.m.).
3. The weather has been absolutely fantastic the previous night when I took this picture, and it appeared that the same would repeat again.
I was technically sick but I was not letting an opportunity like this pass me by. I packed my gear and headed towards the KPC building which provides one of the better viewpoints of Kuwait City. I arrived at the exact moment that the moon poked it's head over the buildings and I started clicking away - varying my shutter speed between 10 seconds to 30 seconds (maximum possible on my dSLR, without switching to bulb mode).
My only problem was the strong breeze that was whipping around. Even with the solid tripod, I was worried it would cause blur in the pictures. Luckily, most turned out pretty well.
Here are the 3 that seemed to be the better of the lot.

1. My tripod was acting a little wobbly, so just before taking this shot, I visited the shop from where I purchased it, and the wizard there magically made it into a rock-solid tripod.
2. I had observed that it was a full moon the night before so I knew it would be almost full moon on this night - and the moon would rise at just the right time (around 7 p.m.).
3. The weather has been absolutely fantastic the previous night when I took this picture, and it appeared that the same would repeat again.
I was technically sick but I was not letting an opportunity like this pass me by. I packed my gear and headed towards the KPC building which provides one of the better viewpoints of Kuwait City. I arrived at the exact moment that the moon poked it's head over the buildings and I started clicking away - varying my shutter speed between 10 seconds to 30 seconds (maximum possible on my dSLR, without switching to bulb mode).
My only problem was the strong breeze that was whipping around. Even with the solid tripod, I was worried it would cause blur in the pictures. Luckily, most turned out pretty well.
Here are the 3 that seemed to be the better of the lot.
Sunday, November 25, 2007
Museums in Kuwait
A local advertising company found my work through Flickr, and approached me to do a series of photos on various places of interest in Kuwait.
I jumped at the opportunity because, for some reason or another, I had never visited most of these places in my 15 years in Kuwait. I was provided a list of places to photograph. Some of them were the usual suspects like Kuwait Towers, Liberation Towers, Scientific Center etc., for which I already had some some good pictures. The second list was exclusively for museums, which I had never visited.
So during the weekend, I packed my photo gear and headed out with my son in tow (he loves to accompany me on my photo shoots). We first reached the Memorial museum (next to the KPC building in Shuwaikh). The place looked deserted and closed. After poking around the place a bit, we found one lady who assured us the museum was indeed open - and after paying the KD 1 entrance fee, opened the museum just for us!. The museum was very interesting with a sort of an automated guided tour describing the whole Iraq invasion / atrocities commited / liberation etc. through an audio commentary accompanied by mock setups.
This pretty much described the reception that we got in the other museums that we visited (Al Hashemi II marine museum, Tareq Rajab Museum, and the biggest of them all - the National Museum). In all the places, it looked like we were the only people who visited the museum that day, which is a shame really because there is some really fascinating stuff there.
I will visit all these museums once again - but this time, without the camera equipment so that I can appreciate them better.

I jumped at the opportunity because, for some reason or another, I had never visited most of these places in my 15 years in Kuwait. I was provided a list of places to photograph. Some of them were the usual suspects like Kuwait Towers, Liberation Towers, Scientific Center etc., for which I already had some some good pictures. The second list was exclusively for museums, which I had never visited.
So during the weekend, I packed my photo gear and headed out with my son in tow (he loves to accompany me on my photo shoots). We first reached the Memorial museum (next to the KPC building in Shuwaikh). The place looked deserted and closed. After poking around the place a bit, we found one lady who assured us the museum was indeed open - and after paying the KD 1 entrance fee, opened the museum just for us!. The museum was very interesting with a sort of an automated guided tour describing the whole Iraq invasion / atrocities commited / liberation etc. through an audio commentary accompanied by mock setups.
This pretty much described the reception that we got in the other museums that we visited (Al Hashemi II marine museum, Tareq Rajab Museum, and the biggest of them all - the National Museum). In all the places, it looked like we were the only people who visited the museum that day, which is a shame really because there is some really fascinating stuff there.
I will visit all these museums once again - but this time, without the camera equipment so that I can appreciate them better.
Wednesday, November 21, 2007
It's all about Perspective
We've all seen pictures like this. They suffer from a phenomenon called perspective distortion. This happens when you take a camera and point it in such a way that the lens is not parallel with the ground. For e.g., when we find a building that is high, our tendency is to point the camera upwards. This distorts the image and it feels as though the building is going to fall down.
Perspective distortion happens because the lens is not able to resolve straight lines as straight due to the angle at which the lens is positioned. For architechture photography, this type of distortion is not acceptable, and photographers use specialized lenses called perspective correction lenses.
Since a normal user will not use PC lenses, Here are some ideas to avoid perspective distortion in your pictures.
1. Instead of shooting from up close, try to find a location further from the subject and use a telephoto lens to take the picture.
2. Shoot with perspective distortion and then edit in Photoshop. PS has a feature that allows you to do perspective correction.
In this picture, you can clearly see the perspective distortion as the tower of the mosque seems to be falling down - even though the horizon line is straight. But in this case, it's okay. I actually like the effect.
Here are some more pictures I took from the same vantage point that exhibit perspective distortion.

Perspective distortion happens because the lens is not able to resolve straight lines as straight due to the angle at which the lens is positioned. For architechture photography, this type of distortion is not acceptable, and photographers use specialized lenses called perspective correction lenses.
Since a normal user will not use PC lenses, Here are some ideas to avoid perspective distortion in your pictures.
1. Instead of shooting from up close, try to find a location further from the subject and use a telephoto lens to take the picture.
2. Shoot with perspective distortion and then edit in Photoshop. PS has a feature that allows you to do perspective correction.
In this picture, you can clearly see the perspective distortion as the tower of the mosque seems to be falling down - even though the horizon line is straight. But in this case, it's okay. I actually like the effect.
Here are some more pictures I took from the same vantage point that exhibit perspective distortion.
Friday, November 16, 2007
Maximizing your Dynamic Range
Our cameras (whether digital or film-based) are limited by the amount of dynamic range that they can capture. In photography, dynamic range refers to the difference between the darkest and the brightest area in the picture frame. So if you are trying take a picture where some part of the picture is extremely bright while other parts are in shadows, your camera will struggle to get a decent exposure of the scene. That's why pictures taken on a cloudy day look so great. The dynamic range is low enough for the camera to capture everything within the frame perfectly.
Films are generally better at capturing dynamic range while the tiny sensors on digital point&shoot cameras or cell phones are the worst offendors. Digital camera manufacturers use different techniques to overcome the limitations of their imaging sensors. The current champ in dynamic range capture is the Fuji FinePix S5 Pro which uses 2 separate imagers (one for highlights & one for shadows), and then combines them during post-processing to give you an image with a much better dynamic range.
A software based alternative for maximizing dynamic range is to take multiple exposures of the same scene at different EV values and then combine them to generate a single image. Obviously, this will only work for static objects such as archtechture or landscape.
Last year, HDRsoft created a lot of buzz when they introduced a software called Photomatix that merged multiple images using an unique algorithm called "Tone-mapping". I got involved in the buzz and went ballistic with the software, creating some freaky tone mapped images.
But the problem with "tone-mapped" images is that they look too artificial. Photoshop CS2 has a more subtle technique for merging multiple exposures. In this example, I used the Photoshop menu option "Merge to HDR" to combine 7 different exposures taken at +/- 1EV apart. This essentially created a 32-bit HDR image. The image was then converted to 8-bit using the "Exposure & Gamma" option, which essentially tries to balance the contents of all the 7 images to give a well-balanced photo.
And the best part is that it does not look artificial like tonemapped HDR. A normal person looking at this example photo will merely thing it is a nicely exposed image.

Films are generally better at capturing dynamic range while the tiny sensors on digital point&shoot cameras or cell phones are the worst offendors. Digital camera manufacturers use different techniques to overcome the limitations of their imaging sensors. The current champ in dynamic range capture is the Fuji FinePix S5 Pro which uses 2 separate imagers (one for highlights & one for shadows), and then combines them during post-processing to give you an image with a much better dynamic range.
A software based alternative for maximizing dynamic range is to take multiple exposures of the same scene at different EV values and then combine them to generate a single image. Obviously, this will only work for static objects such as archtechture or landscape.
Last year, HDRsoft created a lot of buzz when they introduced a software called Photomatix that merged multiple images using an unique algorithm called "Tone-mapping". I got involved in the buzz and went ballistic with the software, creating some freaky tone mapped images.
But the problem with "tone-mapped" images is that they look too artificial. Photoshop CS2 has a more subtle technique for merging multiple exposures. In this example, I used the Photoshop menu option "Merge to HDR" to combine 7 different exposures taken at +/- 1EV apart. This essentially created a 32-bit HDR image. The image was then converted to 8-bit using the "Exposure & Gamma" option, which essentially tries to balance the contents of all the 7 images to give a well-balanced photo.
And the best part is that it does not look artificial like tonemapped HDR. A normal person looking at this example photo will merely thing it is a nicely exposed image.
Wednesday, November 14, 2007
World Diabetic Day
While browsing through Mark's blog, I learned that Kuwait Towers have been lighted up in blue colors. I did not know if this was going to be a permanent setup or something temporary. All I knew is that it was a photo opportunity, so I packed my camera gear and headed out to the seaside.
The Towers indeed looked eerie and a bit out of this world. Today, I learned that they were lighted up as a commemoration for the World Diabetes Day. I also learned that Kuwait Scientific Center also took part in the campaign, and kicked myself for missing that opportunity.
Here are few more pictures that I took of the blue towers.

The Towers indeed looked eerie and a bit out of this world. Today, I learned that they were lighted up as a commemoration for the World Diabetes Day. I also learned that Kuwait Scientific Center also took part in the campaign, and kicked myself for missing that opportunity.
Here are few more pictures that I took of the blue towers.
Sunday, November 04, 2007
The Multi-Cam 1000 AF Module
My D200 may look like a camera from the outside, but it's a complex electronic machine inside. It's a serious piece of machinery designed with a professional in mind - starting from it's durable magnesium-alloy chassis to the various sealings designed to protect it in harsh environments.
The biggest change for me though, has been the auto-focus module embedded in the camera. The Multi-Cam 1000 autofocus module allows for fast and accurate focusing in all kinds of situations. Just a generation ago, professionals sneered at the idea of auto-focusing lenses, relying on their hand-eye coordination and their gut instincts to get the perfect shot.
But technology evolves rapidly, and today, auto-focusing technology has matured to the point that it will be a rare sight to see professionals using manual focus lenses.
While an experienced professional can pull off a shot like this using manual focusing, the rest of us mere mortals need the technology provided by these professional cameras to get the desired result.
To read more about the Multi-Cam autofocus module, use this link http://www.nikonians.org/nikon/d200_multi-cam_af/

The biggest change for me though, has been the auto-focus module embedded in the camera. The Multi-Cam 1000 autofocus module allows for fast and accurate focusing in all kinds of situations. Just a generation ago, professionals sneered at the idea of auto-focusing lenses, relying on their hand-eye coordination and their gut instincts to get the perfect shot.
But technology evolves rapidly, and today, auto-focusing technology has matured to the point that it will be a rare sight to see professionals using manual focus lenses.
While an experienced professional can pull off a shot like this using manual focusing, the rest of us mere mortals need the technology provided by these professional cameras to get the desired result.
To read more about the Multi-Cam autofocus module, use this link http://www.nikonians.org/nikon/d200_multi-cam_af/
Friday, November 02, 2007
Flugtag Kuwait
A Flugtag (German: flight day, airshow) is an event in which competitors attempt to fly in homemade flying machines.
Source: http://en.wikipedia.org/wiki/Flugtag
Kuwait had it's first Flugtag event on Nov 2 2007. I had marked this event in my calendar ever since it was announced about 6 months ago, as I knew it would provide some great photo opportunities.
Even though I was feeling a bit under the weather (due to my asthma acting up again), I decided to head off to the show and dragged my family along with me. I packed the Nikkor 80-200 f2.8 lens as I knew it would provide me with the necessary reach to shoot the event. When we reached the event area (Marina Waves), I was a little apprehensive that the lens may not be good enough - especially after I saw some photogs toting lenses that must have been around 400mm at the telephoto end. My apprehension was quickly put to rest once I selected a nice vantage point and tested the lens. The range of 80 to 200mm was more than sufficient for capturing action shots (though I would not have complained if I could somehow afford the Nikkor 200-400 f4).
I set the camera to group dynamic AF, so that the camera could quickly achieve focus on the moving subjects, and set my camera to continuos shooting mode.
The camera/lens combination performed superbly. Even though the lens does not have VR (vibration reduction), I never needed it for this particular event as it was bright enough for me to shoot in the 1/1000th second range at around f4 to f8, with the ISO set to it's base 100.

Source: http://en.wikipedia.org/wiki/Flugtag
Kuwait had it's first Flugtag event on Nov 2 2007. I had marked this event in my calendar ever since it was announced about 6 months ago, as I knew it would provide some great photo opportunities.
Even though I was feeling a bit under the weather (due to my asthma acting up again), I decided to head off to the show and dragged my family along with me. I packed the Nikkor 80-200 f2.8 lens as I knew it would provide me with the necessary reach to shoot the event. When we reached the event area (Marina Waves), I was a little apprehensive that the lens may not be good enough - especially after I saw some photogs toting lenses that must have been around 400mm at the telephoto end. My apprehension was quickly put to rest once I selected a nice vantage point and tested the lens. The range of 80 to 200mm was more than sufficient for capturing action shots (though I would not have complained if I could somehow afford the Nikkor 200-400 f4).
I set the camera to group dynamic AF, so that the camera could quickly achieve focus on the moving subjects, and set my camera to continuos shooting mode.
The camera/lens combination performed superbly. Even though the lens does not have VR (vibration reduction), I never needed it for this particular event as it was bright enough for me to shoot in the 1/1000th second range at around f4 to f8, with the ISO set to it's base 100.
Thursday, November 01, 2007
K810i v/s the D200
I have always been cynical of the so-called "camera-phones". I don't actually remember shooting any pictures with the various phones that I have owned in the past - starting from the various i-mate models to the last phone that I owned - a 2.0 megapixel capable Sony Ericcson P990i.
The reason is simple. The pictures suck. When I say that the pictures suck - I don't mean that the results are lousy. I mean they are really really lousy.
But technology keeps improving, and I hope we reach a stage where I can give up my dSLR in exchange for a phone that allows me to talk, SMS, take pictures, listen to music and manage my contacts & calendar.
The K810i is a step in the right direction.
1. It can synchronize with Outlook to keep all my contacts & calendar in sync. This was the most important feature for me.
2. It doubles up as a very good MP3 player with the additonal 2GB card that I put in the phone (it came with only 128MB). I can now go jogging with just the phone, instead of a phone AND an iPod jangling in my pocket.
3. Amazing battery life means I don't have to worry about charging it every day.
4. It supports stereo bluetooth output, which goes nicely with my stereo bluetooth headset that I had originally picked up for the P990i, but never really used it as the connection with the P990 was a bit flaky. Actaully, everything with the P990 is flaky.
And now for the most important part. It's much acclaimed 3.2 megapixel camera with "auto-focus" and a real "xenon" flash.
It sucks.
But at least when an opportunity arises out of nowhere, and I don't have my dSLR camera with me, I can feel comfortable in the knowledge that I will be able to capture that moment with the K810i, in all of it's sucky, noisy 3.2 megapixel glory.

The reason is simple. The pictures suck. When I say that the pictures suck - I don't mean that the results are lousy. I mean they are really really lousy.
But technology keeps improving, and I hope we reach a stage where I can give up my dSLR in exchange for a phone that allows me to talk, SMS, take pictures, listen to music and manage my contacts & calendar.
The K810i is a step in the right direction.
1. It can synchronize with Outlook to keep all my contacts & calendar in sync. This was the most important feature for me.
2. It doubles up as a very good MP3 player with the additonal 2GB card that I put in the phone (it came with only 128MB). I can now go jogging with just the phone, instead of a phone AND an iPod jangling in my pocket.
3. Amazing battery life means I don't have to worry about charging it every day.
4. It supports stereo bluetooth output, which goes nicely with my stereo bluetooth headset that I had originally picked up for the P990i, but never really used it as the connection with the P990 was a bit flaky. Actaully, everything with the P990 is flaky.
And now for the most important part. It's much acclaimed 3.2 megapixel camera with "auto-focus" and a real "xenon" flash.
It sucks.
But at least when an opportunity arises out of nowhere, and I don't have my dSLR camera with me, I can feel comfortable in the knowledge that I will be able to capture that moment with the K810i, in all of it's sucky, noisy 3.2 megapixel glory.
Friday, October 26, 2007
Flamingos - A little bit closer.
Last week, I tried photographing the exotic flamingos that make Kuwait their home. My effort was a little bit off, as they live in this kind of a swamp that is pretty difficult to get close to.
I thought I'll give it another shot hoping that it is high tide which would make the flamingos a little more accessible. Well, it was not high tide (need to check the tide calendar before trying it next time), but luckily for me, a bunch of flamingos were feeding very close to the shore.
I used the same lens as before, 80-200mm f2.8. This picture is a 100% crop of the 10 megapixel image. A 400mm would have been just the ticket to get a closer shot of these amazing birds.

I thought I'll give it another shot hoping that it is high tide which would make the flamingos a little more accessible. Well, it was not high tide (need to check the tide calendar before trying it next time), but luckily for me, a bunch of flamingos were feeding very close to the shore.
I used the same lens as before, 80-200mm f2.8. This picture is a 100% crop of the 10 megapixel image. A 400mm would have been just the ticket to get a closer shot of these amazing birds.
Wednesday, October 24, 2007
Bracketing with D200
If you have a penchant for bracketing your exposures, there is no better tool than the D200. You can bracket upto 9 shots at varying exposures from 1/3 to 1 full stop.
For those who love HDR photography, this is indeed a drool worthy feature. My earlier D70 could do only 3 shots in auto-bracketing mode. I still managed to get some decent HDR photos though. I can only imagine what those pictures would have looked like if shot with the D200.
Even if you don't like HDR, the ability for such a wide range of bracketing means that you can enable bracketing for most of your shots and then select the best exposed one. Nowadays, memory is very cheap so storage is definitely not a problem.
In this shot, I took 5 exposures at 1 stop interval and then merged all the 5 pictures in Photomatix software.

For those who love HDR photography, this is indeed a drool worthy feature. My earlier D70 could do only 3 shots in auto-bracketing mode. I still managed to get some decent HDR photos though. I can only imagine what those pictures would have looked like if shot with the D200.
Even if you don't like HDR, the ability for such a wide range of bracketing means that you can enable bracketing for most of your shots and then select the best exposed one. Nowadays, memory is very cheap so storage is definitely not a problem.
In this shot, I took 5 exposures at 1 stop interval and then merged all the 5 pictures in Photomatix software.
Sunday, October 21, 2007
Flamingos in Kuwait
I was quiet surprised to learn that there are flamingos in Kuwait; as I had never seen a single one in my 15 years of living here (except in the Kuwait zoo).
Apparently, they are found only in a specific area in Kuwait. There is a sort of a sanctuary near the Shuwaikh hospitals area, and the flamingos are found there.
I decided to check it out so I packed my camera gear and headed towards the Al-Sabah maternity hospital; as I remember seeing an access area to the beach there.
I was indeed surprised to find a whole flock of flamingos near the waterside. Unfortunately for me, it was low tide and it was not possible to get close enough to them to get a decent shot.
This was shot with my 80-200 f2.8 zoomed to it's maximum of 200mm. Not good enough!.
Now I need to visit the place again during high tide, hoping to get a little closer to the birds.

Apparently, they are found only in a specific area in Kuwait. There is a sort of a sanctuary near the Shuwaikh hospitals area, and the flamingos are found there.
I decided to check it out so I packed my camera gear and headed towards the Al-Sabah maternity hospital; as I remember seeing an access area to the beach there.
I was indeed surprised to find a whole flock of flamingos near the waterside. Unfortunately for me, it was low tide and it was not possible to get close enough to them to get a decent shot.
This was shot with my 80-200 f2.8 zoomed to it's maximum of 200mm. Not good enough!.
Now I need to visit the place again during high tide, hoping to get a little closer to the birds.
Friday, September 28, 2007
D200 and high ISO
About a year back, I visited the Kuwait Scientific Center aquarium. At that time, I had my trusty Nikon D70, and the versatile 50mm f1.8 lens.
I have never been comfortable shooting above ISO 800 on the D70 as the images turn extremely noisy, so I had to limit myself to ISO 800 and open the lens wide to it's maximum aperture. Even after stretching both the camera body & the lens to it's maximum, I had difficulty getting sharp pictures. I remember thinking to myself that this particular setup demands a D200 body, and a lens that can open up to f1.4.
As it so happens, I managed to upgrade myself to a D200 body, and acquire the superlative Sigma 30mm f1.4 lens. I was eager to try this combination at the Scientific center but had to wait for a few months for the opportunity.
I finally got my chance last week. As I had expected, the D200 could handle the high ISO with aplomb. Coupled with the fast aperture of the Sigma, I managed to get some great pictures of the sea life on display at the aquarium.

I have never been comfortable shooting above ISO 800 on the D70 as the images turn extremely noisy, so I had to limit myself to ISO 800 and open the lens wide to it's maximum aperture. Even after stretching both the camera body & the lens to it's maximum, I had difficulty getting sharp pictures. I remember thinking to myself that this particular setup demands a D200 body, and a lens that can open up to f1.4.
As it so happens, I managed to upgrade myself to a D200 body, and acquire the superlative Sigma 30mm f1.4 lens. I was eager to try this combination at the Scientific center but had to wait for a few months for the opportunity.
I finally got my chance last week. As I had expected, the D200 could handle the high ISO with aplomb. Coupled with the fast aperture of the Sigma, I managed to get some great pictures of the sea life on display at the aquarium.
Friday, June 08, 2007
Long Exposures
One of the key benefit of a dSLR cameras is long-exposure shooting. This involves placing the camera on a solid tripod and taking shots of night-life.
Of course, you can do this with a small point & shoot camera, but due to the high noise inherent in such tiny sensors, the results are usually dissapointing. Here are some passable shots that I took with a Casio Exilim.
Earlier, I've used my D70 to take some great night time photos of Kuwait cityscape, and ever since upgrading to D200, I've been itching to go and try some night shots. I was unable to do so till now due to 2 factors:
- It's summer time in Kuwait which means it's always dusty (a definite no-no for dSLR cameras).
- I lost my tripod while travelling to India and was debating on which tripod to get as a replacement. I have the Manfrotto 055MF4 in my wish list, but have been unable to purchase it for various reasons. In the meantime, I decided to pick up a reasonably decent tripod from a local store. It's a chinese made, and for $100, it's quiet heavy and stable.
The resulting picture taken at
f11
15-second exposure
White balance and saturation adjusted in Photoshop.

Of course, you can do this with a small point & shoot camera, but due to the high noise inherent in such tiny sensors, the results are usually dissapointing. Here are some passable shots that I took with a Casio Exilim.
Earlier, I've used my D70 to take some great night time photos of Kuwait cityscape, and ever since upgrading to D200, I've been itching to go and try some night shots. I was unable to do so till now due to 2 factors:
- It's summer time in Kuwait which means it's always dusty (a definite no-no for dSLR cameras).
- I lost my tripod while travelling to India and was debating on which tripod to get as a replacement. I have the Manfrotto 055MF4 in my wish list, but have been unable to purchase it for various reasons. In the meantime, I decided to pick up a reasonably decent tripod from a local store. It's a chinese made, and for $100, it's quiet heavy and stable.
The resulting picture taken at
f11
15-second exposure
White balance and saturation adjusted in Photoshop.
Tuesday, May 29, 2007
I was there!!

The last 2 pictures that I have posted to my Flickr account are not the type of pictures I would normally post to my photo-stream. Bad composition, too much noise etc.
What makes these 2 pictures different is that while chatting on my favourite forum, someone mentioned about a subject, and I realized that I had taken picture of the same subject. It went something like this:
Did you see the big smoke in Kuwait city today?
Earlier that day, I had gone for a function that was hosted on the 9th floor. As typical of me, I quickly opened the window and took a few rapid shots of the dusty panaroma. I realized that I must have captured the smoke in question and checked my camera and found that I had indeed captured something burning in the horizon.
Hey, it was me doing kite-surfing last week at Kuwait towers. Did you take any pictures?
Well, of course, I did!!.
Saturday, May 19, 2007
The Dust Season
The start of summer season means only one thing (besides the extremely hot weather) - and that's the start of the dust season. It permeates everywhere. Everything is covered with a fine layer of brown dust.
Dust and digital SLR's don't go hand in hand - which means when there's dust in the air, my camera stays inside the house. This picture was taken with a Casio P&S, which is not susceptible to dust.
I am told that dust like this is good for the date fruit plantations; and I think that's the only thing it is good for. It's definitely not good for my asthma!.

Dust and digital SLR's don't go hand in hand - which means when there's dust in the air, my camera stays inside the house. This picture was taken with a Casio P&S, which is not susceptible to dust.
I am told that dust like this is good for the date fruit plantations; and I think that's the only thing it is good for. It's definitely not good for my asthma!.
Thursday, May 10, 2007
A Visit to the Grand Mosque
The AWARE Center (Advocates for Western-Arab Relations), organized a tour of the Grand Mosque. Well, I am not a westerner, but I decided to take the opportunity to join the tour.
The tour started with a gathering of all the attendees, followed by a 20-minute presentation of the Mosque and then the actual tour.
I was aware that the lighting inside the mosque will be dim so I made sure I took my Sigma 30mm f1.4, as well as the ultra-wide angle 12-24mm. I debated taking a tripod and eventually decided not too as the D200 could handle high ISO, which meant that I could shoot hand-held. In retrospect though, I wish I had carried a tripod as it would have allowed me to take some great visuals of the inside of the mosque.
Oh well. Perhaps another time. Here are some more pictures that I took during the trip.

The tour started with a gathering of all the attendees, followed by a 20-minute presentation of the Mosque and then the actual tour.
I was aware that the lighting inside the mosque will be dim so I made sure I took my Sigma 30mm f1.4, as well as the ultra-wide angle 12-24mm. I debated taking a tripod and eventually decided not too as the D200 could handle high ISO, which meant that I could shoot hand-held. In retrospect though, I wish I had carried a tripod as it would have allowed me to take some great visuals of the inside of the mosque.
Oh well. Perhaps another time. Here are some more pictures that I took during the trip.
Wednesday, April 11, 2007
Goodbye my trusty D70
After taking some really great pictures with the D70, I made up my mind to "upgrade" to it's big brother, the D200.
It was not an easy decision to make. The D70 served me well, and there wasn't anything lacking in it as far as my needs are concerned. Shooting in RAW mode, I could extract every last bit of detail from the images that it brilliantly captured. Most importantly, the D200 is not cheap and represents a significant investment at $1340 + shipping.
But after getting comfortable with the D70, I felt I could use some of the pro features that the D200 brings to the table. Here are some of the reasons that I decided to upgrade. The values in bracket represent comparison with the D70.
- 10.2 megapixel sensor (6mp)
- Faster shooting at 5fps (3fps)
- Faster focusing with Multi-CAM 1000 (Multi-cam 900)
- Rugged Magnesium alloy body (plastic)
- Wider ISO range from 100-3200 (200-1600)
- Auto bracketing upto 9 shots (3)
- Ability to shoot RAW+JPEG fine (RAW+JPEG basic)
- Mirror lockup (Not available)
There are dozens of tiny improvements which makes the D200 a very superior piece of technology. And I wanted some of it!
It is probibitively expensive to buy it from the local dealer. He listed KD 570/- (after discount). That is just ridiculous as the on-line price from Amazon works out to KD 390/-. I decided to place my order with Amazon and the D200 is now on it's way.

It was not an easy decision to make. The D70 served me well, and there wasn't anything lacking in it as far as my needs are concerned. Shooting in RAW mode, I could extract every last bit of detail from the images that it brilliantly captured. Most importantly, the D200 is not cheap and represents a significant investment at $1340 + shipping.
But after getting comfortable with the D70, I felt I could use some of the pro features that the D200 brings to the table. Here are some of the reasons that I decided to upgrade. The values in bracket represent comparison with the D70.
- 10.2 megapixel sensor (6mp)
- Faster shooting at 5fps (3fps)
- Faster focusing with Multi-CAM 1000 (Multi-cam 900)
- Rugged Magnesium alloy body (plastic)
- Wider ISO range from 100-3200 (200-1600)
- Auto bracketing upto 9 shots (3)
- Ability to shoot RAW+JPEG fine (RAW+JPEG basic)
- Mirror lockup (Not available)
There are dozens of tiny improvements which makes the D200 a very superior piece of technology. And I wanted some of it!
It is probibitively expensive to buy it from the local dealer. He listed KD 570/- (after discount). That is just ridiculous as the on-line price from Amazon works out to KD 390/-. I decided to place my order with Amazon and the D200 is now on it's way.
Wednesday, March 28, 2007
Tools of the Trade
In an earlier post, a friend asked me to post about my photographic equipment. Well, here it is.
Besides my trusty D70, these are the list of lenses, that I have collected over the period:
a) AF Nikkor 50mm f/1.8D. This has got to be my most favourite lens. It is so sharp and fast, that I hardly need to do any sharpening in post-processing. On a film camera, this would be a "normal" lens, but on my D70 (with it's 1.5 crop factor), this lens translates to a moderate telephoto of 75mm. Excellent for portrait work. This lens is currently the best buy from Nikon.
b) Nikkor 80-200 f/2.8 ED AF-D. At around $800, this lens is not cheap, and at 2.85lb, definitely not something you can hang around your neck (unless you have a very thick neck). But it is a fast lens (f2.8), that is great for low light photography, and sports.
c) Sigma 30mm f/1.4 EX DC HSM. The fastest lens in my arsenal at f1.4. Great for low-light photography. It is also what photographers call a "normal" lens, because when mounted on the D70, it translates to 45mm. Great for general photography.
d) Sigma 12-24mm f/4.5-5.6 HSM. Super-wide angle lens that I love for outdoor photography.
e) Nikon AF 18-70mm f/3.5-4.5G. This is a great general purpose lens that I use a lot. I had purchased this along with the D70, and I must have taken atleast 80% of my photos using this lens.
f) Speedlights. As you can see, I have 3 external flashes. The main one that I mount on the camera is the SB-800. I use the other 2 flashes whenever I am doing portrait work. Simply place them on each side of the subject and I have an instant studio!. They work using wireless signals, so I can place them anywhere in the room to create creative lighting.

Besides my trusty D70, these are the list of lenses, that I have collected over the period:
a) AF Nikkor 50mm f/1.8D. This has got to be my most favourite lens. It is so sharp and fast, that I hardly need to do any sharpening in post-processing. On a film camera, this would be a "normal" lens, but on my D70 (with it's 1.5 crop factor), this lens translates to a moderate telephoto of 75mm. Excellent for portrait work. This lens is currently the best buy from Nikon.
b) Nikkor 80-200 f/2.8 ED AF-D. At around $800, this lens is not cheap, and at 2.85lb, definitely not something you can hang around your neck (unless you have a very thick neck). But it is a fast lens (f2.8), that is great for low light photography, and sports.
c) Sigma 30mm f/1.4 EX DC HSM. The fastest lens in my arsenal at f1.4. Great for low-light photography. It is also what photographers call a "normal" lens, because when mounted on the D70, it translates to 45mm. Great for general photography.
d) Sigma 12-24mm f/4.5-5.6 HSM. Super-wide angle lens that I love for outdoor photography.
e) Nikon AF 18-70mm f/3.5-4.5G. This is a great general purpose lens that I use a lot. I had purchased this along with the D70, and I must have taken atleast 80% of my photos using this lens.
f) Speedlights. As you can see, I have 3 external flashes. The main one that I mount on the camera is the SB-800. I use the other 2 flashes whenever I am doing portrait work. Simply place them on each side of the subject and I have an instant studio!. They work using wireless signals, so I can place them anywhere in the room to create creative lighting.
Tuesday, March 27, 2007
Copyright infringement
I had an interesting experience of finding my photo being used without permission on a local Arabic daily newspaper, Al-Qabas.
One of my photography friend Q8e, found my picture while reading the newspaper, and sent me a Flickr e-mail mentioning the page number where the picture was published. He also took an interesting photo of the infringement and posted it here.
I posted the news about the infringement on a very popular Kuwait forum, and the forum admin immediately posted it on his even more popular blog, www.248am.com.
Needless the say, the reaction has been very interesting. I even received an email from another magazine editor denouncing this blantant violation of intellectual property rights.
I have sent an e-mail to Al-Qabas, but have yet to receive any reply.

One of my photography friend Q8e, found my picture while reading the newspaper, and sent me a Flickr e-mail mentioning the page number where the picture was published. He also took an interesting photo of the infringement and posted it here.
I posted the news about the infringement on a very popular Kuwait forum, and the forum admin immediately posted it on his even more popular blog, www.248am.com.
Needless the say, the reaction has been very interesting. I even received an email from another magazine editor denouncing this blantant violation of intellectual property rights.
I have sent an e-mail to Al-Qabas, but have yet to receive any reply.
Saturday, March 10, 2007
Canon Powershot S2 IS
During my recent trip to Goa, I took along a Powershot S2 as a gift for my brother. I have always recommended this camera for beginners and I thought it would be an ideal gift for him as he loves photography.
I was truly impressed with the performance of this camera and ended up using it on many occasions instead of my D70. It's 12x optical zoom with image stabilization actually works and the shutter lag is hardly noticeable.
It's a great camera for general use. I would'nt use it for night time photography (too much noise) - but for daytime, it is truly amazing.

I was truly impressed with the performance of this camera and ended up using it on many occasions instead of my D70. It's 12x optical zoom with image stabilization actually works and the shutter lag is hardly noticeable.
It's a great camera for general use. I would'nt use it for night time photography (too much noise) - but for daytime, it is truly amazing.
Tuesday, March 06, 2007
A Refreshing Break
Just returned from a short break from Goa (India). My brothers run a very successful business with everything from fine dining, river cruises, beach shacks and even Ayurvedic massages (www.bettysgoa.com). Needless to say, I was pampered to the extreme, with exotic foods and drinks and plenty of leisure activities. I think my kids enjoyed the most playing with their cousins, and having a blast at the beaches.
Here are some of the pictures I have posted to my Flickr account.

Here are some of the pictures I have posted to my Flickr account.
Wednesday, February 21, 2007
National Day Celebrations
Feb 25th and 26th are the National Day/Liberation day holidays for Kuwait. Last year, the celebrations were cancelled due to the passing of the Amir of Kuwait.
This year, all the buildings are lit up with the colors of Kuwait flag and it looks like it's going to be one heck of a party. Too bad I am going to miss it, as I am travelling to India for a short break.
I did manage to shoot some late night long exposures

This year, all the buildings are lit up with the colors of Kuwait flag and it looks like it's going to be one heck of a party. Too bad I am going to miss it, as I am travelling to India for a short break.
I did manage to shoot some late night long exposures
Sunday, February 18, 2007
Photographing Sunsets...

One of the challenges of photographing sunsets is to get your metering right. To ensure this, you should point your camera straight at the sun so that the camera will get the right exposure. (WARNING: Be careful!!. If you are using an optical viewfinder, make sure the sun is not too bright as it could damage your eyes).
However, I don't like to keep the sun in the center as it creates an unappealing composition, and prefer to use the Rule of Thirds for my sunset shots.
To ensure that you get the correct exposure AND the right composition, follow these steps.
1. Point you camera straight at the sun.
2. Press the shutter release half-way to lock the focus and the exposure. (Professional cameras allow you to lock the focus separately from the exposure - but that's another story).
3. Recompose your image without letting go of the shutter release button.
4. Once you've got the right composition, press the shutter the rest of the way down to capture the final image.
Here are some of my Kuwait Sunset Pictures.
Friday, February 16, 2007
Beautiful Days

So last week, I was snoozing at home when I saw these brilliant cloud formations and not a speckle of dust or haze in sight. I jumped out of my bed and told my wife that I will be out for the evening and that she had to figure out how to spend the evening with the kids without me. Angel that she is, she agreed.
I quickly got in my car and drove to some of my favourite places. Every photo that I took was a keeper (and I must have shot over 100 pictures).
Here are some of the better ones that I posted to Flickr.
Thursday, November 30, 2006
More on the Sigma 12-24 lens.
I was very surprised to get a call from the Managing Director of Marina Waves - a very friendly lady. She had seen some of my Marina pictures and wanted to congratulate me and invite me for a party.
I went over and found lots of music and lights. I checked with the security guy and found that the party was for a new restaurant that was opening up. I could see a live band and lots of activity.
Unfortunately, I had a dinner engagement at 8 p.m., so I decided not to go inside.
I used the opportunity of flashing lights to take some pictures with the Sigma 12-24 wide angle lens.
I must admit I am falling in love with this lens.

I went over and found lots of music and lights. I checked with the security guy and found that the party was for a new restaurant that was opening up. I could see a live band and lots of activity.
Unfortunately, I had a dinner engagement at 8 p.m., so I decided not to go inside.
I used the opportunity of flashing lights to take some pictures with the Sigma 12-24 wide angle lens.
I must admit I am falling in love with this lens.
Sunday, November 26, 2006
How wide is 12mm?
Short answer: Very wide!
I recently acquired the Sigma 12-24 wide angle lens. I was in two minds whether to pick up the newer 10-20 (which is wider) but is designed only for DX sensors. On the other hand the 12-24 will work fine with a full-frame sensor or even a film camera.
But my main reason for choosing the 12-24 over the wider counterpart was that the 12-24 feels solid and professional, while the 10-20 looks like a flimsy affair.
On my Nikon D70 (with it's 1.5 crop factor), the 12-24 translates into 18-36mm. So my question should really be "How wide is 18mm?".
Even at 18mm, the lens is very wide. It is like a whole new world opening up. Till now, I have been constrained by the lack of wide angle lens in my arsenal.
Now I am looking forward to creating some dramatic looking panaromic shots.

I recently acquired the Sigma 12-24 wide angle lens. I was in two minds whether to pick up the newer 10-20 (which is wider) but is designed only for DX sensors. On the other hand the 12-24 will work fine with a full-frame sensor or even a film camera.
But my main reason for choosing the 12-24 over the wider counterpart was that the 12-24 feels solid and professional, while the 10-20 looks like a flimsy affair.
On my Nikon D70 (with it's 1.5 crop factor), the 12-24 translates into 18-36mm. So my question should really be "How wide is 18mm?".
Even at 18mm, the lens is very wide. It is like a whole new world opening up. Till now, I have been constrained by the lack of wide angle lens in my arsenal.
Now I am looking forward to creating some dramatic looking panaromic shots.
Friday, November 24, 2006
Camera advice
I recently received an email from a friend.
"Hi Cajie
How have you been? Hope you had a great time in Dubai. I love the place, even though traffic is horrible.
I have a question. I know you don't care much about P&S camera's but after seeing your results with your Casio, Iam going to ask nonetheless. My sister needs to buy one. She's moved on from a Nikon Coolpix 2200. She now wants a new one. She's concerned about size and megapixels (she won't listen to me!! ) Could you please recommend one?
Oh and how about the new Nikon D40?. I was thinking of getting into amateur DSLR myself. What say?"
Hello,
Yup, I enjoyed my time in Dubai. Connected with a very good friend who took me around. Now I am thinking of going back in Dec or Jan with my family. I have been to Dubai couple of times before but always for short business trips and never got time to look around.
Well, I am okay with P&S cameras because they serve a specific purpose and I always carry my Casio in my pocket because sometimes a photo oportunity turns up and it is better to take an average photo than no photo at all. And especially for ladies, they will want something that slips easily in their purse.
There is no specific P&S that is good. Just choose something that feels right in your hand. Current specs that will cost you in the 100 KD range ($300) is
- 6 megapixel
- 30fps video capture
- 2.5inch lcd monitor
- 3x to 4x optical zoom.
Panasonic has some interesting models that feature "Mega OIS" (optical image stabilization). If you can find a slim model that features OIS feature, I would advise to go for it - and you can pay around 20% premium for this feature.
As for the D40, before I left for Dubai, I had heard of the rumours and I see that they plan to release it in December. It is same as D50 minus some features - but the picture quality will be the same.
I would rather advise to go for a D50 with a 18-200 VR lens, and you will have an unbeatable photo-taking machine

"Hi Cajie
How have you been? Hope you had a great time in Dubai. I love the place, even though traffic is horrible.
I have a question. I know you don't care much about P&S camera's but after seeing your results with your Casio, Iam going to ask nonetheless. My sister needs to buy one. She's moved on from a Nikon Coolpix 2200. She now wants a new one. She's concerned about size and megapixels (she won't listen to me!! ) Could you please recommend one?
Oh and how about the new Nikon D40?. I was thinking of getting into amateur DSLR myself. What say?"
Hello,
Yup, I enjoyed my time in Dubai. Connected with a very good friend who took me around. Now I am thinking of going back in Dec or Jan with my family. I have been to Dubai couple of times before but always for short business trips and never got time to look around.
Well, I am okay with P&S cameras because they serve a specific purpose and I always carry my Casio in my pocket because sometimes a photo oportunity turns up and it is better to take an average photo than no photo at all. And especially for ladies, they will want something that slips easily in their purse.
There is no specific P&S that is good. Just choose something that feels right in your hand. Current specs that will cost you in the 100 KD range ($300) is
- 6 megapixel
- 30fps video capture
- 2.5inch lcd monitor
- 3x to 4x optical zoom.
Panasonic has some interesting models that feature "Mega OIS" (optical image stabilization). If you can find a slim model that features OIS feature, I would advise to go for it - and you can pay around 20% premium for this feature.
As for the D40, before I left for Dubai, I had heard of the rumours and I see that they plan to release it in December. It is same as D50 minus some features - but the picture quality will be the same.
I would rather advise to go for a D50 with a 18-200 VR lens, and you will have an unbeatable photo-taking machine
Thursday, November 23, 2006
Photography in Dubai
I went for a business trip (Gitex 2006) and was in 2 minds whether to take my Nikon dSLR along. In the end, I decided to travel light and did not carry the big camera. Instead, I took along with me a Casio EX-Z600 - my pocket point & shoot.
I regretted the decision because there are so many amazing structures that look great at night.
I was doubtful whether the Casio was up to the task of taking decent night time shots. After fiddling around the menu, I found that the best results could be obtained by setting the camera in "Night Scene" mode and placing the camera on some sturdy surface and using the self-timer mode to ensure that the shutter release does not cause a blur.
On the bright side, I found a great offer for a 12-24mm Sigma lens. When I compared the price on Amazon, I found that I got it cheaper than Amazon!.
Next time, I am taking the d70 and all my wide-angle lenses.

I regretted the decision because there are so many amazing structures that look great at night.
I was doubtful whether the Casio was up to the task of taking decent night time shots. After fiddling around the menu, I found that the best results could be obtained by setting the camera in "Night Scene" mode and placing the camera on some sturdy surface and using the self-timer mode to ensure that the shutter release does not cause a blur.
On the bright side, I found a great offer for a 12-24mm Sigma lens. When I compared the price on Amazon, I found that I got it cheaper than Amazon!.
Next time, I am taking the d70 and all my wide-angle lenses.
Sunday, November 05, 2006
Panning Technique
Panning is a great way of showing subjects in motion, and to emphasize the movement of the subject. Regardless of how good you are, panning is always a hit-and-miss and you can expect some of the shots to come blurry. However, if you keep trying and follow a few simple guidelines, you should be rewarded with some great action shots.
1. Position yourself in such a way that the subject will pass directly in front of you.
2. Use a camera that supports manual focusing. If you shoot in auto-focus mode, the camera will take time acquiring focus and you will lose the shot or the focus will not be correct (unless you are using a high end professional camera). Also if you are using a small point & shoot camera, focusing is not such an issue because their tiny sensors mean the entire scene is in focus.
On the other hand, for a dSLR, the best thing to do is manually set the focus where you expect the subject to be. In this example, I focused as the drivers were passing me by, and made sure that they appeared sharp and not out-of-focus.
3. Next, you need to set you camera to shutter priority and select a slow shutter speed. A shutter speed of 1/15th to 1/30th of a second works best in these situations.
4. As the subject approaches you, follow the subject with the camera. When the subject is where the focus point is, click on the shutter button - BUT CONTINUE FOLLOWING THE SUBJECT!.
This is the key for great panning shots. As you click the shutter button, keep the camera following the subject. This way, the subject remains sharp, while the rest of the background gets blurred.
5. Practice, Practice!.

1. Position yourself in such a way that the subject will pass directly in front of you.
2. Use a camera that supports manual focusing. If you shoot in auto-focus mode, the camera will take time acquiring focus and you will lose the shot or the focus will not be correct (unless you are using a high end professional camera). Also if you are using a small point & shoot camera, focusing is not such an issue because their tiny sensors mean the entire scene is in focus.
On the other hand, for a dSLR, the best thing to do is manually set the focus where you expect the subject to be. In this example, I focused as the drivers were passing me by, and made sure that they appeared sharp and not out-of-focus.
3. Next, you need to set you camera to shutter priority and select a slow shutter speed. A shutter speed of 1/15th to 1/30th of a second works best in these situations.
4. As the subject approaches you, follow the subject with the camera. When the subject is where the focus point is, click on the shutter button - BUT CONTINUE FOLLOWING THE SUBJECT!.
This is the key for great panning shots. As you click the shutter button, keep the camera following the subject. This way, the subject remains sharp, while the rest of the background gets blurred.
5. Practice, Practice!.
Tuesday, October 24, 2006
Kuwait Scientific Center
The Kuwait Scientific Center (KSR) is a great place to observe a world that most of us will not get to see otherwise. It has one of the largest aquarium tanks in the middle east, plus various other smaller tanks that host a variety of sea life.
KSR is located on the Gulf Road, just after the Sultan Center, Salmiya.
For a photographer (with the right equipment), it presents a great opportunity to take pictures of an underwater world. Flash is pretty useless here (and is actually prohibited as it disturbs the fish), but that does not stop all the excited visitors from happily clicking away with their point & shoot cameras, and then wondering why their photos are not coming properly. Of course, a flash will reflect off the glass resulting in over-exposed pictures, and the picture will have a big blob of light in the middle, where the fish is supposed to be.
What you really need is a camera that can operate at high ISO, and a fast lens. When I say fast lens, I mean "really really fast"!. For this picture, I used the 50mm F1.8 prime lens, with the ISO bumped upto 1000, and the lens opened wide to its maximum aperture of 1.8.
The Nikon D70 is not a stellar performer in handling noise once the ISO goes beyond 800. I had to use Neat Image Pro to reduce to noise and apply some post-processing in Photo shop to bring out the details in this picture.
My ideal combination for shooting here would be...
A Nikon D200 with a 85mm 1.4 lens. Alas, I can afford neither at this present moment.

KSR is located on the Gulf Road, just after the Sultan Center, Salmiya.
For a photographer (with the right equipment), it presents a great opportunity to take pictures of an underwater world. Flash is pretty useless here (and is actually prohibited as it disturbs the fish), but that does not stop all the excited visitors from happily clicking away with their point & shoot cameras, and then wondering why their photos are not coming properly. Of course, a flash will reflect off the glass resulting in over-exposed pictures, and the picture will have a big blob of light in the middle, where the fish is supposed to be.
What you really need is a camera that can operate at high ISO, and a fast lens. When I say fast lens, I mean "really really fast"!. For this picture, I used the 50mm F1.8 prime lens, with the ISO bumped upto 1000, and the lens opened wide to its maximum aperture of 1.8.
The Nikon D70 is not a stellar performer in handling noise once the ISO goes beyond 800. I had to use Neat Image Pro to reduce to noise and apply some post-processing in Photo shop to bring out the details in this picture.
My ideal combination for shooting here would be...
A Nikon D200 with a 85mm 1.4 lens. Alas, I can afford neither at this present moment.
Sunday, October 22, 2006
Portrait Photography
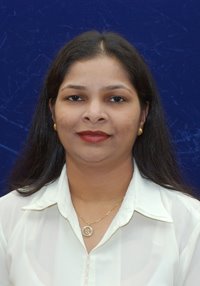 Last week, my wife wanted to renew her passport so she went to the nearby studio to take some passport-sized photos. The results came out quite unflattering. Over-exposed face, distorted perspective, wrong pose etc. etc. I would have posted the sample photo taken by the studio but I fear for my life :)
Anyway, I suggested that I take the studio shot as I have the basic equipment required to take portrait photos, plus a photo printer to do the printing and a photo cutter to make it look like a professional job.
This is the first time I have attempted an actual portrait photo so I wanted to make a good job of it. I setup my blue backdrop and arranged the 2 wireless flash units on each side pointing upwards so that they will bounce off the white ceiling giving an even distribution of light. The Nikon D70 was setup with it's master flash covered with a flash diffuser pointing straight at the subject (that's my wife), but with the power reduced to eliminate over-exposure.
I fitted the camera with the superb 50mm 1.8 lens opened to it's optimum optical performance of F8. The shutter speed was manually set to 125th of a second, and the 3 flashes took care of providing the sufficient light to make this work.
The resulting photo was slightly photoshopped with some healing brush and some minor adjustments. I think I will stick to home-made portraits for the family in future.
Tuesday, October 10, 2006
Brazilians In Kuwait
I have not had many opportunities to use my Nikon 80-200 F2.8 lens. The football match between Kuwait & Brazil was a good chance for me to try out it's low-light capabilities.
I had previously tried photographing night-time football matches with the cheaper 70-300 lens, and had never found any photos acceptable. The lens was so slow (F5.6 at the tele end), that it made focusing virtually impossible, and the resulting images were soft and blurry.
The new lens is a stellar performer. Even without AF-S, the focusing is very fast. I mounted it on a monopod and set the ISO to 1000. The images (though a bit noisy) are tack sharp and very usable.
This lens (for approx $800) is currently the best value for money from Nikon (apart from the 50mm F1.8 - which, at $90, is the deal of the century).

I had previously tried photographing night-time football matches with the cheaper 70-300 lens, and had never found any photos acceptable. The lens was so slow (F5.6 at the tele end), that it made focusing virtually impossible, and the resulting images were soft and blurry.
The new lens is a stellar performer. Even without AF-S, the focusing is very fast. I mounted it on a monopod and set the ISO to 1000. The images (though a bit noisy) are tack sharp and very usable.
This lens (for approx $800) is currently the best value for money from Nikon (apart from the 50mm F1.8 - which, at $90, is the deal of the century).
Friday, September 29, 2006
Product Photography
 We are surrounded by product photos everwhere we go. Glossy advertisements hawk all kinds of products accompanied by beautiful pictures. You really need a studio environment for product photography. The key is to control the amount of light so that it is evenly spread - something you cannot do with normal lighting or a normal flash.
However, you can achieve reasonably good results at home with some creativity, and optionally - some good flash units.
I own a Nikon D70 - which is blessed by Nikon, with their CLS (Creative Lighting System). This amazingly flexible system allows you to control multiple flashes in wireless mode - and control the flash output of each flash unit independently. I have 2 SB-600 flash units, and 1 SB-800. The SB-800 acts as a "master" flash and can wirelessly control the other 2 flashes. You can find more information about the CLS system here.
I decided to use this setup to do some product photography. The first requirement for this type of work is a "light box". If you have the time and effort, you can create your own light box. I purchased mine from a local camera store. Depending on the type of products you want to photograph, you can purchase different sizes. The one used in this project is the smallest available - and is suitable for photographing small objects like mobile phones, small cameras, toys etc. The light box comes with different backgrounds that you can use depending on the type of product you are shooting. I use white background for dark objects, and vice-versa.
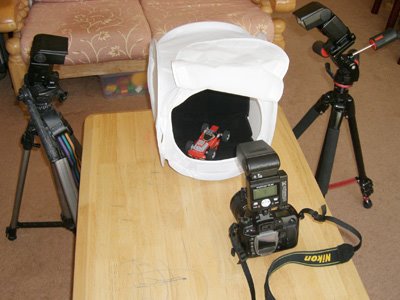 The light box was setup on a table, with the 2 SB-600 units on either side mounted on tripod stands. The camera was mounted with the SB-800 unit and set to "master mode". After setting up the appropriate background cloth, I place the product inside the lightbox, and then close it completely. The lightbox comes with a small slit in front to push the lens inside. Takes a little bit of trial and error to setup the correct flash output to get decent pictures. That's the great thing about digital photography. I cannot imagine doing something like this with film-based cameras!
Of course, it is not mandatory to have flash units. You can achieve similar results by placing the light box in bright (and direct) sunlight. It will be hot work - and not as flexible as using the system shown above, but the results will certainly be good enough that people will ask you "How did you do that?"
Wednesday, September 06, 2006
Geo-Tagging with Flickr
Geo-Tagging allows photographers to embed the details of the physical location (latitude/longtitude) from where the photo is taken. This information is usually recorded as EXIF (Exchangeable Image File) data inside the photograph.
How is geo-tagging useful?. Well, in the first place, you will be able to identify the exact location each photo was taken. Imagine being able to go back to the exact same location after 20 years and compare the scene from the original photograph. For historians, it can provide vital information on changing environment.
Most professional digital cameras can link to an external GPS unit and automatically embed the location information everytime a photo is taken.
But what about normal digital cameras that cannot record this information?. One low-tech solution is to use a stand-along GPS unit such as the SONY GPS-CS1. Just make sure the date and time on the camera is synchronized with the GPS unit and the included software will then scan your images to match the date/time with the coordinates recorded by the GPS unit.
If you have your own GPS unit, you could also record geo-tags in your images manually using an EXIF editor tool such as the Opanda Exif Editor.
But this article is not about all of the above. It is about how href="http://www.flickr.com/">Flickr has come out with a cool way of embedding geo-tags inside your photos - and the good thing is that you don't need any hardware or software to do it!
By integrating Yahoo! maps inside the Flickr photostream, users can zoom into the map to identify the spot at which the photo was taken - and simply drop the photo at that location.
Flickr automatically reads the physical coordinates and embeds them inside your photograph. Once you have geo-tagged all your photos, you can view a global map showing the locations where each photo was taken. Pretty cool!.
I have just started geo-tagging my photos. You can see an example here.
Now for the not so cool part. Yahoo! maps are'nt the best in the world (At least when compared to Google maps). Yahoo! maps are pretty detailed for the U.S. region, but fall short when it comes to the rest of the world. It would have been really cool if Flickr had integrated their
service with Google maps, but I guess that would be asking too much since Flickr is owned by Yahoo!. I only hope Yahoo! updates it's maps to be on a similar level as Google.
Secondly, Geo-tagging using satellite maps can be, at most, a task in approximation (however detailed the maps may be or may become in future). It can never replace a direct interface between the camera and a GPS unit. But in the absence of a GPS interface, it is the next best thing.
Go ahead and try it out.

How is geo-tagging useful?. Well, in the first place, you will be able to identify the exact location each photo was taken. Imagine being able to go back to the exact same location after 20 years and compare the scene from the original photograph. For historians, it can provide vital information on changing environment.
Most professional digital cameras can link to an external GPS unit and automatically embed the location information everytime a photo is taken.
But what about normal digital cameras that cannot record this information?. One low-tech solution is to use a stand-along GPS unit such as the SONY GPS-CS1. Just make sure the date and time on the camera is synchronized with the GPS unit and the included software will then scan your images to match the date/time with the coordinates recorded by the GPS unit.
If you have your own GPS unit, you could also record geo-tags in your images manually using an EXIF editor tool such as the Opanda Exif Editor.
But this article is not about all of the above. It is about how href="http://www.flickr.com/">Flickr has come out with a cool way of embedding geo-tags inside your photos - and the good thing is that you don't need any hardware or software to do it!
By integrating Yahoo! maps inside the Flickr photostream, users can zoom into the map to identify the spot at which the photo was taken - and simply drop the photo at that location.
Flickr automatically reads the physical coordinates and embeds them inside your photograph. Once you have geo-tagged all your photos, you can view a global map showing the locations where each photo was taken. Pretty cool!.
I have just started geo-tagging my photos. You can see an example here.
Now for the not so cool part. Yahoo! maps are'nt the best in the world (At least when compared to Google maps). Yahoo! maps are pretty detailed for the U.S. region, but fall short when it comes to the rest of the world. It would have been really cool if Flickr had integrated their
service with Google maps, but I guess that would be asking too much since Flickr is owned by Yahoo!. I only hope Yahoo! updates it's maps to be on a similar level as Google.
Secondly, Geo-tagging using satellite maps can be, at most, a task in approximation (however detailed the maps may be or may become in future). It can never replace a direct interface between the camera and a GPS unit. But in the absence of a GPS interface, it is the next best thing.
Go ahead and try it out.
Saturday, August 19, 2006
Nikkor 80-200 F2.8
I got hold of this superb lens last month - but did not get much opportunity to use it until now. When you hold this lens in your hands, you immediately realize that this is some serious glass.
It weights in at 2.84 lb. So even if you don't get good pictures with it, you will at least build your upper body strength carrying this beast around.
This week, I got my first opportunity to use this lens. The occasion being the Independence day celebrations at the Indian Embassy. The lens was perfectly suited for the occasion. The zoom range meant that I could take portraits such as this.

At the same time, the wide aperture allowed me to throw background out of focus. Even when the lens is kept wide open at F2.8, it is beautifully sharp.
At $900, this is not a cheap lens, but at the same time, it is the best bargain Nikon has on offer for this range. The other alternative is the 70-200 AF-S VR which costs almost twice as much (approx. $1700). Optically, both lenses are about the same. The more expensive version provides faster and silent focusing, and the VR (Vibration reduction) features means that you can shoot hand-held, which is very difficult with my lens. My solution is to use a $70 Manfrotto monopod, which gets the job done.
Rating: Highly Recommended.

It weights in at 2.84 lb. So even if you don't get good pictures with it, you will at least build your upper body strength carrying this beast around.
This week, I got my first opportunity to use this lens. The occasion being the Independence day celebrations at the Indian Embassy. The lens was perfectly suited for the occasion. The zoom range meant that I could take portraits such as this.
At the same time, the wide aperture allowed me to throw background out of focus. Even when the lens is kept wide open at F2.8, it is beautifully sharp.
At $900, this is not a cheap lens, but at the same time, it is the best bargain Nikon has on offer for this range. The other alternative is the 70-200 AF-S VR which costs almost twice as much (approx. $1700). Optically, both lenses are about the same. The more expensive version provides faster and silent focusing, and the VR (Vibration reduction) features means that you can shoot hand-held, which is very difficult with my lens. My solution is to use a $70 Manfrotto monopod, which gets the job done.
Rating: Highly Recommended.
Thursday, August 17, 2006
Photographers right's in Kuwait
Photographing public places in Kuwait is always a tricky thing. There are no laws (that I am aware of), that can prevent someone from taking a picture of a public building.
Even Saudi Arabia loosened it's tight grip on photography recently - allowing public buildings to be photographed.
I generally don't have any problems while photographing public places. However, on a few occasions, I have had people come up to me and question me why I am taking pictures. Few months back, while photographing this building, a woman walked up to me and wanted me to stop taking the picture because she thought that she and her friends - who were sitting nearby - might get included in the shot. I quickly took the pictures anyway, before she reached me.
This week, I was photographing the National Assembly building. I setup my tripod and the camera and started taking some long exposures. A Kuwaiti guy walks up to me and wants to know why I am taking picture of this particular building - and whether I am a presss photographer. Unfortunately for me, I don't know much Arabic and all I could communicate was that I am taking the pictures for personal use. He seemed to become suspicious and it looked like he wanted to call the cops or something. Luckily for me, my wife and kids were around, and when they walked up to me, he seemed to lose interest.
Moral of the story: When taking pictures of public places in Kuwait, it's good to have your family nearby as insurance !

Even Saudi Arabia loosened it's tight grip on photography recently - allowing public buildings to be photographed.
I generally don't have any problems while photographing public places. However, on a few occasions, I have had people come up to me and question me why I am taking pictures. Few months back, while photographing this building, a woman walked up to me and wanted me to stop taking the picture because she thought that she and her friends - who were sitting nearby - might get included in the shot. I quickly took the pictures anyway, before she reached me.
This week, I was photographing the National Assembly building. I setup my tripod and the camera and started taking some long exposures. A Kuwaiti guy walks up to me and wants to know why I am taking picture of this particular building - and whether I am a presss photographer. Unfortunately for me, I don't know much Arabic and all I could communicate was that I am taking the pictures for personal use. He seemed to become suspicious and it looked like he wanted to call the cops or something. Luckily for me, my wife and kids were around, and when they walked up to me, he seemed to lose interest.
Moral of the story: When taking pictures of public places in Kuwait, it's good to have your family nearby as insurance !
Tuesday, August 15, 2006
Proud to be an Indian
I have been living in Kuwait for 14 years and never once attended the Independence day or Republic day celebrations held at the Indian Embassy. I always meant to go, but the time (7 AM) was a bit too early for me.
This year, I was motivated because of my new lens that I purchased few weeks back. I just knew that this lens was ideal for this kind of event.
I reached the Embassy just 5 minutes before the ceremony began. I was a little worried that the security would not let me get in - because the camera with the 80-200 lens mounted looks quite menacing. Plus I was carrying a monopod.
To my surprise, I found that everyone simply assumed that I am a professional photographer, and I could walk just about anywhere and take whatever photo I want (including going right in front of the Ambassador during his speech).
Here are some more of the photos that I took.
http://www.flickr.com/photos/cajie/sets/72157594237713141/

This year, I was motivated because of my new lens that I purchased few weeks back. I just knew that this lens was ideal for this kind of event.
I reached the Embassy just 5 minutes before the ceremony began. I was a little worried that the security would not let me get in - because the camera with the 80-200 lens mounted looks quite menacing. Plus I was carrying a monopod.
To my surprise, I found that everyone simply assumed that I am a professional photographer, and I could walk just about anywhere and take whatever photo I want (including going right in front of the Ambassador during his speech).
Here are some more of the photos that I took.
http://www.flickr.com/photos/cajie/sets/72157594237713141/
Monday, August 14, 2006
Summer in Kuwait...
What can I say? Summer time in Kuwait is.... Well, it's hot.
Starting from May, temperatures stay in the 40+ degree celsius throughout the day. It is not unusual to see a day where the temperature reaches 50 degrees.
The worst part of summer is that it is practically impossible to get any decent photographs. Extreme heat makes the desert sand dry causing huge dust storms that can last for days.
I am eagerly waiting for September, when temperatures will cool down.


Starting from May, temperatures stay in the 40+ degree celsius throughout the day. It is not unusual to see a day where the temperature reaches 50 degrees.
The worst part of summer is that it is practically impossible to get any decent photographs. Extreme heat makes the desert sand dry causing huge dust storms that can last for days.
I am eagerly waiting for September, when temperatures will cool down.
Subscribe to:
Posts (Atom)