Last week, I decided to upgrade my 50 mm f1.8 to the more professional grade 50 mm f1.4. I even placed the order on Amazon. One week passed, and Amazon still had problems fulfilling the order. This got me thinking...
Why exactly am I paying $300 for a lens that gives me merely a 1/3 wider aperture compared to the lens that I already own?. I am not exactly a professional, and even though I have done a couple of assignments, this is not my full time job. The f1.8 is a fine lens and I felt that the $300 would be better spent in purchasing a lens that I don't own.
Since I have started doing macro work, I felt that spending money on a dedicated macro lens would be more appropriate - and the 105 mm AF-S VR Micro Nikkor seemed like just the ticket. Of course, it's costs a whole lot more than $300; but this lens is legendary, so I had no qualms cancelling my order for the 50mm, and placing the order for the macro lens.
I did check with the local dealer what price they could sell it, but as usual, they are darn expensive. By purchasing from Amazon, I reckon I will save around 65 KD; which is not exactly chump change. I do wish the local dealers realize that internet has made everything global, and such ridiculous markups are no longer acceptable.
Thursday, March 27, 2008


Monday, March 24, 2008
Making a DIY lightbox.
I've been meaning to make a cheap light-box, using this tutorial. But everytime I think of starting the project, I stop; because I can't figure out where I will store the darn thing. I don't have the luxury of having many spare rooms in the house.
Couple of months back, I had purchased a small foldable lightbox. This picture of an easter egg is taken using this lightbox; but it's too small for anything other than tiny objects. I need more working space. I have to make one more trip to that photography shop in the city to see if they can offer me something more compact that a big ugly looking box.
Lightboxes are a great way of taking pictures of still objects. Because the light box is completely white, it distributes the light equally so that you don't get the harsh shadows. For example, in this picture, I just placed the lightbox near the window which had some morning light streaming in. No fancy lighting. And the pictures turn out great!.

Couple of months back, I had purchased a small foldable lightbox. This picture of an easter egg is taken using this lightbox; but it's too small for anything other than tiny objects. I need more working space. I have to make one more trip to that photography shop in the city to see if they can offer me something more compact that a big ugly looking box.
Lightboxes are a great way of taking pictures of still objects. Because the light box is completely white, it distributes the light equally so that you don't get the harsh shadows. For example, in this picture, I just placed the lightbox near the window which had some morning light streaming in. No fancy lighting. And the pictures turn out great!.
Saturday, March 22, 2008
Upgrading to 50mm f1.4
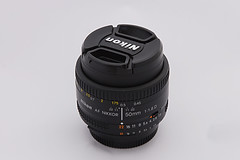
I've had this 50mm f1.8 prime lens for about 2 years. It's is well-built and one of the best bargain lens from Nikon. Depending on where you buy it from, the price is around $120.
I have never figured out why this lens is sold at such a low price. In the pre-digital era (yes, when people used to shoot with film), this lens was usually bundled as the "kit" lens for most of the Nikon pro-bodies. It may be that over the years, Nikon (and Canon) have figured out how to streamline the manufacturing process of this lens - hence the affordability.
It is a fanstastic portrait lens. On Nikon dSLR bodies (except the newer full-frame D3), the focal length of this lens translates into 75mm (1.5 crop sensor means 50mm x 1.5 = 75mm). This is a good range for taking head shots without any perspective distortion.
It is also an amazing lens for low-light work. The f1.8 means you can work in low-light interiors without a flash and still get useful results.
However, my eye has been on it's more faster cousin. The 50mm f1.4 AFD. For just 1/3rd stop faster focal length, it costs 3 times as much. When I saw Amazon selling it for a $20 discount, I did one of those "impulse" buys and hit the order button.
Once I get hold of the new lens, I will most likely (and grudingly) get rid of this fine piece of Nikon engineering.
I have never figured out why this lens is sold at such a low price. In the pre-digital era (yes, when people used to shoot with film), this lens was usually bundled as the "kit" lens for most of the Nikon pro-bodies. It may be that over the years, Nikon (and Canon) have figured out how to streamline the manufacturing process of this lens - hence the affordability.
It is a fanstastic portrait lens. On Nikon dSLR bodies (except the newer full-frame D3), the focal length of this lens translates into 75mm (1.5 crop sensor means 50mm x 1.5 = 75mm). This is a good range for taking head shots without any perspective distortion.
It is also an amazing lens for low-light work. The f1.8 means you can work in low-light interiors without a flash and still get useful results.
However, my eye has been on it's more faster cousin. The 50mm f1.4 AFD. For just 1/3rd stop faster focal length, it costs 3 times as much. When I saw Amazon selling it for a $20 discount, I did one of those "impulse" buys and hit the order button.
Once I get hold of the new lens, I will most likely (and grudingly) get rid of this fine piece of Nikon engineering.
Friday, March 21, 2008
Stock Photography
I decided to enroll into istockphoto.com, one of the most popular stock photography site. The idea of stock photography is very simple. You upload your pictures to the site, and then people purchase the pictures at a very low price. The photographer is paid in cents rather than dollars; but because so many people download these pictures, the cents add up.
iStockphoto.com is now owned by Getty Images, which is one of the top stock agencies. Getting into iStockphoto was not as easy as I thought!
Even before you are allowed to upload images, you have to go through an online tutorial, and then answer an exam to ensure you understand their rules of uploading images to the site.
Once you successfully pass the test, you have to load 3 sample images (highest resolution possible) for the istockphoto admins to determine if your photos meet their standards.
This is where I got stuck. At first, I loaded 3 very good images but all got rejected because they did not demonstrate enough variety (they were all pictures of architechture). Next time, the picture was slightly over-exposed, or the focus was not "dead-on", or the picture was over-corrected in photoshop.
The whole process was a very valuable learning experience. Of course, I did manage to give them the 3 "high quality, perfectly exposed, perfectly in focus, diverse" images they were looking for :).
This image of my niece Milica was the last image that was approved by the istockphoto admins and I became an authorized contributor of istockphoto.
Now comes the hard part of actually shooting and uploading "stock-type" images; and hopefully making a few bucks in the process.

iStockphoto.com is now owned by Getty Images, which is one of the top stock agencies. Getting into iStockphoto was not as easy as I thought!
Even before you are allowed to upload images, you have to go through an online tutorial, and then answer an exam to ensure you understand their rules of uploading images to the site.
Once you successfully pass the test, you have to load 3 sample images (highest resolution possible) for the istockphoto admins to determine if your photos meet their standards.
This is where I got stuck. At first, I loaded 3 very good images but all got rejected because they did not demonstrate enough variety (they were all pictures of architechture). Next time, the picture was slightly over-exposed, or the focus was not "dead-on", or the picture was over-corrected in photoshop.
The whole process was a very valuable learning experience. Of course, I did manage to give them the 3 "high quality, perfectly exposed, perfectly in focus, diverse" images they were looking for :).
This image of my niece Milica was the last image that was approved by the istockphoto admins and I became an authorized contributor of istockphoto.
Now comes the hard part of actually shooting and uploading "stock-type" images; and hopefully making a few bucks in the process.
Thursday, March 20, 2008
Event Photography.
Up to now, I have stayed away from event photography. I am not really a "people" person (or at least that's how I used to look at myself).
I recently had an opportunity to do 2 events that made me change that attitude.
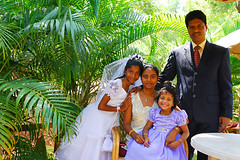
The first was the communion ceremony of my lovely niece, Milica. I decided to fly to Goa for a quick trip with my D200. To keep my travel kit light, I just packed the 17-55 lens and the SB-800 flash. This lens is really the absolute number one choice for event photography. It provides all the required ranges to capture group photos or an occasional portrait shot. The wide aperture of f2.8 ensures that it handles very well in low-light situation.
I found myself enjoying the whole experience. With the formidable D200 around my neck, everyone simply assumed I am some official photographer, and I could engage anyone for a photo, by simply giving a smile and pointing to my camera to get their acceptance to take the picture.
The second opportunity I had was a birthday party for a close friend's daughter. This was purely an indoor affair; which means the 17-55 + the SB-800 is all that I needed to take great indoor shots.
I recently had an opportunity to do 2 events that made me change that attitude.
The first was the communion ceremony of my lovely niece, Milica. I decided to fly to Goa for a quick trip with my D200. To keep my travel kit light, I just packed the 17-55 lens and the SB-800 flash. This lens is really the absolute number one choice for event photography. It provides all the required ranges to capture group photos or an occasional portrait shot. The wide aperture of f2.8 ensures that it handles very well in low-light situation.
I found myself enjoying the whole experience. With the formidable D200 around my neck, everyone simply assumed I am some official photographer, and I could engage anyone for a photo, by simply giving a smile and pointing to my camera to get their acceptance to take the picture.
The second opportunity I had was a birthday party for a close friend's daughter. This was purely an indoor affair; which means the 17-55 + the SB-800 is all that I needed to take great indoor shots.
Wednesday, March 19, 2008
A period of introspection.
Ever since we returned back to Kuwait (after our trip to Toronto in January), I've been having a tough time to get back into photography. The first few weeks were immersed in work and a long business trip to Saudi Arabia. But even after returning back to a normal schedule, I just can't seem to get the inspiration to go out and do some shooting.
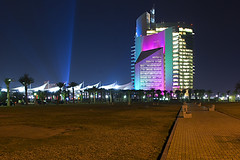
This picture of the KPC building was the only picture I have taken during the past 2 months!!
The weather is really great these days (well, most of the time), and it's spring time with lots of flowers springing up everywhere. I need something to make me get out of the house. Perhaps a cool beer, which I miss from my Canada trip?
I did manage to do 2 events. The first was the communion of my niece in India. I flew there just for the occasion, and managed to get some great pictures of the whole ceremony. I am currently doing a project to get these pictures printed through www.blurb.com. I will post about this experience very soon.
The second event was a birthday party that I did last week for the daughter of a very close friend. The D200 paired with the 17-55 f2.8 and the SB-800 speed-light was a fantastic combination. I wish I could post some of the pictures, but I would feel uncomfortable posting pictures of friends without their consent.
This picture of the KPC building was the only picture I have taken during the past 2 months!!
The weather is really great these days (well, most of the time), and it's spring time with lots of flowers springing up everywhere. I need something to make me get out of the house. Perhaps a cool beer, which I miss from my Canada trip?
I did manage to do 2 events. The first was the communion of my niece in India. I flew there just for the occasion, and managed to get some great pictures of the whole ceremony. I am currently doing a project to get these pictures printed through www.blurb.com. I will post about this experience very soon.
The second event was a birthday party that I did last week for the daughter of a very close friend. The D200 paired with the 17-55 f2.8 and the SB-800 speed-light was a fantastic combination. I wish I could post some of the pictures, but I would feel uncomfortable posting pictures of friends without their consent.
Tuesday, January 22, 2008
Slideshows


Slideshows are a pretty neat way of showcasing your photographs, and there are plenty of free tools on the net that can do this for you. I came across a friend's post showcasing a new tool from slide.com that is dead-easy to use; especially if you are using a photo-sharing site like flickr. I just entered my flickr name and it pulled out all my sets. As a test, I just selected my recently shot "Toronto" set, and I was done. It spewed out some code that I just paste into my blog, and the slide show is up and running.
Very cool.
Wednesday, January 02, 2008
The Amazing CN Tower
We got up today to a bright and clear day after 2 days of heavy snow and dull weather. I thought this would be a great opportunity to visit the Toronto CN tower - one of the tallest structures in the world. The clear weather meant I would have some good photo opportunities.
We reached the tower at around 11:00 AM. It was indeed a great day to visit the place as the view was simply stunning. The only problem was that the temperature was -9 degrees and we literally turned to ice as we walked up to the tower to purchase our tickets.
Due to the cold weather, there were not much people around, so we managed to get an elevator fairly quickly - and very soon, we were on top of Toronto. I was not interested in anything except clicking away at the amazing view.
The thing on my mind was - if this is such a great view during daytime, how good will it be at night? and more importantly, how the heck can I keep the kids for 6 whole hours on top of the tower so that I could get some night-time shots of Toronto city?
I took the family to lunch in the Tower restaurant where I sipped on a cool cocktail while enjoying the panaromic view of Toronto City. Then I got the kids involved in some trick photography one guy was doing by taking their pictures on a green background and then photoshopping it to make the kids look as though they were climbing the CN Tower like King Kong.
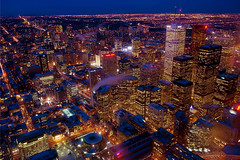
Finally, it was sunset and the city started turning on the lights. As you can see from the picture, the view was indeed stunning.
We reached the tower at around 11:00 AM. It was indeed a great day to visit the place as the view was simply stunning. The only problem was that the temperature was -9 degrees and we literally turned to ice as we walked up to the tower to purchase our tickets.
Due to the cold weather, there were not much people around, so we managed to get an elevator fairly quickly - and very soon, we were on top of Toronto. I was not interested in anything except clicking away at the amazing view.
The thing on my mind was - if this is such a great view during daytime, how good will it be at night? and more importantly, how the heck can I keep the kids for 6 whole hours on top of the tower so that I could get some night-time shots of Toronto city?
I took the family to lunch in the Tower restaurant where I sipped on a cool cocktail while enjoying the panaromic view of Toronto City. Then I got the kids involved in some trick photography one guy was doing by taking their pictures on a green background and then photoshopping it to make the kids look as though they were climbing the CN Tower like King Kong.
Finally, it was sunset and the city started turning on the lights. As you can see from the picture, the view was indeed stunning.
Monday, December 31, 2007
A walk on the wild side.
I decided to take the family to the Toronto Zoo. Probably not a very good idea to visit a zoo during a time where the outside temperature is zero degrees.
It was freezing, with snow everywhere. Most of the animals were either hibernating or hiding in their warm homes. But there was still plenty to see and do.
The kids had a good time though the little one got tired with all the walking and the freezing cold; and I ended up carrying her most of the time.
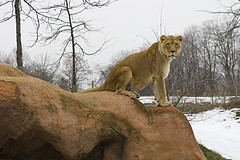
The high point for me was this lion exhibit. It's designed in such a way that you get to see the lion face to face with only a wall separating the lion and a tasty snack. This particular lioness was looking the other way and I waited around 15 minutes near the exhibit hoping he will turn his face. Finally he did, and I managed to to get this shot.
Here are some more pictures that I took at the zoo.
It was freezing, with snow everywhere. Most of the animals were either hibernating or hiding in their warm homes. But there was still plenty to see and do.
The kids had a good time though the little one got tired with all the walking and the freezing cold; and I ended up carrying her most of the time.
The high point for me was this lion exhibit. It's designed in such a way that you get to see the lion face to face with only a wall separating the lion and a tasty snack. This particular lioness was looking the other way and I waited around 15 minutes near the exhibit hoping he will turn his face. Finally he did, and I managed to to get this shot.
Here are some more pictures that I took at the zoo.
Zero Degrees
We travelled to Toronto, Canada - and my kids went berserk with all the snow around. Erika (my 4-year old daughter) had never seen real snow before but you wouldn't know that seeing her embrace it like a long lost friend.
I took them near the Toronto harbor area which has an outdoor skating rink. The temperature was zero degrees celsius, which for everyone (except for me and my wife) seemed to be nice and balmy.
I rented out some skates for both the kids - Shawn can do some basic skating (He learned at the Kuwait skating rink), but it was first time for Erika.
As the sun went down, I had a very hard time convincing Erika to get out of the rink.

I took them near the Toronto harbor area which has an outdoor skating rink. The temperature was zero degrees celsius, which for everyone (except for me and my wife) seemed to be nice and balmy.
I rented out some skates for both the kids - Shawn can do some basic skating (He learned at the Kuwait skating rink), but it was first time for Erika.
As the sun went down, I had a very hard time convincing Erika to get out of the rink.
Sunday, December 23, 2007
Merry Christmas
Last night, I happened to be at the Catholic church just as they were unveiling this year's christmas crib. Luckily, I had my camera bag in the car.
When the organizers saw my camera gear, they immediately requested that I do an "official" photograph of their creation. This meant that I needed a tripod, which I always keep in the car.
The funny thing is that everyone who wanted to take a picture with their camera phone or point & shoot gave me a wide and respectful berth; assuming I am some official photographer - which, in this case, I guess I was.
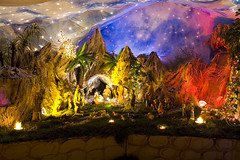
So I ended up doing this "official" photo of the 2007 christmas crib. I also ended up taking some pictures of the organizing committee.
Merry Christmas & a Happy New Year 2008.
When the organizers saw my camera gear, they immediately requested that I do an "official" photograph of their creation. This meant that I needed a tripod, which I always keep in the car.
The funny thing is that everyone who wanted to take a picture with their camera phone or point & shoot gave me a wide and respectful berth; assuming I am some official photographer - which, in this case, I guess I was.
So I ended up doing this "official" photo of the 2007 christmas crib. I also ended up taking some pictures of the organizing committee.
Merry Christmas & a Happy New Year 2008.
Wednesday, December 19, 2007
Nikkor 17-55 f2.8, First test shots.
I got my first chance today to try out the new 17-55 lens. It looks and feels great and allows me to take pictures that were not possible before.
This picture of a local mall is taken wide open at 17mm at f4 and ISO 640 giving me sufficient hand-held shutter speed of 1/50th of a second.
What is more interesting for me is that at this ultra-wide angle, the distortion (though it exists) is minimal and well-controlled.
This is going to be the lens that stays on my camera body 95% of the time from now on.
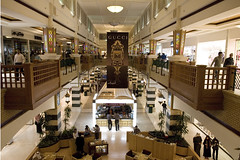
This picture of a local mall is taken wide open at 17mm at f4 and ISO 640 giving me sufficient hand-held shutter speed of 1/50th of a second.
What is more interesting for me is that at this ultra-wide angle, the distortion (though it exists) is minimal and well-controlled.
This is going to be the lens that stays on my camera body 95% of the time from now on.
Tuesday, December 18, 2007
The beast has arrived.
I have been toying with the idea of purchasing this lens for a long time, but the price was just beyond my reach. I just could not justify paying $1400 for a lens with a range of 17-55mm, when my $300 18-70mm DX lens was giving great results, plus extra range upto 70mm.
But what sets this lens apart from the 18-70mm lens is that this is a fixed focal lens - just like my 80-200 f2.8. It has a constant maximum aperture of f2.8, which means that regardless of what focal length I choose, the widest aperture is guaranteed to remain at f2.8. This is great for low light photography.
I was finally convinced to pick this thing when I saw Amazon offering it for $1200. Though not cheap, I decided to throw caution to the wind and closed my eyes and hit the order button.
The first impression I got when I held this lens in my hand is that I better hit the gym. The thing is built like a tank and carrying this thing around for a long time is definitely going to test my frail muscles.
I have not yet got a chance to test the image quality of this lens, but I am looking forward to doing so in the next few days.
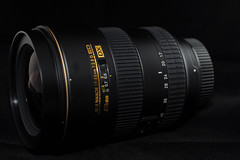
But what sets this lens apart from the 18-70mm lens is that this is a fixed focal lens - just like my 80-200 f2.8. It has a constant maximum aperture of f2.8, which means that regardless of what focal length I choose, the widest aperture is guaranteed to remain at f2.8. This is great for low light photography.
I was finally convinced to pick this thing when I saw Amazon offering it for $1200. Though not cheap, I decided to throw caution to the wind and closed my eyes and hit the order button.
The first impression I got when I held this lens in my hand is that I better hit the gym. The thing is built like a tank and carrying this thing around for a long time is definitely going to test my frail muscles.
I have not yet got a chance to test the image quality of this lens, but I am looking forward to doing so in the next few days.
Friday, December 07, 2007
Farewell to a trusty tool.
I just sold this lens, as I ordered the Nikkor 17-55 f2.8 lens, and expecting to receive it in the next few days.
The 18-70 served me well during the 2 year that I owned it - first on my D70, and then for the past few months, on the D200. It is fast, wide, light in weight and offers a good zoom range that is ideal while travelling, or general walkabouts.
As of now, more than 90% of the work posted on my flickr account is taken with this lens. I had come to learn it's quirks and how to work around them. For e.g., it distorts heavily at the wide angle. In this photo, the nearest lamp post looks like it is curved instead of appearing straight. Nothing much can be done about it because that the nature of lower-end glass.
The 17-55, on the other hand, is a professional grade lens, and hence distortion should be minimal. I say "should", because I have not yet tried this lens, nor held it in my hands. I have simply ordered it based on the recommendations of fellow photographers.
Some people asked me why I would give up the advantage of the wider zoom range (18-70), and pay 4 times the price for a lesser zoom range (17-55). Well, it's true that I will be crippled because I do not have anything from 55mm to 80mm (My 80-200 f2.8 does duties from 80 to 200mm).
However, it's not just about zoom range. For e.g., for half the price, I could have picked up the 18-200 VR wonder lens. But what sets the 17-55 apart from all these amateur lenses is the constant f2.8 aperture for the entire zoom range. That means, whether I set the lens at 17mm or 55mm, I can keep the aperture at 2.8, which in turn, means I can shoot great photos in very low-light conditions.
At least, that's the theory.
And my 1300 dollars are riding on that theory.
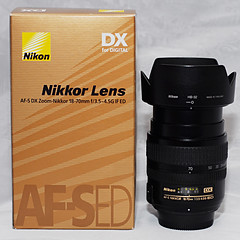
The 18-70 served me well during the 2 year that I owned it - first on my D70, and then for the past few months, on the D200. It is fast, wide, light in weight and offers a good zoom range that is ideal while travelling, or general walkabouts.
As of now, more than 90% of the work posted on my flickr account is taken with this lens. I had come to learn it's quirks and how to work around them. For e.g., it distorts heavily at the wide angle. In this photo, the nearest lamp post looks like it is curved instead of appearing straight. Nothing much can be done about it because that the nature of lower-end glass.
The 17-55, on the other hand, is a professional grade lens, and hence distortion should be minimal. I say "should", because I have not yet tried this lens, nor held it in my hands. I have simply ordered it based on the recommendations of fellow photographers.
Some people asked me why I would give up the advantage of the wider zoom range (18-70), and pay 4 times the price for a lesser zoom range (17-55). Well, it's true that I will be crippled because I do not have anything from 55mm to 80mm (My 80-200 f2.8 does duties from 80 to 200mm).
However, it's not just about zoom range. For e.g., for half the price, I could have picked up the 18-200 VR wonder lens. But what sets the 17-55 apart from all these amateur lenses is the constant f2.8 aperture for the entire zoom range. That means, whether I set the lens at 17mm or 55mm, I can keep the aperture at 2.8, which in turn, means I can shoot great photos in very low-light conditions.
At least, that's the theory.
And my 1300 dollars are riding on that theory.
Tuesday, November 27, 2007
Perfect Timing.
Even though this picture took some planning and patience, in the end, it was a result of many factors coming together to result in one of my best night-time exposures.
1. My tripod was acting a little wobbly, so just before taking this shot, I visited the shop from where I purchased it, and the wizard there magically made it into a rock-solid tripod.
2. I had observed that it was a full moon the night before so I knew it would be almost full moon on this night - and the moon would rise at just the right time (around 7 p.m.).
3. The weather has been absolutely fantastic the previous night when I took this picture, and it appeared that the same would repeat again.
I was technically sick but I was not letting an opportunity like this pass me by. I packed my gear and headed towards the KPC building which provides one of the better viewpoints of Kuwait City. I arrived at the exact moment that the moon poked it's head over the buildings and I started clicking away - varying my shutter speed between 10 seconds to 30 seconds (maximum possible on my dSLR, without switching to bulb mode).
My only problem was the strong breeze that was whipping around. Even with the solid tripod, I was worried it would cause blur in the pictures. Luckily, most turned out pretty well.
Here are the 3 that seemed to be the better of the lot.

1. My tripod was acting a little wobbly, so just before taking this shot, I visited the shop from where I purchased it, and the wizard there magically made it into a rock-solid tripod.
2. I had observed that it was a full moon the night before so I knew it would be almost full moon on this night - and the moon would rise at just the right time (around 7 p.m.).
3. The weather has been absolutely fantastic the previous night when I took this picture, and it appeared that the same would repeat again.
I was technically sick but I was not letting an opportunity like this pass me by. I packed my gear and headed towards the KPC building which provides one of the better viewpoints of Kuwait City. I arrived at the exact moment that the moon poked it's head over the buildings and I started clicking away - varying my shutter speed between 10 seconds to 30 seconds (maximum possible on my dSLR, without switching to bulb mode).
My only problem was the strong breeze that was whipping around. Even with the solid tripod, I was worried it would cause blur in the pictures. Luckily, most turned out pretty well.
Here are the 3 that seemed to be the better of the lot.
Sunday, November 25, 2007
Museums in Kuwait
A local advertising company found my work through Flickr, and approached me to do a series of photos on various places of interest in Kuwait.
I jumped at the opportunity because, for some reason or another, I had never visited most of these places in my 15 years in Kuwait. I was provided a list of places to photograph. Some of them were the usual suspects like Kuwait Towers, Liberation Towers, Scientific Center etc., for which I already had some some good pictures. The second list was exclusively for museums, which I had never visited.
So during the weekend, I packed my photo gear and headed out with my son in tow (he loves to accompany me on my photo shoots). We first reached the Memorial museum (next to the KPC building in Shuwaikh). The place looked deserted and closed. After poking around the place a bit, we found one lady who assured us the museum was indeed open - and after paying the KD 1 entrance fee, opened the museum just for us!. The museum was very interesting with a sort of an automated guided tour describing the whole Iraq invasion / atrocities commited / liberation etc. through an audio commentary accompanied by mock setups.
This pretty much described the reception that we got in the other museums that we visited (Al Hashemi II marine museum, Tareq Rajab Museum, and the biggest of them all - the National Museum). In all the places, it looked like we were the only people who visited the museum that day, which is a shame really because there is some really fascinating stuff there.
I will visit all these museums once again - but this time, without the camera equipment so that I can appreciate them better.

I jumped at the opportunity because, for some reason or another, I had never visited most of these places in my 15 years in Kuwait. I was provided a list of places to photograph. Some of them were the usual suspects like Kuwait Towers, Liberation Towers, Scientific Center etc., for which I already had some some good pictures. The second list was exclusively for museums, which I had never visited.
So during the weekend, I packed my photo gear and headed out with my son in tow (he loves to accompany me on my photo shoots). We first reached the Memorial museum (next to the KPC building in Shuwaikh). The place looked deserted and closed. After poking around the place a bit, we found one lady who assured us the museum was indeed open - and after paying the KD 1 entrance fee, opened the museum just for us!. The museum was very interesting with a sort of an automated guided tour describing the whole Iraq invasion / atrocities commited / liberation etc. through an audio commentary accompanied by mock setups.
This pretty much described the reception that we got in the other museums that we visited (Al Hashemi II marine museum, Tareq Rajab Museum, and the biggest of them all - the National Museum). In all the places, it looked like we were the only people who visited the museum that day, which is a shame really because there is some really fascinating stuff there.
I will visit all these museums once again - but this time, without the camera equipment so that I can appreciate them better.
Wednesday, November 21, 2007
It's all about Perspective
We've all seen pictures like this. They suffer from a phenomenon called perspective distortion. This happens when you take a camera and point it in such a way that the lens is not parallel with the ground. For e.g., when we find a building that is high, our tendency is to point the camera upwards. This distorts the image and it feels as though the building is going to fall down.
Perspective distortion happens because the lens is not able to resolve straight lines as straight due to the angle at which the lens is positioned. For architechture photography, this type of distortion is not acceptable, and photographers use specialized lenses called perspective correction lenses.
Since a normal user will not use PC lenses, Here are some ideas to avoid perspective distortion in your pictures.
1. Instead of shooting from up close, try to find a location further from the subject and use a telephoto lens to take the picture.
2. Shoot with perspective distortion and then edit in Photoshop. PS has a feature that allows you to do perspective correction.
In this picture, you can clearly see the perspective distortion as the tower of the mosque seems to be falling down - even though the horizon line is straight. But in this case, it's okay. I actually like the effect.
Here are some more pictures I took from the same vantage point that exhibit perspective distortion.

Perspective distortion happens because the lens is not able to resolve straight lines as straight due to the angle at which the lens is positioned. For architechture photography, this type of distortion is not acceptable, and photographers use specialized lenses called perspective correction lenses.
Since a normal user will not use PC lenses, Here are some ideas to avoid perspective distortion in your pictures.
1. Instead of shooting from up close, try to find a location further from the subject and use a telephoto lens to take the picture.
2. Shoot with perspective distortion and then edit in Photoshop. PS has a feature that allows you to do perspective correction.
In this picture, you can clearly see the perspective distortion as the tower of the mosque seems to be falling down - even though the horizon line is straight. But in this case, it's okay. I actually like the effect.
Here are some more pictures I took from the same vantage point that exhibit perspective distortion.
Friday, November 16, 2007
Maximizing your Dynamic Range
Our cameras (whether digital or film-based) are limited by the amount of dynamic range that they can capture. In photography, dynamic range refers to the difference between the darkest and the brightest area in the picture frame. So if you are trying take a picture where some part of the picture is extremely bright while other parts are in shadows, your camera will struggle to get a decent exposure of the scene. That's why pictures taken on a cloudy day look so great. The dynamic range is low enough for the camera to capture everything within the frame perfectly.
Films are generally better at capturing dynamic range while the tiny sensors on digital point&shoot cameras or cell phones are the worst offendors. Digital camera manufacturers use different techniques to overcome the limitations of their imaging sensors. The current champ in dynamic range capture is the Fuji FinePix S5 Pro which uses 2 separate imagers (one for highlights & one for shadows), and then combines them during post-processing to give you an image with a much better dynamic range.
A software based alternative for maximizing dynamic range is to take multiple exposures of the same scene at different EV values and then combine them to generate a single image. Obviously, this will only work for static objects such as archtechture or landscape.
Last year, HDRsoft created a lot of buzz when they introduced a software called Photomatix that merged multiple images using an unique algorithm called "Tone-mapping". I got involved in the buzz and went ballistic with the software, creating some freaky tone mapped images.
But the problem with "tone-mapped" images is that they look too artificial. Photoshop CS2 has a more subtle technique for merging multiple exposures. In this example, I used the Photoshop menu option "Merge to HDR" to combine 7 different exposures taken at +/- 1EV apart. This essentially created a 32-bit HDR image. The image was then converted to 8-bit using the "Exposure & Gamma" option, which essentially tries to balance the contents of all the 7 images to give a well-balanced photo.
And the best part is that it does not look artificial like tonemapped HDR. A normal person looking at this example photo will merely thing it is a nicely exposed image.

Films are generally better at capturing dynamic range while the tiny sensors on digital point&shoot cameras or cell phones are the worst offendors. Digital camera manufacturers use different techniques to overcome the limitations of their imaging sensors. The current champ in dynamic range capture is the Fuji FinePix S5 Pro which uses 2 separate imagers (one for highlights & one for shadows), and then combines them during post-processing to give you an image with a much better dynamic range.
A software based alternative for maximizing dynamic range is to take multiple exposures of the same scene at different EV values and then combine them to generate a single image. Obviously, this will only work for static objects such as archtechture or landscape.
Last year, HDRsoft created a lot of buzz when they introduced a software called Photomatix that merged multiple images using an unique algorithm called "Tone-mapping". I got involved in the buzz and went ballistic with the software, creating some freaky tone mapped images.
But the problem with "tone-mapped" images is that they look too artificial. Photoshop CS2 has a more subtle technique for merging multiple exposures. In this example, I used the Photoshop menu option "Merge to HDR" to combine 7 different exposures taken at +/- 1EV apart. This essentially created a 32-bit HDR image. The image was then converted to 8-bit using the "Exposure & Gamma" option, which essentially tries to balance the contents of all the 7 images to give a well-balanced photo.
And the best part is that it does not look artificial like tonemapped HDR. A normal person looking at this example photo will merely thing it is a nicely exposed image.
Wednesday, November 14, 2007
World Diabetic Day
While browsing through Mark's blog, I learned that Kuwait Towers have been lighted up in blue colors. I did not know if this was going to be a permanent setup or something temporary. All I knew is that it was a photo opportunity, so I packed my camera gear and headed out to the seaside.
The Towers indeed looked eerie and a bit out of this world. Today, I learned that they were lighted up as a commemoration for the World Diabetes Day. I also learned that Kuwait Scientific Center also took part in the campaign, and kicked myself for missing that opportunity.
Here are few more pictures that I took of the blue towers.

The Towers indeed looked eerie and a bit out of this world. Today, I learned that they were lighted up as a commemoration for the World Diabetes Day. I also learned that Kuwait Scientific Center also took part in the campaign, and kicked myself for missing that opportunity.
Here are few more pictures that I took of the blue towers.
Sunday, November 04, 2007
The Multi-Cam 1000 AF Module
My D200 may look like a camera from the outside, but it's a complex electronic machine inside. It's a serious piece of machinery designed with a professional in mind - starting from it's durable magnesium-alloy chassis to the various sealings designed to protect it in harsh environments.
The biggest change for me though, has been the auto-focus module embedded in the camera. The Multi-Cam 1000 autofocus module allows for fast and accurate focusing in all kinds of situations. Just a generation ago, professionals sneered at the idea of auto-focusing lenses, relying on their hand-eye coordination and their gut instincts to get the perfect shot.
But technology evolves rapidly, and today, auto-focusing technology has matured to the point that it will be a rare sight to see professionals using manual focus lenses.
While an experienced professional can pull off a shot like this using manual focusing, the rest of us mere mortals need the technology provided by these professional cameras to get the desired result.
To read more about the Multi-Cam autofocus module, use this link http://www.nikonians.org/nikon/d200_multi-cam_af/


The biggest change for me though, has been the auto-focus module embedded in the camera. The Multi-Cam 1000 autofocus module allows for fast and accurate focusing in all kinds of situations. Just a generation ago, professionals sneered at the idea of auto-focusing lenses, relying on their hand-eye coordination and their gut instincts to get the perfect shot.
But technology evolves rapidly, and today, auto-focusing technology has matured to the point that it will be a rare sight to see professionals using manual focus lenses.
While an experienced professional can pull off a shot like this using manual focusing, the rest of us mere mortals need the technology provided by these professional cameras to get the desired result.
To read more about the Multi-Cam autofocus module, use this link http://www.nikonians.org/nikon/d200_multi-cam_af/
Subscribe to:
Posts (Atom)