Saturday, May 03, 2014

When the action gets too close.

Whenever a storm rolls in, my first instinct is to grab my tripod and camera and try to capture lightning.

This is exactly what I was doing few days back in India. I had managed to capture just one lightning shot and was getting frustrated but kept clicking away hoping for something good.

The shutter was open when I heard a terrifying explosion and a bright and blinding light right in front of me, not more than 30 meters away.

I had the presence of mind to keep the shutter cable pressed, and was rewarded with this crazy lightning shot.

Thursday, December 19, 2013

A new way to explore Flickr.

I've been a Flickr user ever since the service was introduced as a small start-up in Vancouver, and was subsequently acquired by Yahoo. It is certainly one of the best sites to share and explore photos.

Every now and then, they introduce some cool features. Their latest one allows you to embed the pictures directly into your website, and explore other pictures in your stream in a very seamless manner.


This will certainly change the way I write blog posts in future.

Sunday, December 15, 2013

The 5-Axis IBIS (In-Body Image Stabilization)

5-Axis IBIS illustration. Image copyright by Olympus Corporation.
Olympus first introduced their 5-axis IBIS (In-Body Image Stabilization) with the E-M5, and further refined it with the E-M1 (their current flagship camera).

When I purchased the E-M1, the IBIS feature was not on my "must-have" list. I purchased the camera because of its other features (weather sealed body, 10fps shooting speed, great viewfinder etc.). My understanding was that image stabilization that is done on a lens (favored by Nikon & Canon) is always better than image stabilization done in the camera body (by moving the sensor, as shown in the illustration above). I was very skeptical that this type of stabilization would give good results.

I was completely wrong.

Saturday, December 14, 2013

The Switch to Micro 4/3rd

My current micro 4/3 system.
Photography has become a lot more interesting for me recently, and it has to do with one tiny gem of a camera from Olympus. The rather odd sounding OM-D E-M1.

Up until now, I have shot mostly with Nikon D800 and have managed to collect some really beautiful Nikon lenses. I still love shooting with the D800, and I know its controls like the back of my hand. But it has one disadvantage that makes it impractical as an everyday camera. It is big and it is heavy.

I wanted something small and light that I could carry around with me, especially while travelling. About 2 years back, I decided to try the Olympus E-P2. It was a nice and slick camera, but its underwhelming auto-focus speed left a lot to be desired. I also tried the much revered Panasonic GF1 (which has great auto-focus speed), and even invested in the Panasonic GX1 (improvement over the GF1). I still have the GX1 and occasionally do use it, but all of these cameras fall woefully short in terms of image quality, when compared to the mighty Nikon D800.

I became very interested in the Olympus E-M5, as it was considered a game changer for the micro 4/3 system. But before I could make up my mind to buy it, rumors started circulating that Olympus was going to introduce something extraordinary. I decided to wait and see.

The OM-D E-M1 was finally announced, and it seemed to have everything that I was looking for in a smaller camera. I hit the pre-order button the moment it became available on Amazon. I was one of the early recipient of the camera, and the moment I held it in my hands, I knew I had a winner. It was exactly like a mini-version of my beloved D800.
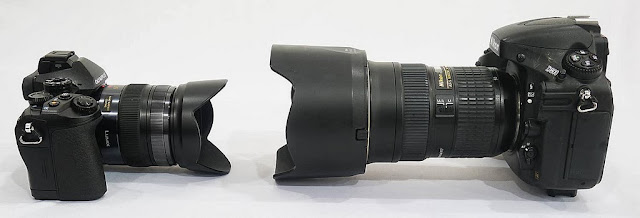
E-M1 vs the D800
I have been using the E-M1 for more than 1 month now and it has exceeded all my expectations. I was thinking of writing one long post about all the unique features of the E-M1, but since that will be a very long post, I have decided to make separate posts highlighting some of the cool things I have been able to do with this camera.

Detailed technical review of the camera can be found at dpreview.com, where it earned their highest "Gold Award". My subsequent posts will be more focused on real-world use, and my personal experience with this camera.

Saturday, October 05, 2013

High Speed Flash Photography.

SB-910. Shot at 1/32th power (approximately 1/17,000th of a second)
When we need to freeze action, the shutter speed of the camera has to be high, otherwise you will end up with a blurred image. Typically for sports, a shutter speeds between 1/500th of a second to 1/1000th of a second should give very sharp images. To get these kind of shutter speeds, one or more of the following should hold true:
    1. There is plenty of available light (e.g. daytime)
    2. You have a fast lens.
    3. Your camera can shoot at high ISO without too much degradation of image quality.

In broad daylight, you should be able to get those kind of high shutter speeds even with a normal lens, and normal ISO. But once the light starts fading, then your choices are limited to managing with #2 (fast lens) and/or #3 (setting a higher ISO). It is for this reason you see sports shooters with those huge professional lenses that are designed to gather as much light as possible, and big camera bodies that are designed to shoot at high ISO speed and still give excellent image quality.

Saturday, September 21, 2013

Bramping (Bulb Ramping) on the Cheap.


Bulb Ramping, or "Bramping", as it is commonly called, is a technique of creating time-lapse videos by using the 'bulb' mode of the camera, and controlling each exposure using an external timer. These type of time-lapse videos tend to give very smooth transition between day and night (and vice-versa), instead of the flicker you tend to get if you leave the exposure for the camera to determine (or if you change the exposure manually).

Compare the video above (created using the 'Bramping' technique), to the one below, in which the exposure was manually increased to compensate for the rapidly changing light. The changes in exposure give the video (the one below) a very jarring effect. In fact, this was my first attempt at time-lapse during a sunset.

Friday, September 06, 2013

Light Painting with Steel Wool

Nikon D800, 30 Second exposure.
Light painting is a technique where you keep your camera's shutter open for long a period of time in a fairly dark environment, and then use some kind of light source to paint the canvas (in this case, the camera's sensor).

An interesting technique for light painting is using steel wool as a light source. Steel wool is highly flammable, and burns bright for a short duration, but its sparks can create interesting patterns.

Friday, August 30, 2013

The Panasonic 12-35mm f2.8 Zoom.

The Panasonic 12-35mm f2.8 on a GX1 body.
I invested in the micro 4/3 format some time back, but never got around to taking it seriously especially since I shoot with a Nikon D800, which is an amazing camera.

I have used the Panasonic GX1 with the kit lens (14-42mm f3.5-f5.6) during my Ladakh trekking trip, but the slowness of that lens never really impressed me. It is good in daylight, but gives poor results in low light situations. I tried using prime lenses, but that becomes extremely inconvenient for trekking, where you need to travel as light as possible, and changing lenses on the side of steep trails is not an option.

Since I do lot of trekking, I wanted something comparable to the results of the D800, but without the bulk. Is that even remotely possible?.  When Panasonic announced their professional grade 12-35mm f2.8 fixed aperture lens, I was immediately interested. Could this be it?

The price of the lens was a deterrent for me. At $1,299 it is priced almost similar to a professional grade FX lens. I thought if the price ever goes below $1000, I would jump at the opportunity to own this lens. Over the last few months, Amazon dropped the price by $100 to $1,199, but it still wasn't enticing enough for me.

Saturday, September 01, 2012

Trekking : Padum to Lamayuru - Day 3

Trekking from Omachu to Hanumala base camp.
Our third day of trekking proved to be not only the toughest day, but also the longest day of trekking. With the exception of few (and short) breaks for snacks and water, we walked non-stop for 12 hours.

One thing I had learned over the past 3 days was that, the combination of searing heat and the prospect of ascending steep mountains did not agree with my son at all. Since we would start our 3rd day with a steep climb (which we were supposed to do the previous evening), I decided to start off early.

I set the alarm at 5:00 a.m., and made sure our daybags were packed and ready before we went to sleep. My objective was to start off only with Shawn and complete the climb to Snertse before the sun came up. Roy would follow a bit later, and the horses and guide would take their own time to join us.

Sunday, August 19, 2012

Trekking : Padum to Lamayuru - Day 2

Trekking from Hanumil to Snertse.
We were warned by our guide that today would be a tough day, as we had to scale 2 mountain passes to reach our destination in Snertse.

Up till now, I had relied on my iPhone to search for information about the trek route. But now we were in an area, where there was no cell phone reception. I was cursing myself for not carrying a printed copy of the trek route. The GPS device was giving me accurate data about our current location, elevation, and distance covered from the last point - but I had no means of cross-referencing this data with the trek route. This meant that I had absolutely no idea how far, or how high we had to walk to reach our destination. If I had this data, I could have prepared myself both physically and mentally. Without this data, I had to rely on whatever Trashi (our guide) was telling us - and truth be told, he was not the most encouraging guide I have come across.

Saturday, August 18, 2012

Trekking : Padum to Lamayuru - Day 1

Trekking from Pishu to Hanumil
To start our Padum to Lamayuru trek, we checked out from our hotel in Padum, and loaded our trekking gear in a jeep that would drive us to Pishu. It was still dark outside, but we wanted to reach Pishu early, so that we could start the trek before the sun comes out in full force and makes trekking difficult.

The distance from Padum to Pishu is about 30 kilometers. Some people still trek on this route (making a pit stop in Karsha, which is on the way to Pishu). I don't like trekking on motorable roads, as it seems pointless, hence our decision to start our trek from Pishu.

Friday, August 17, 2012

Karsha Gompa, Zanskar (Ladakh).

Karsha Gompa (Monastery) in Zanskar, Ladadkh
The population of Ladakh is predominantly buddhist, and this is reflected in the landscape of the region - which is dotted with Gompas (monasteries). Most of these Gompas are imposing structures, built high on the  mountain side. The Karsha Gompa is one such imposing structures.

The village of Karsha lies 14 kilometers from Padum (which was supposed to the be starting point of our Padum-Lamayuru trek). However, we were unable to find any horseman in Padum, willing to take his horses on the difficult route we had selected. Some locals suggested that we might get lucky in Karsha. There is a motorable road from Padum to Karsha and the local jeeps charge a steep amount of Rs. 1,500/- for the return journey. Since we were already in the mood for trekking, we decided to pack our daybag with some water and snacks, and trek all the way to Karsha.

Saturday, August 11, 2012

Understanding 36 mega-pixels.

I purchased the Nikon D800 more than 1 month back, and I have been really enjoying the amazing detail and colors that this camera produces.

One of the key features of the camera is its massive 36 mega-pixel full frame sensor. It is capable of capturing detail that even our eyes cannot pick up.

To understand what I mean, look at the picture below.

100% crop of a 36-megapixel image. D800 with 70-200 f2.8 VR
This is a picture of my daughter's eye. She was standing on the beach. You can clearly see the sunset and the waves, as well as my silhouette, as I stood in front of her with my camera.

This is the actual picture.


It doesn't get any more impressive than this.

Thursday, August 09, 2012

Padum to Lamayuru Trek.

Padum-Lamayuru trekking route (data generated by by GPS Logger)
The Padum to Lamayuru trek has to be one of the most challenging treks in India. Cutting through the remote Zanskar region in Ladakh, the trek goes through several high mountains passes (some reaching as high as 5000 meters). It is a fantastic trekking option if you:

  1. Are physically fit.
  2. Not scared of heights.
  3. Do not suffer suffer from HAS (High Altitude Sickness).

Wednesday, August 08, 2012

World's Most Dangerous Road - The Zoji-La

The Zogi Pass (Zogi-La)
According to this CNN article, The Zogi Pass (or the Zogi-La as it is known in Kashmir), is the 5th most dangerous road in the world.

I disagree. It should be atleast number 3. The 2 other roads mentioned as more dangerous are not really that dangerous. At no. 3 is "The Highway of Death" in Iraq. Well, that's not really a dangerous road. It was just something that got bombed during the Iraq war. And the road listed at no. 2 (The Road of Death, Bolivia) is no longer an active road as there is an alternative road available for travellers there.

The Zogi-la, on the other hand, is part of National Highway 1 linking Srinagar to Leh (Ladakh), and is the lifeline connecting these 2 places in north India.

During our recent trekking trip to Ladakh, we were forced to travel on this road as there was no other alternative. My first reaction when we hit the road was "WTF?". My brothers reaction was a bit more practical - but more on that later.


Wednesday, August 01, 2012

The Trek that almost never happened.

Padum-Lamayuru Trek.
After nearly a year of planning, we finally selected our Ladakh trek (Padum to Lamayuru), and traveled to Srinagar to commence our trek. However, the entire trip seemed like a series of misadventures, designed to ensure that we do not go ahead with our trekking plans. If we managed to do this trek, it was because of sheer determination, and a huge dose of luck.

1. The lost suitcase: When we landed in Srinagar, we found that our suitcase (containing key trekking equipment) was missing. Without the suitcase, it would be extremely difficult to proceed with the trek. Besides the trekking equipment, it also contained the Nikon D3200 camera, which I was carrying for a friend, and the money from the camera would be used to partly fund the trek.

After submitting the lost luggage report, we had to wait patiently for 1 day till Air-India located our suitcase in Delhi, and had it transferred to Srinagar. It also meant we were already 1 day behind schedule.

The Lost Suitcase.

Friday, June 22, 2012

iGotU GT-800 GPS Logger - Review

iGotU GT-800 GPS Logger
I've been experimenting with different methods of geo-tagging my photos. The last experiment I tried was with my Samsung smart-phone, plus a free application from the Google market-place. It works fine but it made me realize that for long trekking trips, it would be more advisable to have a dedicated GPS logger. After some research, I decided to go with the igotU GT-800 (yes, I know its a very strange name). Reviews were mostly positive, and the price (though not cheap), seemed reasonable. The following features attracted me to this device over others:

1. IPX 7 water-proof (1 meter underwater for 30 minutes).
2. Small size (you can wear it like a watch, with the supplied strap).
3. Motion sensor which automatically puts it to sleep when not moving - thereby conserving battery power.
4. Comes with software to geo-tag your photos, and then show them on the map.
5. Has lots of bonus features such as pedometer, current speed, compass etc.

In short, a geeky device. Just my sort of thing.

I was a little wary of the battery as it runs on a rechargeable battery. Ideally, I would have preferred a device that runs on AA batteries, so that I could carry spares with me, when it runs out of juice. The GT-800 comes with a rechargeable battery that charges via USB. This would be a problem for long treks where there is no access to electricity, but since I have resolved that problem with a Voltaic solar charger, this should no longer be an issue. In fact, when I first received the device, I charged it with the solar charger, just to make sure everything will work in the wilderness, when we go for our trek in Ladakh next month.

Friday, June 15, 2012

The Solar Charging Solution

Voltaic Fuse 4W Solar Charger
As part of my preparation for our 10-day trekking trip to Ladakh (Kashmir), I have been franctically looking around for a solution to keep my Panasonic GX1 camera charged, since we would be in the wilderness for the entire duration of the trek - with no possibility of finding an electric source for charging the batteries.

I ordered 3 extra batteries, and even purchased an external viewfinder for the camera, hoping it will extend the battery power, and allow me to complete the full trek without the need for any re-charging.

But real-world usage of the camera made me come to the conclusion that there was no way that the 4 batteries would last for 10 days. These new cameras, with their reliance on LCD or electronic viewfinders for composition, and electronic systems for controlling all aspects of the camera, simply need more juice than the traiditonal dSLR cameras that use optical viewfinders, and use the battery only for triggering the shutter, and saving the resulting image to the memory card.

I had 2 options. Buy more batteries - perhaps another 4 or 5 (which I would use only once for this trek), or look for other alternatives.

The obvious choice for me was a solar-charging solution. They are reasonably affordable, and instead of worrying about just charging the camera, the solar-charging solution would charge a number of other devices (most importantly, our mobile phones). Most of the solar chargers in the market seem to be targetted for charging just mobile phones, but I found an interesting device that is geared towards trekkers like me, and has the ability to charge camera batteries.

Tuesday, June 12, 2012

How to Geo-Tag your Photos.

View of Kuwait City - From Dasman Block 2.
I travel a lot, and I take a lot of photos. When I start reviewing the pictures, sometimes it is difficult to remember where the photos were taken.

Some modern cameras have built-in GPS which automatically put a geo-tag (latitude, longtitude, and elevation) stamp on each picture that you take. The Nikon Coolpix AW100 is an example of a GPS-enabled camera. Other cameras (especially professional dSLRs) have support for GPS. What this means is that you can hook up a compatible GPS unit to the camera, and the camera will read the GPS data from the unit and embed that information on each picture that is taken.

But what if your camera does not have a built-in GPS or support for an external GPS? My Panasonic GX1 falls in this category. Since I want to carry this with me on my trekking trip to Kashmir, I thought it would be a cool idea to geo-tag all the pictures that I take during the trip, in order to make it easier for me to sort them out later on.

Here is a step-by-step guide on how you can geo-tag your photos.

Saturday, June 09, 2012

I am now a FX shooter.

The Nikon D800.
My journey into dSLR photography started when I first purchased the Nikon D70 about 8 years ago (June 2004 to be precise). The D70 was a 6 mega-pixel camera and cost me an arm and a leg (with the excellent 18-70 mm kit lens). It was a massive leap from the Casio QV-3000EX, a 3 mega-pixel point-and-shoot I was using at the time.

The D70 made me focus on photography, and I started learning all the technical details of photography, and took some wonderful images in the process.

As technology kept changing, I kept changing the camera bodies - upgrading first to the D200, and then eventually to the D300. I purchased some great lenses - especially the awesome Nikkor 17-55mm f2.8. I think it was this one lens that kept me from jumping to the FX format when the D700 was announced, because I was getting great results with this lens - especially when it was paired with the D300.

But there was no denying the need to jump into the FX format, and I decided to wait for the D700 successor, which everyone was expecting to be released in 2010. So I waited. And waited. Eventually, the D800 was announced. And what an announcement it was!. 36 mega-pixels, Full-HD video, 51-point AF system, etc.